

|
|
|
|
|
|
#31
 08-01-2009, 05:40 PM
|
|||
|
|||
|
Parts list and pic
I did my mounts and engine shocks as part of an overall rehab last week. I think they were the 1983 originals since I've got service records back through '94 and there was no mention of them being replaced.
Parts list - the shock mounts were the priciest, but mine were completely disintegrated: Engine Shock/Damper; Left/Right (this is a small shock absorber) Engine/Motor Mount; Left/Right; Front (large block of rubber) Engine Shock/Damper; Engine Shock Mount at Bottom (this is a bonded metal/rubber sleeve to hold the shock) Engine Shock/Damper; Engine Shock Mounting Kit (new rubber bushings for the shock) In the image, the mount on the left was under the driver's side and was saturated with oil and PS fluid and was losing chunks of rubber, the one on the right was under the turbo and flattened but more/less intact. The engine sits maybe half an inch higher now, judged by increased clearance between the engine and the cross-member. 
|
|
#32
02-22-2010, 10:49 PM
|
|||
|
|||
|
I did mine this afternoon after reading the above....and the manual.
The inner 6mm bolt (under the IP) was easy to get to after the engine was jacked up and I took off the long AC compressor mounting bolt closest to the center of the car. Gave me enough room for an allen socket and 3/8" rachet. The hardest part was getting the engine moved around to get the 8mm bottom bolts back in. Got 'em with the engine jacked back up (lifted off the new mounts), moved the engine a bit using a crow bar and a pry bay. OMG, it sounds like a Benz again, not a bucket of bolts
__________________
95 E300D gave away 77 300D, 227k, station car 83 300CD 370k, body gone away to the rust gods, engine is in a Yota pickup, going strong 89 190E 2.6- 335k, no more 79 VW FI Bus- 154k summer driver 59 VW Beetle ragtop- 175k 12 VW Jetta- 250k 74 MG Midget-78k Last edited by my83300cd; 02-22-2010 at 11:06 PM. Reason: comment re moving engine
|
|
#33
02-22-2010, 10:59 PM
|
||||
|
||||
|
More data
Heat shield OM617 engine mount
http://www.peachparts.com/shopforum/diesel-discussion/121452-heat-shield-om617-engine-mount-post873875.html Bad engine mounts http://www.peachparts.com/shopforum/diesel-discussion/121286-bad-engine-mounts-post868339.html Engine / motor mount DIY http://www.peachparts.com/shopforum/diesel-discussion/146482-engine-motor-mount-diy.html#post1104023
|
|
#34
02-23-2010, 07:34 AM
|
||||
|
||||
|
Quote:
-For the engine shock, there is a 7mm flat section which a small wrench can slide on, which may help prevent dmage to the shock. The two mount nuts and the nuts for the shock shaft all use a 10mm socket. -Easiest way to get the 8mm main allen on the mount is via a high quality hex socket on an extension. Get it in there after cleaning, good and tight, and use the ratchet for leverage, keeping the extension shaft very rigid and straight. -DO remove the fan shroud clips and the throttle linkage. My mounts were nearly new, but to get enough height to remove the heat shields and have space to get the oil cooler hoses out, the engine needs to go fairly high. Be careful with the shroud near the radiator hose/neck. The shroud will push up a bit when the engine is high enough to be able to service new mounts. -The inner bolts are a pain. Removing the shock and/or heat shield still does not give you topside access or space to place an allen socket. It just doesnt line up: 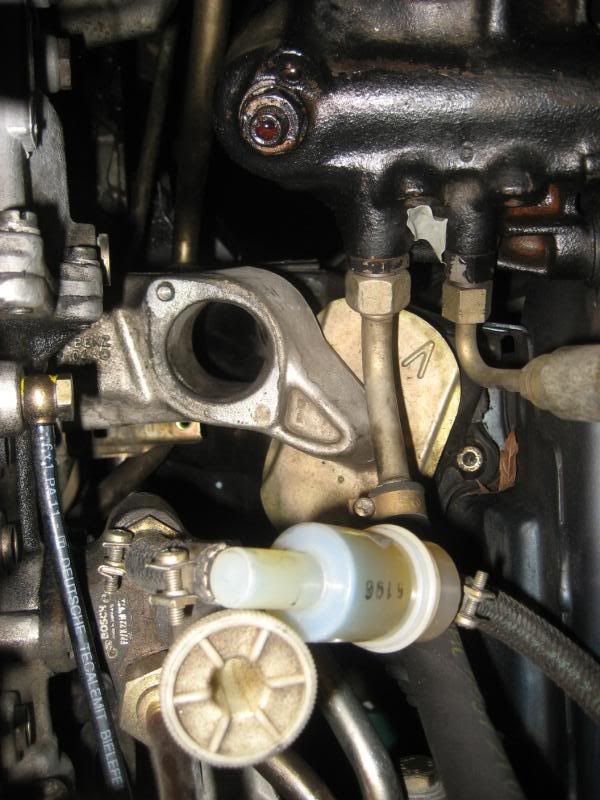 I don't have a good solution, as I didnt need to remove the mount so left as-is. It would be good for folks to explain their techniques.
__________________
Current Diesels: 1981 240D (73K) 1982 300CD (169k) 1985 190D (169k) 1991 350SD (116k) 1991 350SD (206k) 1991 300D (228k) 2008 ML320 CDI (199k) 1996 Dodge Ram CTD (442k) 1996 Dodge Ram CTD (267k) Past Diesels: 1983 300D (228K), 1985 300D (233K), 1993 300D 2.5T (338k), 1993 300SD (291k) Last edited by whunter; 10-27-2011 at 09:09 PM. Reason: attached picture
|
|
#35
04-22-2010, 12:10 PM
|
|||
|
|||
|
Quote:
Did mine this morning...much easier than expected. One was in crumbles and one wasn't to bad. Got the drivers side up and new one in, and when I went to do the passenger side I found that the main center bolt was missing! Glad there are other bolts that help support the engine...that could've led to a major problem. Now it sounds like a new car again!
|
|
#36
10-27-2011, 08:36 PM
|
||||
|
||||
|
Bump for floridian member!
__________________
John HAUL AWAY, OR CRUSHED CARS!!! HELP ME keep the cars out of the crusher! A/C Thread "as I ride with my a/c on... I have fond memories of sweaty oily saturdays and spewing R12 into the air. THANKS for all you do! My drivers: 1987 190D 2.5Turbo 1987 560SL convertible 1987 190D 2.5-5SPEED!!!  1987 300TD 2005 Dodge Sprinter 2500 158"WB 1994GMC 2500 6.5Turbo truck... I had to put the ladder somewhere!
|
|
#37
09-25-2012, 10:25 PM
|
||||
|
||||
|
Just did this myself on my '85. I found having a small 1/4" drive ratchet and socket to be helpful on the passenger side inner mount bolts and shock tower bolts. Some tight clearances there. Having an 18" extension is also handy for a few of the outer bolts. I had a problem lining up the holes on the engine to the bolts underneath, I jacked the engine back up and moved it around with a pry bar a little bit.
__________________
Charlie --------------------------- '66 VW 1300 96K miles '97 E300D 239K miles '85 300D 203K miles (sold Sep 2012) 
|
|
#38
04-20-2013, 09:40 AM
|
|||
|
|||
|
well i have a 600 mile round trip comming up today, i have the engine mounts, and plan on changing them before the trip. i hope i dont run into any stupid problems. thanks for the great diy and all the great info guys! i cant wait to hear the car after the mounts are changed! i dont know why the guy i got the car from didnt do them when he changed the engine but hey, his mistakes cost him a great car. we picked it up cheap, and i have only put elbow grease in it so far, well break light headlight and just bought 2 engine mounts.
__________________
82 300cd my baby and daily. 82 300sd parts car, looking for a fox body to take her heart... 85 300sd womans daily (soon to be baby pink she hopes!) 92 f350 7.3 idi N/A (for now) cc lb dually retired to tow pig/ back up been a good long road, now take some boost!!! http://i1272.photobucket.com/albums/...ps5aba00d7.jpg
|
|
#39
04-20-2013, 09:43 AM
|
||||
|
||||
|
Just be really careful with the Allen screws.
__________________
Current Diesels: 1981 240D (73K) 1982 300CD (169k) 1985 190D (169k) 1991 350SD (116k) 1991 350SD (206k) 1991 300D (228k) 2008 ML320 CDI (199k) 1996 Dodge Ram CTD (442k) 1996 Dodge Ram CTD (267k) Past Diesels: 1983 300D (228K), 1985 300D (233K), 1993 300D 2.5T (338k), 1993 300SD (291k)
|
|
#40
04-20-2013, 09:55 AM
|
|||
|
|||
|
my hope is that they arnt already messed up...lol if the engine was just changed then there cant ( one would think) be that much gunk in the hex heads. i was planning on buying new hex head sockets thats why i was searching for the diy first so i knew all the tools i would need first. i want it done and over with.
__________________
82 300cd my baby and daily. 82 300sd parts car, looking for a fox body to take her heart... 85 300sd womans daily (soon to be baby pink she hopes!) 92 f350 7.3 idi N/A (for now) cc lb dually retired to tow pig/ back up been a good long road, now take some boost!!! http://i1272.photobucket.com/albums/...ps5aba00d7.jpg
|
|
#41
04-20-2013, 11:57 AM
|
|||
|
|||
|
Quote:
I just completed the engine mounts install on my 1983 300D. I went through two cans of brake cleaner and 1 can of PB Blaster before I took off the old mounts. One thing I recommend you do that I wish I did was pressure wash the engine mount areas. I also went to Harbor freight and picked up a impact 1/2" Allen socket set and a short set of Allen wrenches. Another good tool is a very small socket set. 18" breaker bar is a nice tool to have for working on the Mercedes.
|
|
#42
04-21-2013, 09:38 AM
|
|||
|
|||
|
well i got it done, and the 11 hour trip... terre haute, IN to kalamazoo michigan and back. thanks for the info guys. oh and i cleaned the hex heads with q-tips and seafoam. they were still full of gunk...lol and only finger tight! and the mounts were destroyed! sounds and runs like a new car!
__________________
82 300cd my baby and daily. 82 300sd parts car, looking for a fox body to take her heart... 85 300sd womans daily (soon to be baby pink she hopes!) 92 f350 7.3 idi N/A (for now) cc lb dually retired to tow pig/ back up been a good long road, now take some boost!!! http://i1272.photobucket.com/albums/...ps5aba00d7.jpg
|
|
#43
02-20-2015, 11:41 PM
|
|||
|
|||
|
is there a list of torque values for the w123 on the site? I've tried to look at the online shop manual (startek...) but it doesn't work with my space age 64-bit browser.
I'll be doing a few things (engine mounts included) soon and am gathering intel. thanks! p/s i forgot to order a couple new bolts for the engine mounts in case one or more are stripped. What are the odds i'll need one or two (or 4?) ** nevermind ** I found .pdf version of the shop manuals. Felt like striking gold. Still not exactly certain on the mount bolts. I wanted to stop somewhere and buy a few good quality bolts to replace them or in case of a stripped head Last edited by zampano; 02-21-2015 at 11:28 PM.
|
|
#44
02-23-2017, 04:29 PM
|
|||
|
|||
|
Easy access to the inner 6mm bolt, at least on the driver's side. Haven't done the passenger side yet.
Tools: Stub of 6mm allen wrench with no bend in it (got mine from ************** in their little motor mount tool kit) 1/4" 1/4" drive socket 1/4" wobble extension Masking tape. Jack up the engine. Tape the stub of the 6mm allen into the 1/4" socket so it won't drop out as you lower it down. Put the 1/4" socket on your wobble extension. (may work with a standard extension--I didn't try. I went with the wobble) Make the extension long enough so you can get the 1/4' ratchet on the extension way up near the top of the engine so it's easy to work with Reach down on front side of engine mount arm close to the IP with the socket/wobble in right hand while using left hand to direct the 6mm allen into the inner bolt. (clean out the head of the bolt in advance-I use brake cleaner aerosol with a 2' extension nozzle) Unscrew the inner bolt Voila. I should add that you need all this in 1/4" because a 3/8" drive 6mm allen socket is too fat. It will hit the motor mount arm and not be capable of going in to the bolt head. All this on 84 SD Finished the passenger side mount. I can confirm that once the air filter bracket is removed you can access the inner bolt of the mount using the tools above by feeding the long extension down between the manifold and the turbo.
__________________
1977 300d 70k--sold 08 1985 300TD 185k+ 1984 307d 126k--sold 8/03 1985 409d 65k--sold 06 1984 300SD 315k--daughter's car 1979 300SD 122k--sold 2/11 1999 Fuso FG Expedition Camper 1993 GMC Sierra 6.5 TD 4x4 1982 Bluebird Wanderlodge CAT 3208--Sold 2/13 Last edited by kerry; 02-25-2017 at 03:22 PM.
|
|
#45
02-23-2017, 04:33 PM
|
|||
|
|||
|
Old collapsed mount on left. New lemforder mount on right.
__________________
1977 300d 70k--sold 08 1985 300TD 185k+ 1984 307d 126k--sold 8/03 1985 409d 65k--sold 06 1984 300SD 315k--daughter's car 1979 300SD 122k--sold 2/11 1999 Fuso FG Expedition Camper 1993 GMC Sierra 6.5 TD 4x4 1982 Bluebird Wanderlodge CAT 3208--Sold 2/13 Last edited by kerry; 02-24-2017 at 02:12 PM.
|
 |
| Bookmarks |
|
|


 Linear Mode


