

|
|
|
|
|
|
#76
 03-02-2010, 04:50 PM
|
|||
|
|||
|
So, I did this, great tutorial. I wasn't really able to find the 1 drop per second though. No matter where I positioned the pump it was a constant stream as long as I kept pumping the primer (I have the new sealed style). I noticed though that the more advanced I had the pump (towards the engine) the slower the drips would be after I stopped pumping and waited a few seconds. No tutorial I've seen (neither the FSM nor the Haynes manual) explains exactly how the dripping works. Anyway, I pushed my pump all the way advanced (it was pretty much all the way to begin with) and tightened everything up. Didn't make much of a difference with my issue.
There are lots of comments about the difficulty of loosening the mounting nut on the back of the pump. I went in with a standard 13mm combo wrench from the side (not the top as in the tutorial photo), between the two hard oil filter lines. There was just enough room to loosen the nut using both ends (started with the the box end and then went to the open end I think). It only took a few minutes once I was able to see the nut. It only has to be loosened like a 1/4 turn.
__________________
'84 Euro 300TD Turbo, 192K 
|
|
#77
02-26-2012, 10:02 AM
|
|||
|
|||
|
I just didn't understand the hand pump part. what type of hand pump is used and where is it shown in the pictures? thanks I have a 603 that has become noisy and think it might be the timing..thanks
|
|
#78
02-26-2012, 12:09 PM
|
||||
|
||||
|
Quote:
All of the above go into a port on the Side of the Governor after you remove a Plug. All of the above use 15 degrees after top dead center as their timing point; past top dead center of the Compression Stroke. Below is a pic of the Timing/locking pin.
__________________
84 300D, 82 Volvo 244Gl Diesel
|
|
#79
02-26-2012, 12:25 PM
|
||||
|
||||
|
Quote:
I will try to give a generic explanation. You have one feed port on the side of the Element Barrel. As the Plunger comes up it is closing the Feed Port; but, as long as the Feed Port is open the rising Plunger forces the fuel out of the Feed Port. When the Plunger rises enough it closes/blocks the Feed port trapping the Fuel in side and the Fuel pushed towards your Injectors; that is the Begin of Injection. The idea of drip timing is that when the Plunger is making that one drip per second is that the Feed Port is almost closed and it is right at/on the borderline of the Begin of Injection. Drip Timing Summarized Before you do any rotating of the Fuel Injection Pump scribe a mark a crossed the Pump Flange to the Engine so you can return the Fuel Injection Pump to the original spot if you run into a problem. The Engine needs to be rotated Clockwise as viewed from the Crankshaft Damper end of the Engine. If you are adjusting the timing on an Engine that has been running OK the timing is most likely just a little be retarded/late. What this means is that if the Fuel Injection Pump needs to be moved it is only going to be a tiny amount. What makes the Movement easier is to remove all of the Fuel Injection Hard Line Tubing. With Crank Shaft Damper lined up on 24 Degrees BTDC (on the compression stroke) and the Drip Tube in place Pump on the Hand Primer and see what happens. If the Fuel Injection Pump needs to be rotated loosen the Fuel Injection Pump Flange Nuts and just nudge the Fuel Injection Pump a tiny bit. Leave it like that and pump on the Hand Primer and count the drips; If the IP moves line it back up with your scribed mark and snug down one Nut enough that you can more the Fuel Injection Pump but at the same time can still pump the Hand Primer. So basically you move the Fuel Injection Pump a tiny increment; stop; Pump the Hand primer and count the drips when the pressure is up. If it needs to be moved repeat the proceedure. Rotating the top of the Fuel Injection Pump towards the Engine Block advances the Timing. Moving towards the Fender Well retards the timing.
__________________
84 300D, 82 Volvo 244Gl Diesel
|
|
#80
05-24-2012, 04:11 PM
|
|||
|
|||
|
615.912
Hello this is my first message in her
 i have a 220d with a ( as I understand it) vacum droven deaceleration system on the ip( a spring setts it to ful trottle and the vacum deac. it. Dose somone know wate I have to do before i start with the timing? I`m thinking on the part about: setting it on ful trottel, disconecting vacum lines ( the stop is wire driven) any tips or trick`s? Reg: Grisle
|
|
#81
05-25-2012, 04:29 AM
|
|||
|
|||
|
Quote:
The 220D has a pneumatic governor. Vacuum created by a venturi in the intake manifold works against spring pressure to control the amount of diesel injected and so the speed of the engine. A throttle (controlled by the accelerator pedal) controls the air flow through the venturi and so the vacuum. The starter knob on the dashboard has to be in the "drive" position. That is enough. The spring will force the pump into the full-load position, because when the engine isn't running, there isn't vacuum. The 220D has a M pump, meaning that there is a copper washer and a rubber O ring, nr. 5 and 2 in the picture below: 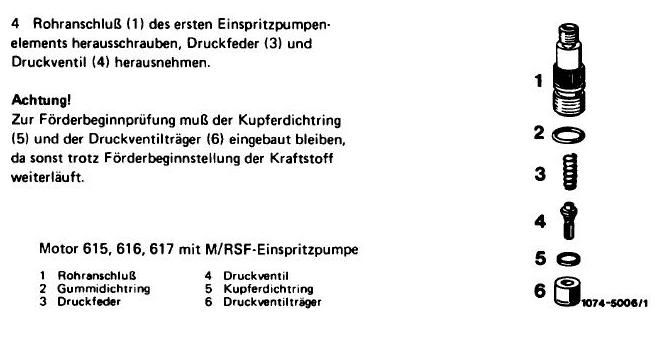 The copper washer always needs to be replaced by a new one, the rubber O ring usually too, but if it is not damaged, it can be reused. The copper washer is a specific one, get one from the MB dealer or a (Bosch) diesel service station. You have to torque the delivery valve holder in this order: 30 Nm > loosen, 30 Nm > loosen, 35 Nm. This ensures that the copper washer is properly seated. Oil the threads of the delivery valve holder beforehand. Clean the IP beforehand too, so no dirt will get into the pump.
|
|
#82
04-15-2014, 09:23 PM
|
|||
|
|||
|
rabbit ears lobe position
The second (2) picture of this pictorial shows the position of the lobe for 24btdc injection pump timing. The picture looks like it is the wrong position. Would someone please confirm that this picture is what it looks like when it is 180 degrees OFF. I see the rabbit ears position when I did mine. Is this the right position? The picture does NOT look like both thin points of the lobes are facing up. Could someone please confirm the correct lobe position for drip tube timing on the injection pump. Thanks, goldveg
__________________
1985 W126 300sd
|
|
#84
04-17-2014, 03:26 AM
|
||||
|
||||
|
Quote:
.
__________________
w126 500SEC gen II euro, powered by OM617 turbo stolen from 84 300SD  2.88 diff,EGR blinded 2.88 diff,EGR blindednext wish/project: w114 coupe OM603 powered
|
|
#85
04-17-2014, 05:43 AM
|
|||
|
|||
|
1983 300D engine with a 1984 300SD IP.
The PO removed and reinstalled the IP. This thread makes no mention of what to do if the assembly of the IP to the engine is incorrect and the drive splines are misaligned by one or two teeth. I took the car to a very experience mechanic to time the IP. He pulled/adjusted the top of the IP towards the fender well (retarding the timing) AS FAR AS IT WOULD GO. The current symptoms are: 1. Engine bucks hard when first started at cold idle, about 700-800 rpm. Runs more smoothly when cold when throttled up to ~1000 rpm. 2. White smoke when first started. Goes away when warm. 3. Runs smoother when warmed up, especially when throttled up to 1000 rpm, or trans is put in Neutral. Did I give enough info above to diagnose the problem and get an answer on what I should do? Thanks!
__________________
. 1st MBz: 1982 300SD 2nd MBz: 1987 300SDL 3rd MBz: 1995 S420 4th MBz: 1987 190DT 5th MBz: 1984 300SD w/1983 300DT engine 6th MBz: 1999 C230k I'm 3rd owner, got it w/57,235 miles. and manages Mom's 2007 R320 CDI
|
|
#86
04-17-2014, 05:54 AM
|
||||
|
||||
|
.
take the IP out set 24 degrees on the Compression stroke (2 first lobes pointing upwards) and line up the IP notches plunge IP back timing afterwards is your choice.... I would also check rack dumper and IP dv's. edit : check if you have code numbered 251 MW IP which has 3 teeth mismarkings... .
__________________
w126 500SEC gen II euro, powered by OM617 turbo stolen from 84 300SD 2.88 diff,EGR blindednext wish/project: w114 coupe OM603 powered Last edited by cho; 04-17-2014 at 06:08 AM.
|
|
#87
04-17-2014, 05:59 AM
|
|||
|
|||
|
Quote:
When removing the IP is it possible to see if the "IP notches" are correctly aligned before the splines are completely disengaged? If they are aligned properly, and that can be seen, it would be better to not fully disengage them, and just slide and bolt it back together. Then figure out what to do next.
__________________
. 1st MBz: 1982 300SD 2nd MBz: 1987 300SDL 3rd MBz: 1995 S420 4th MBz: 1987 190DT 5th MBz: 1984 300SD w/1983 300DT engine 6th MBz: 1999 C230k I'm 3rd owner, got it w/57,235 miles. and manages Mom's 2007 R320 CDI
|
|
#88
04-17-2014, 06:01 AM
|
|||
|
|||
|
Quote:
I did adjust the rack damper, I could do that again. What is the "IP dv's"?
__________________
. 1st MBz: 1982 300SD 2nd MBz: 1987 300SDL 3rd MBz: 1995 S420 4th MBz: 1987 190DT 5th MBz: 1984 300SD w/1983 300DT engine 6th MBz: 1999 C230k I'm 3rd owner, got it w/57,235 miles. and manages Mom's 2007 R320 CDI
|
|
#89
04-17-2014, 06:25 AM
|
||||
|
||||
|
Quote:
I don't think so but I m not sure...(oil filter is in your way...) mark the IP position before removal if you are scared of misaligment... easier is to take bosch number of the IP plate ...see if 251 appears ... like in 0 413 xxx 990 IICR only 1982 pump had those teeth messed up ....but your has been changed so who can be sure which one is plunged in now...? .
__________________
w126 500SEC gen II euro, powered by OM617 turbo stolen from 84 300SD 2.88 diff,EGR blindednext wish/project: w114 coupe OM603 powered
|
|
#90
04-17-2014, 06:27 AM
|
||||
|
||||
|
Quote:
timing check....that IP retardation would trouble me first... dont touch IP elements (also on top of IP 2 screw bolted/adjusted) btw  .
__________________
w126 500SEC gen II euro, powered by OM617 turbo stolen from 84 300SD 2.88 diff,EGR blindednext wish/project: w114 coupe OM603 powered
|
 |
| Bookmarks |
|
|


 Linear Mode


