

|
|
|
|
|
|
#31
 10-11-2010, 12:35 PM
|
||||
|
||||
|
Quote:
The external Threads on the Injector are M24x2; this is the size you would need to make the Ring Removal Tool. The internal threads of the Prechamber; the ones you need for the Puller are M22x1 And, you cannot use any of the Injectors for the later Mercedes Diesels as a source to make either tool as they have external threads of M22x1.5 I am selling the Prechamber tool I used last: Prechamber Ring Removal Tool and Prechamber Puller For Sale
__________________
84 300D, 82 Volvo 244Gl Diesel 
|
|
#32
11-02-2010, 10:14 AM
|
||||
|
||||
|
Quote:
__________________
85 300D turbo pristine w 157k when purchased 167,870 July 2025 83 300 D turbo 297K runs great. SOLD! 83 240D 4 spd manual- parted out then junked
|
|
#33
11-02-2010, 02:17 PM
|
||||
|
||||
|
Quote:
Also I think you can tell ounce you pull out one Prechamber. If there is no obvious damage you can see from above the only reasons to pull a Prechamber would be if you know you have a leak or to inspect the holes at the bottom. I suppose in some unusual circumstance a Prechamber could be full of so much Carbon (un-heated WVO users perhaps) that it would be easier to pull the Prechambers to clean them.
__________________
84 300D, 82 Volvo 244Gl Diesel
|
|
#35
10-15-2011, 07:12 PM
|
||||
|
||||
|
Hmm
Sorry, no pictures
DIY 617.9XX prechamber tools
|
|
#36
08-11-2012, 12:31 PM
|
|||
|
|||
|
Quote:
Mercedes Diesel Engine Combustion Pre-chamber Leak Repair by Kent Bergsma - YouTube http://www.google.com/url?sa=t&rct=j&q=**************%20video%20prechamber&source=web&cd=7&ved=0CEsQtwIwBg&url=http%3A%2F%2Fwww.youtube.com%2Fwatch%3Fv%3DepVJMkFltEU&ei=OIMmUI-MHYqIiALRmID4CA&usg=AFQjCNEQNcRb11C1D7XlgTLky5ew7r-CqA
__________________
1985 300D, 250k 1980 300SD, 180K
|
|
#37
08-11-2012, 05:56 PM
|
||||
|
||||
|
I am selling a used Prechamber Ring Tool and a puller:
http://www.peachparts.com/shopforum/mercedes-used-parts-sale-wanted/322839-prechamber-ring-removal-tool-slotted-type-rings-prechamber-puller.html
__________________
84 300D, 82 Volvo 244Gl Diesel
|
|
#38
08-12-2012, 01:17 AM
|
|||
|
|||
|
Here is a other self made tool.
The puller is made out of a 3/4" drive socket, the 3/4" square is still visible. The inner part is made of mild steel. 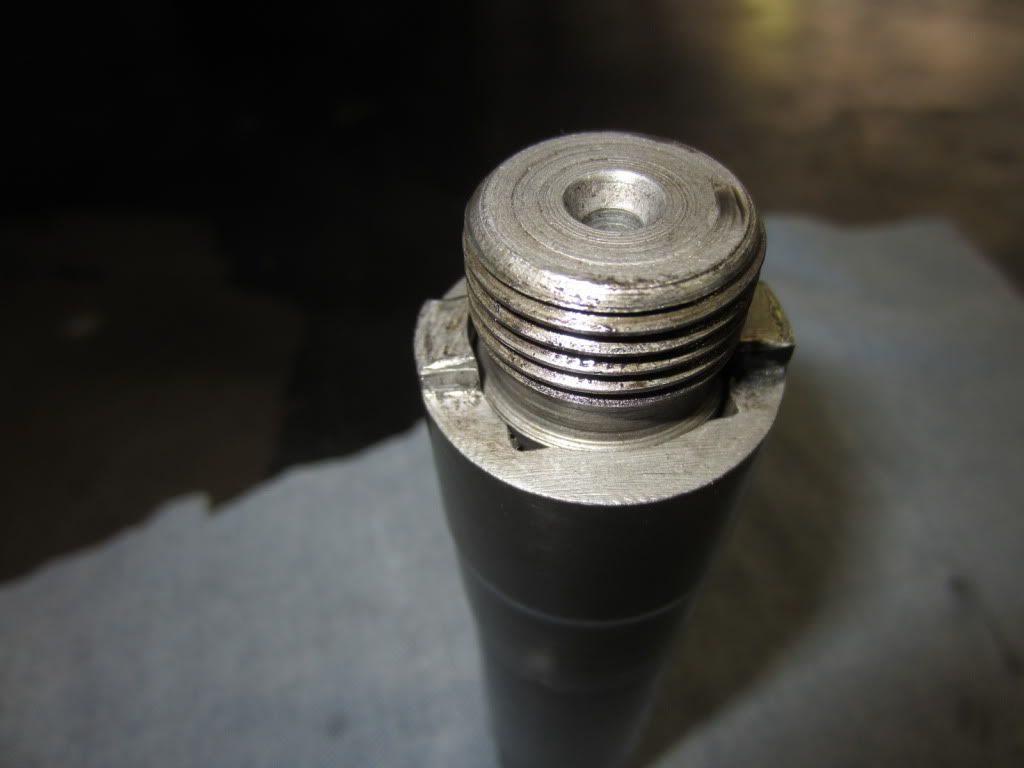 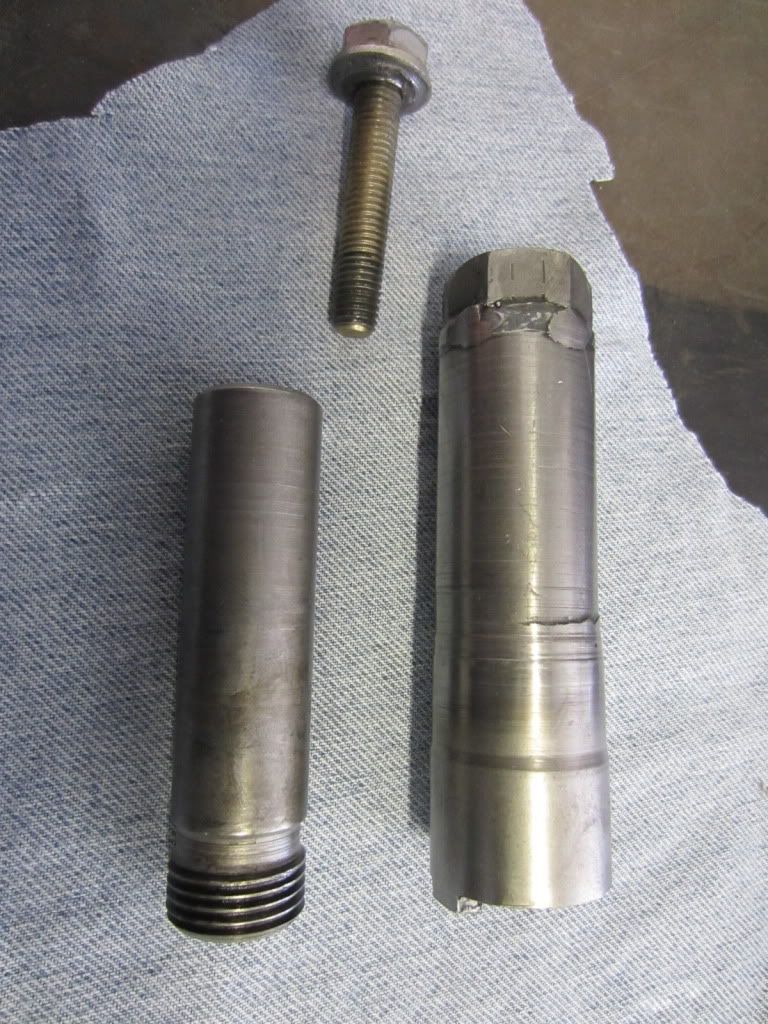 The pre chamber puller used to be a 11mm deep impact socket. 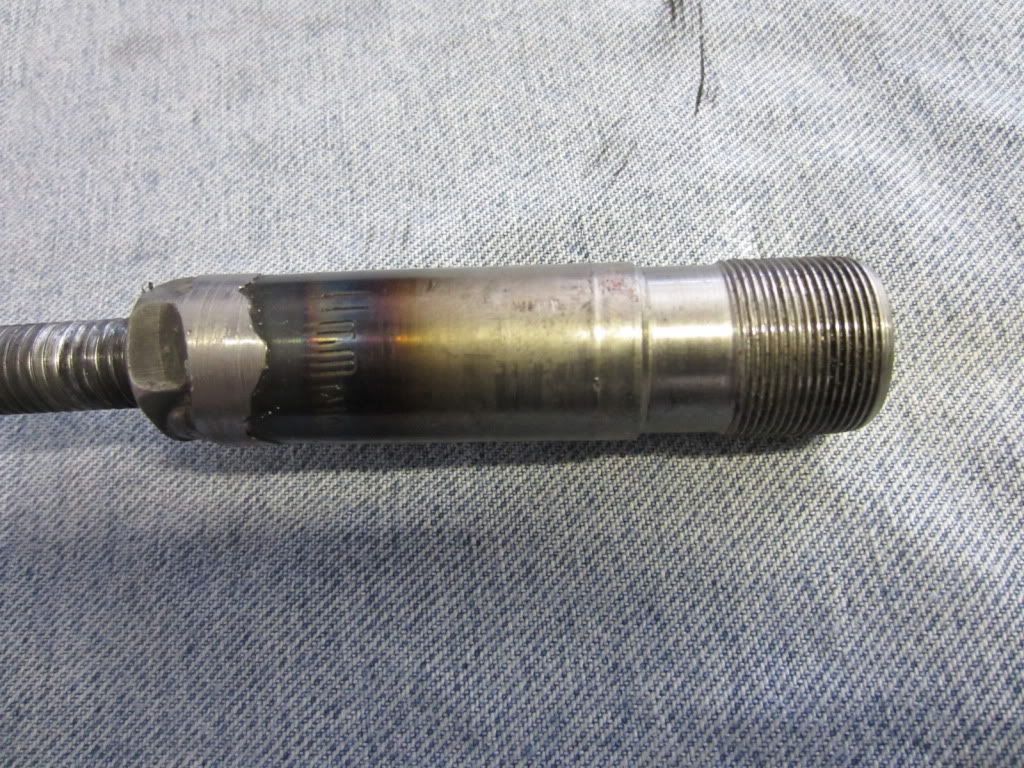
__________________
 76 240 D. Bought in 1998 for $25. 85 300D. Got it for free with a bad engine. ( Sold ) 60 Unimog 404. What was left of it, was given to me. Now powerd by 617A. 88 560 SEL. Bought without engine and trans. Now powerd by 617A. 67 250 SE. Cuope. For resto or sale. 64 220SE. For resto.
|
|
#39
08-12-2012, 02:50 AM
|
||||
|
||||
|
Quote:
Were the threading part operations done on a Lathe? I have made and sold some but I fooled with different designs. Several I made from a Bolt Head as in the Picture. OK for making one for Myself but too time consuming to turn it on a Lathe and then Mill the Pins that go into the Slots on the Ring. I welded the Hex on the one in the Pic I also made some where I Milled the Hex. I sold enough of them to pay back my expenses. But, I found it Dulled My Milling Bit and I would have had to upgrade my Tools and so on to continue making them that way and I moved on to other designs. I bought the Wilbar Tool I am selling (Ad link in post #38) as part of the research . The Prechamber Puller is another part of a Bolt I turned down on the Lathe and threaded; and, welded to a Rod Rod Coupling. The Prechamber Tool in the AD I am selling is made of part of a Bolt threads externally and internally and is all one piece; no welding. I bought one of those Bicycle Hub Tools to make into a Prechamber Puller but deceded not to use it. It is missing in action anyway.
__________________
84 300D, 82 Volvo 244Gl Diesel
|
|
#40
08-12-2012, 03:16 PM
|
|||
|
|||
|
Quote:
We had to order the first oversize prechamber crush ring which is 2.3mm. Since I had both 2.0mm and 2.3mm I decided to measure them to make sure I got the correct oversized ones sent to me. I also thought when looking at these two different sizes side by side that they looked like the same size. Being that you probably can't actually see .3mm with the human eye...this makes sense. The two rings were different sizes when measured with calipers...just how much...I can't remember. I think it worked out to close to the .3mm I was after. What they measure out at once they have been torqued down once is another story...I don't know what they would be. I have been thinking this same thing through..... If the car changes owners.... how will the next owner know that the prechambers, if removed... will require the oversized seal rings? I guess I'll have to remember to tell them.
|
|
#42
08-12-2012, 03:25 PM
|
|||
|
|||
|
Yes it's made on a lathe.
The prongs are milled. I made this one about 14 years ago, and used it many, many times. If I had to make it again, I would not weld a nut on the top, I would machine the whole thing.
__________________
76 240 D. Bought in 1998 for $25. 85 300D. Got it for free with a bad engine. ( Sold ) 60 Unimog 404. What was left of it, was given to me. Now powerd by 617A. 88 560 SEL. Bought without engine and trans. Now powerd by 617A. 67 250 SE. Cuope. For resto or sale. 64 220SE. For resto.
|
|
#43
08-12-2012, 05:21 PM
|
||||
|
||||
|
Quote:
It just looks less homemade with out the Weld; and that does not matter when you make one for Yourself. I found the Pic of the one I milled the Hex on. I made three if them like that and decided milling the Hex is too time consuming for the results; and infect I don't make any more of that design. The Pic on the right is the first one I made compared to the Wilbar Prechmaber ring Tool. I welded large Nut to a section of Hex Rod and turned it on the Lathe so OD and ID would be centered. I still have the first one. I also found out that only people who had an absolute need for the Tool bought them. I try to buy Tools before I have need for them so I have time to shop for a good deal. If you wait until you have to have one right now and you cannot make one as You did you end up paying through the Nose!
__________________
84 300D, 82 Volvo 244Gl Diesel Last edited by Diesel911; 08-12-2012 at 05:33 PM.
|
|
#44
08-12-2012, 11:37 PM
|
|||
|
|||
|
The one on the left looks very nice.
What material did you use for the pronged part?
__________________
76 240 D. Bought in 1998 for $25. 85 300D. Got it for free with a bad engine. ( Sold ) 60 Unimog 404. What was left of it, was given to me. Now powerd by 617A. 88 560 SEL. Bought without engine and trans. Now powerd by 617A. 67 250 SE. Cuope. For resto or sale. 64 220SE. For resto.
|
|
#45
08-13-2012, 12:07 AM
|
||||
|
||||
|
Quote:
I ground off the pointed part of the Hex Head by Hand close to the OD so that it would take as much time to turn down and at the same time not mess up My Lathe Bit. The Prongs were Milled out of the Head. That was done on a large Mill/Drill Machine; meaning that there is no automatic Feed on it; another Hand Job.
__________________
84 300D, 82 Volvo 244Gl Diesel
|
 |
| Bookmarks |
|
|


 Linear Mode


