

|
|
|
|
|
|
|
|
#1
 05-24-2010, 09:16 AM
|
||||
|
||||
|
I've pulled the wheel once or twice for this, but don't feel that it saves any time JMO. Extending it does.
__________________
 Gone to the dark side - Jeff 
|
|
#2
05-24-2010, 10:30 AM
|
|||
|
|||
|
Quote:
__________________
1987 300TD 309, xxx 2.8.2014 10,000 mile OCI Be careful of the toes you step on today, as they may be connected to the ass you have to kiss tomorrow. anonymous Be who you are and say what you feel, because those who mind dont matter, and those who matter wont mind. Dr. Seuss
|
|
#3
07-04-2011, 11:57 AM
|
||||
|
||||
|
digging this thread since the question will be useful.
When I removed my crack free blue dash from the junk yard the A pillars were already gone and it made removal a bit easier I think. Is it neccessary to remove the A-pillars? my only worry about removing the dash is those clips for the vents. In the junkyard I didn't push the vents out like the DIY says to.
|
|
#5
07-04-2011, 12:07 PM
|
||||
|
||||
|
I had an issue removing the dash even with them out. It would not freely come out. It was getting caught on something even though everything was undone.
crack free blue dash's are awesome
|
|
#6
07-04-2011, 12:36 PM
|
||||
|
||||
|
Indeed, I've never seen one. I had to get a black dash and paint it.
__________________
 "Buster" in the '95 Our all-Diesel family 1996 E300D (W210) . .338,000 miles Wife's car 2005 E320 CDI . . 113,000 miles My car Santa Rosa population 176,762 (2022) Total. . . . . . . . . . . . 627,762 "Oh lord won't you buy me a Mercedes Benz." -- Janis Joplin, October 1, 1970
|
|
#7
07-04-2011, 04:44 PM
|
||||
|
||||
|
I got my dash out with them in, but could not get it back in without taking them off.
__________________
hum..... 1987 300TD 311,000M Stolen. Presumed destroyed
|
|
#8
03-13-2013, 03:45 PM
|
||||
|
||||
|
Finally got around to swapping my dash out. I did take pictures and will post them soon
|
|
#9
03-13-2013, 04:53 PM
|
||||
|
||||
|
The following instructions are copied from the original poster (babymog) and photos supplied by me(TheDon)
 tools used for the most part 1) Remove screw-cover from RH speaker grill, small strip toward the center of dash, by prying upward along the length. Don't reach too deep to pry or you'll get under the speaker enclosure, and be careful not to damage the dash by prying. It can usually be removed with a strong set of fingernails. 2) Remove two small phillips screws from speaker grille. 3) Rotate/lift the speaker grill up and toward the A pillar, slide the clips on the A-pillar side out of the dash. 4) Remove the 8mm bolt exposed by removing the grille.  out come of steps 1-4 5) open the glovebox door and remove the 6 retainer buttons (top and bottom) by prying the button out ~1/8" and then pulling out with fingers or needle-nose pliers. If the clip doesn't come out with the retainer (2 pieces each) you will have to pry the clip out separately.   the clips can be a bit hard to remove, try not to damage the felt liner 6) Remove two phillips screws and glovebox latch from top of the compartment. 
Last edited by TheDon; 03-13-2013 at 05:28 PM.
|
|
#10
03-13-2013, 05:00 PM
|
||||
|
||||
|
7) Remove the glovebox light by pulling downward on the light, unplug the light.
 8) Slide the glovebox liner out. You will need to pry the middle of the top downward slightly to get it to slide out.  9) Remove the RH vent from the dash: Through the glovebox, reach your left hand in. Using light pressure toward you, push the ductwork and vent toward you. While keeping this pressure, use your pick to pry the 4 retainer clips inward from inside the top and bottom of the vent. They are metal spring-clips with a hole in the middle, best to use a pick or jeweler's screwdriver to pry one at a time inward until all have released. It might be necessary to do each one more than once until the vent is out far enough to pull it free of the duct. Remove the light from the vent by pulling it directly out.  Demonstrating how to pull down on the tabs and the location of the tabs 10) Reach in to the glovebox opening and un-plug the speaker wires, the plug should be wrapped in foam, green and black (Gruen und Swarz) wires. 11) Remove the two 8mm bolts at the bottom of the dash.  There are two machine screws hidden by the vent. The two bolts on the underside of the knee panel are easy to see  After removing the screws for the glow box door and the two on the sides of the glove box the knee panel can be removed
|
|
#11
03-13-2013, 05:07 PM
|
||||
|
||||
 The air sample for the HVAC is mounted to the passenger side knee panel, remove the hose and plug Now the left side. 12) Sitting in the driver's seat, pull the instrument cluster toward you. It is a friction fit, usually can be pulled out with finger pressure out to both sides, rocking from side-to-side. If you have a stubborn one, ... you might benefit from a set of M-B dash removal tools, I haven't needed them yet. Once the cluster is out far enough to reach your left hand behind it, unscrew the retaining ring on the speedometer cable (directly behind the center of the speedometer). I have not had a problem with a 124 having too little cable for this (yet). Unplug the wires from the cluster, should be plenty of cable. If the wire numbers are no longer on the warning lights you might want to mark them before removing them. The rest of the wires will only plug into one place, only one of each connector. Unplug all of the lights and wires. If you are in an '87, the temp-display wires are pigtails, they unplug in the middle of the wiring under the dash, three separate plugs.  the cluster removed 13) Remove the left speaker grille and 8mm bolt beneath using steps 1-4 as a guide. 14) Remove the left vent similar to step 9. 14.5) Reach into the opening and un-plug the speaker wires same as RH side. 15) Pull the headlamp switch knob off. Might take some rocking as you pull, some take a strong set of fingers. 16) Using the slip-joint pliars (best tool for this, honest) loosen the nut from the headlamp switch and remove it. 17) CAREFULLY pry the headlamp switch bezel toward you. It will also remove one end of the brow over the steering column. Carefully pry the mating trim from the dash on the other side of the steering column.   Here you can see the nut behind the knob. It is easily removed with channel locks or by hand if you have removed it before
|
|
#12
03-13-2013, 05:15 PM
|
||||
|
||||
|
17) CAREFULLY pry the headlamp switch bezel toward you. It will also remove one end of the brow over the steering column. Carefully pry the mating trim from the dash on the other side of the steering column.
18) Remove 2 8mm bolts from the bottom of the dash, and one phillips screw retaining the black under-cover. 18.5) Remove 1 phillips screw on the end of the dash facing the door.   You will have two 8mm bolts here. My car suffers from previous owner syndrome (I have reinstalled the dash with the correct fasteners) 19) Remove the 4 (or 5) 8mm bolts that were exposed by removing the trim on both sides of the steering column. The lower dash panel on the driver's side should now swing down enough to be clear of the dash, it is still held by the park-brake release cable. We are leaving the bottom dash section on the driver's side in the car. 20) Rotate the headlamp switch clockwise until it can be pushed down into the dash. 21) Remove one phillips scew on the glovebox end of the center vent assembly.  22) Using the 4.5mm allen wrench, find the allen-head bolt just right of center in the vent assembly behind the louvers, and loosen until it is free of the vent flap. The bolt is retained, should not drop into the vent. It will move toward you if you turn the thumbwheel to close the vent.  I used a 4mm allen and it worked just fine 23) Using a method similar to removal of the L&R vents, remove the center vent. Once the screw is removed on the glovebox end there are only two clips, on the driver's end. 24) Remove the light from the vent. There is a hinged-door that opens to expose the light, then the light socket assembly will come out (I cut the wire on my first one, ... oops). 25) Remove the two screws above the radio, swing the zebrano panel up and remove. 
|
|
#13
03-13-2013, 05:23 PM
|
||||
|
||||
|
26) Remove 6 screws retaining the ACC control, pull the control out of the opening and unplug the two connectors.
 27) This step is difficult as it is easy to damage the center console while prying: CAREFULLY pry inward on either end of the switch retainer / switch assembly at the top of the opening so that the switch assembly can be pulled out toward you.  I broke mine when removing, it's very difficult to remove and I put a little too much force, but the switches will still mount just fine 28) Looking/feeling up into the top of the center console you should find two bolts, one at each end, connecting the center console to the center of the dash. The nuts are on the bottom, remove them while trying to not drop them into the abyss. The tops of the bolts are visible through the opening where the center vent was, and a clip should be holding each of them in place. Slide the clips forward (again trying to avoid dropping them into aforementioned abyss) and pull both bolts up and out.   The nuts are not torqued on tightly. If the bolt spins simply hold it from up top 29) Lift each end of the dash, it should be free. if not then feel free to comment on whatever I forgot. 30) Reach into the center vent opening and push upward on the dash as close to the defrost vents as you can get. The defrost vents slide down into the ducts and don't easily come out when removing the dash. Missing this step will leave the rubber seals in less than optimum condition.  I removed the passenger side A pillar trim. Also my dash was fighting me to remove it once I got it off of the ducts and since I was replacing it I just ripped it out and the passenger side gave out. So if you are reusing the dash then remove it carefully 
|
|
#14
03-13-2013, 05:27 PM
|
||||
|
||||
 My original dash was different than the dash I used which was out of a '92. Mine had tabs to hold onto the sound deadening material. I should have kept the stuff from the '92 I got the dash from. I also had a screwed up seal on the ducts so I removed the entire duct from the old dash that had a good seal and swapped it over. 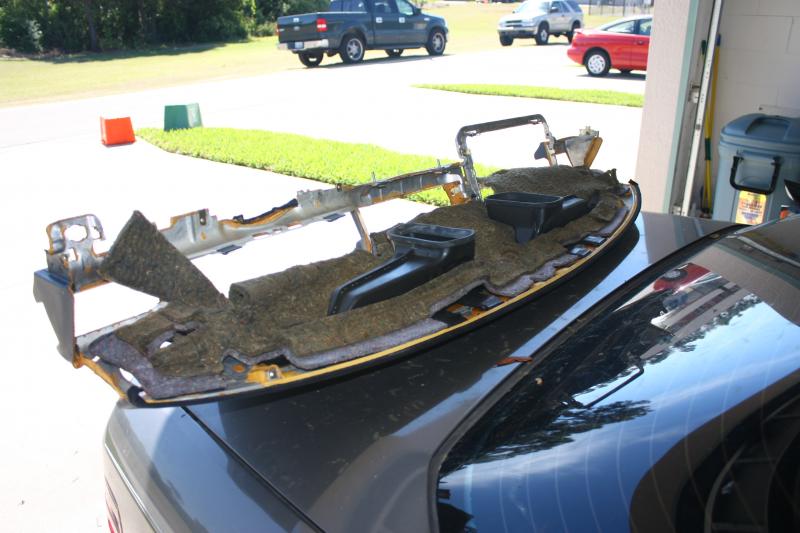 since I did not have the tabs re installing the dash with the interior pad was a little difficult when I needed to seat the ducts but I made it work.  This is what you can expect once the dash is back in. Any questions feel free to ask.
|
 |
| Bookmarks |
|
|


 Hybrid Mode


