

|
|
|
|
|
|
#1
 05-03-2009, 05:30 PM
|
||||
|
||||
|
W126 Outside temperature Display installation in a W123 (300D)
This thread is a pictorial of my install of a w126 Outside Temperature Display Unit in my 1983 300D.
I got this nifty idea from fellow forum member Biodiesel300TD in this THREAD. All my other vehicles have an outside temperature display and find it very useful information to have.  I found a donor unit from a 1983 380SE including the wire harness at my local wrecking yard. I also picked up a backup unit from a 1987 w126. If I am not mistaken, I believe you can get these units and wire harness from 1981-1991 w126s. This is the salvaged w126 components that are needed for the install in my 300D. (The mounting hardware is not salvaged.)  The display unit I have is in Celsius. Here is a picture of one in Fahrenheit.  The Celsius unit takes getting use to. But I have these guidelines in my mind. C = F 0 = 32 5 = 41 10 = 50 15 = 59 20 = 68 25 = 77 30 = 86 35 = 95 Or using a forumula. F = (C x 9 / 5) + 32 Or this formula F =((Cx2)-10%) + 32 The Temperature Display Box/Brain will be inserted in the lower slot of the instrument cluster. 2 ½ inch screws and 1 ½ inch spacers will be needed. Also the box does not fit level with the existing screw holes. I used washers to make an adjustment.  As you can see the Temperature Display does not sit flush with the back of the W123 cluster. So longer screws and a spacer is needed.  In this pic the top cluster is from a w126. Notice the Temperature Display Box is entirely enclosed by the cluster. The center cluster is my W123 mock-up piece in which you can see the Temperature Display Box protruding out from the back. Also notice the circuit board is exposed. I later put a flat piece of plastic from a plastic yogurt container to shield the circuit board. The last cluster is my original 300D cluster ready for the Temperature Display to be installed.  This is the Outside Temperature Display sensor or probe. I installed it behind the license plate similar to the stock location found in the W126.  Continued...
__________________
1983 123.133 California - GreaseCar Veg System 
Last edited by DeliveryValve; 05-03-2009 at 05:50 PM. 
|
|
#2
05-03-2009, 05:33 PM
|
||||
|
||||
|
The Next couple of pics are how the wires are routed along the drivers side wheel well.
I ran them along with the existing wiring using the existing factory zip ties.   This pic is where the probe wire connects to the interior wire loom which go through the grommet on the firewall.  This is a shot of inside of the dash with the cluster out. The power window relay mounted behind the instrument cluster gets in the way of the Temperature Display Unit/Box. The instrument cluster will not seat all the way in with the relay in the way. 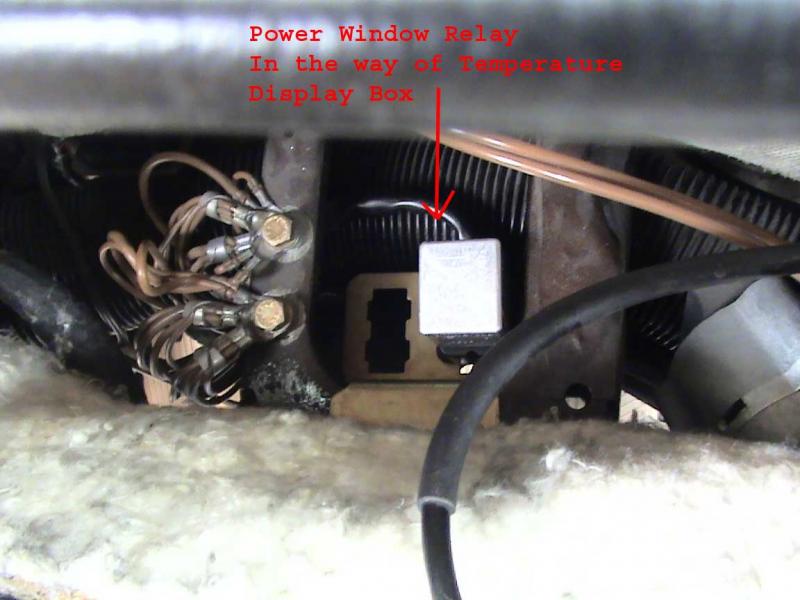 I ended up taking out the bracket and bending it downward. After repeated testing with the Mock-Up cluster, I finally found the correct position the relay should be in without any interference. I also ended up moving the power window relay to the left slot on the bracket. 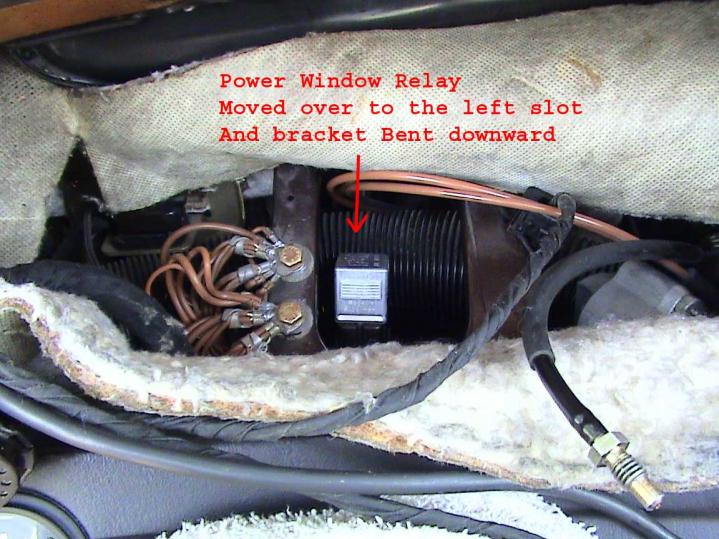 Continued..
__________________
1983 123.133 California - GreaseCar Veg System
|
|
#3
05-03-2009, 05:36 PM
|
||||
|
||||
|
Installation of the wire loom.
1. The thick black wire is 12v power for Illumination. I ended up connecting this to the headlight switch. 2. The Red/Black strip wire is connected to 12v switch power. I ended up using the #2 fuse on the fuse block from underneath the dash for switched power. 3. There are two brown ground leads. The first one is the common ground. I end up using the ground connections near the power window relay. 4. The second brown wire is the ground for the Temperature Probe. 5. The green wire is the signal for the temperature Probe.  Here is a shot of the connection for Illumination Power. The switch power connection is a little harder to get a shot of. Since it is buried deep in the dash.  A shot of the finished wire loom and plug.  Plug it all together and enjoy your new display! .
__________________
1983 123.133 California - GreaseCar Veg System
|
|
#4
05-03-2009, 05:40 PM
|
||||
|
||||
|
Salvage Party! Salvaging the W126 Sensor.
Here is some shots of salvaging the wire loom from a w126.
The first pic is the stock location of the Outside Temperature Display Probe/Sensor.  I carefully removed the mounting clips (be sure to keep them for mounting in your car) along the lower radiator support and snaked the wire out.  Here is a shot of the probe wire along the wheel well of the W126. 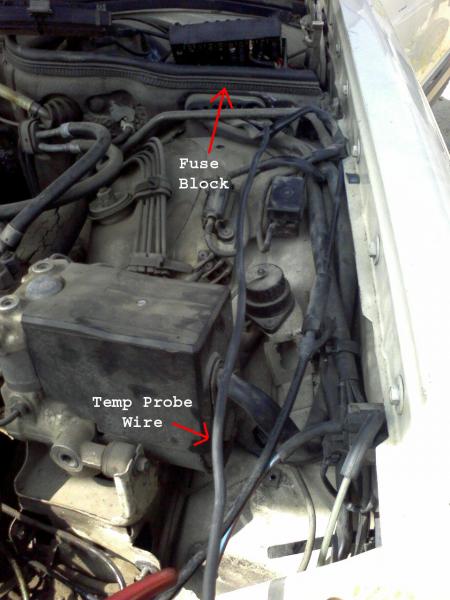 The main connector is located underneath the fuse block on the drivers side wheel well. You will have to lift the fuse board up to get at the connector. Cut the connector out so you can pull the brown and green wire from the cluster side and pull the wire out of the fuse box from the probe side. You will need to resolder the connectors.  As far the wiring in the cluster area. Get as much of it as you can. You might need to extend the wiring if you need to. Hope this helps. .
__________________
1983 123.133 California - GreaseCar Veg System
Last edited by DeliveryValve; 05-04-2009 at 10:37 PM.
|
|
#5
05-04-2009, 02:15 AM
|
||||
|
||||
|
Sweet write up! Now I want to do it on mine.
Maybe you'd like to make a kit for it...  I'd happily get one from you! I'd happily get one from you!
__________________
http://farm8.staticflickr.com/7271/7...144c3fc1dc.jpg
|
|
#6
05-04-2009, 03:45 AM
|
|||
|
|||
|
Well Done !!!!
Very Very Nice, Great Job and well documented and engineered.
Now I am off to the PNP, My '83 300D is my winter ride and that 0*Deg will be helpful to determine road conditions. Thanks,
__________________
Gary Experience is something you get, Just after you needed it.... '99 E300 295K, '83 300D 220K, '75 240D 185K sold '80 MCI Bus Conv DD 6V92TA, w/4 cyl. Kubota diesel GenSet 12.5KW
|
|
#7
05-04-2009, 03:05 PM
|
||||
|
||||
|
Well done.
__________________
 "Buster" in the '95 Our all-Diesel family 1996 E300D (W210) . .338,000 miles Wife's car 2005 E320 CDI . . 113,000 miles My car Santa Rosa population 176,762 (2022) Total. . . . . . . . . . . . 627,762 "Oh lord won't you buy me a Mercedes Benz." -- Janis Joplin, October 1, 1970
|
|
#8
05-04-2009, 03:11 PM
|
||||
|
||||
|
Very nice write up. I am just glad MB put one of those in mine so I dont have to go through all that. I do keep looking at the dash in my focus for the time and for the temp.
__________________
1984 300SD Orient Red/ Palomino 1989 560SEC 2016 Mazda 6 6 speed manual 1995 Ford F-150 reg cab 4.9 5speed manual
|
|
#9
05-04-2009, 03:18 PM
|
||||
|
||||
|
Nice! Very professional and well done. My latest project has been converting memory seats to non-memory for installation into an older car. Maybe I will make a pictorial of the next one I do.
 I see the donor car was a gasser....seems they all end up in the yard.
__________________
-diesel is not just a fuel, its a way of life-  '15 GLK250 Bluetec 118k - mine - (OC-123,800) '17 Metris(VITO!) - 37k - wifes (OC-41k) '09 Sprinter 3500 Winnebago View - 62k (OC - 67k) '13 ML350 Bluetec - 95k - dad's (OC-98k) '01 SL500 - 103k(km) - dad's (OC-110,000km) '16 E400 4matic Sedan - 148k - Brothers (OC-155k)
|
|
#10
05-04-2009, 04:19 PM
|
|||
|
|||
|
Later displays!
Just as an addendum to the OP's nice work. 123 owners looking to do such an install might prefer to use a later 126 display. The later 126 displays are available in F only so if you want a C display this post won't apply. Later displays do not have a large exposed circuit board as the C displays do. The later circuitry has been integrated and reduced in size to a very small board positioned closer to the LCD. As a result the plastic case can be shortened to fit the 123 cluster application. The case can be opened and the wiring/display guts removed, then the empty case reassembled, a slice the requisite width can be cut out, then the two case parts can be glued back together resulting in a shortened case that fits better. The plastic case is ABS and can be glued with ABS cement available at True Value Hardware stores (much of the MB plastic is ABS so having a can of the transparent ABS cement is quite handy to have around) The connector pins are just put back in place and the wiring bent around a little to fit the shorter case. I don't have a picture of a modified case but this is a picture of a later case and the arrangment of it's parts, good luck!

|
|
#11
05-04-2009, 04:33 PM
|
|||
|
|||
|
Looks good! I just also finished adding the display to my 300sd. The only thing I would have done differently to mine would be to wire the the backlight to the circuit controlled by the dimmer, as the temp gauge is much brighter than the dash lights.
__________________
"spreading a trail of obnoxious where ever we go" 1981 300sd w/ 341,500 miles http://www.wecrash.com/pics/ddda_banner.gif
|
|
#12
05-04-2009, 04:37 PM
|
||||
|
||||
|
I want to do this, back the JY to get the parts. 3 new W126's arrived last week.
__________________
1985 300TD Turbo Euro-wagon 1979 280CE 225,200 miles 1985 300D Turbo 264,000 miles 1976 240D 190,000 miles 1979 300TD 220,000 GONE but not forgotten 1976 300D 195,300 miles 1983 300D Turbo 175,000 miles http://i42.photobucket.com/albums/e3...e485-1-2-1.jpg
|
|
#13
05-04-2009, 09:38 PM
|
||||
|
||||
|
Quote:
.
__________________
1983 123.133 California - GreaseCar Veg System
|
|
#14
05-04-2009, 09:42 PM
|
||||
|
||||
|
Quote:
.
__________________
1983 123.133 California - GreaseCar Veg System
|
|
#15
05-04-2009, 09:43 PM
|
||||
|
||||
|
Thanks for the Props everyone!

__________________
1983 123.133 California - GreaseCar Veg System
|
 |
| Bookmarks |
|
|


 Linear Mode


