

|
|
|
|
|
|
|
|
#1
 09-02-2010, 01:52 AM
|
||||
|
||||
|
A subframe question (just the beginning ...)
Today I bit the bullet and ordered all the rear subframe linkage for my 87 300D, which is pretty much just decrepit back there at this point. Other than the swaybar, sway links and shocks, everything is original, and it's time for the next round. I'm also planning on swapping out the subframe itself for one I got from an 88 300E ... mine has a crack under the diff (which can probably be welded, but I have this nice frame in my shed so might as well use it).
The only thing I didn't order was springs ... they don't look bad and I'm not sure how to assess whether they ought to be replaced, too. One thing I can tell you is my car lilts to the right in the rear ... perceivably. Is that likely because of the worn linkage, or should I consider it a sign the springs are in need of replacement as well? To be honest, I'm not entirely sure the physics or what holds what up, beyond the basics. I don't want to finish the job and have it still lilt because I left worn springs in there, but I also don't want to throw out perfectly good springs. Thoughts would be appreciated. I won't start this project for a couple weeks at least, so take your time. I also might wimp out and take it to my indy ... 
__________________
1987 300D, arctic white/palomino--314,000 miles 1978 240D 4-speed, Euro Delivery, light ivory/bamboo--370,000 miles 2005 Jeep Liberty CRD Limited, light khaki/slate--140,000 miles 2018 Chevy Cruze diesel, 6-speed manual, satin steel metallic/kalahari--19,000 miles 1982 Peugeot 505 diesel, 4-speed manual, blue/blue, 130,000 miles 1995 S320, black/parchment--34,000 miles (Dad's car) 
|
|
#2
09-02-2010, 04:49 AM
|
||||
|
||||
|
some one should be able to tell you the free length of the springs, as you look like you are going to have a complete disassemble/rebuild you will be able to check the lenght.
__________________
Grumpy Old Diesel Owners Club group I no longer question authority, I annoy authority. More effect, less effort....  1967 230-6 auto parts car. rust bucket. 1980 300D now parts car 800k miles 1984 300D 500k miles  1987 250td 160k miles English import  2001 jeep turbo diesel 130k miles  1998 jeep tdi ~ followed me home. Needs a turbo. 1968 Ford F750 truck. 6-354 diesel conversion. Other toys ~J.D.,Cat & GM ~ mainly earth moving
|
|
#3
09-02-2010, 08:25 AM
|
|||
|
|||
|
Spring replacement is relatatively minor
 compared to the rest of the job. I'd do all else then see if the listing to the side is still there. Also, spring compressor is not absolutely required, but does make it easy. compared to the rest of the job. I'd do all else then see if the listing to the side is still there. Also, spring compressor is not absolutely required, but does make it easy.
__________________
Hanno '79 6.9 Sold (after 27 years) '83 280SL, 5 spd. '94 E320 Sdn. 5 spd conversion '02 E320 Sdn.(on loan to mom!) '87 300E (5 spd. conversion) Sold '05 E500 Wagon
|
|
#4
09-02-2010, 08:34 AM
|
|||
|
|||
|
I agree with Hanno, dropping the subframe is a big, big job. By comparison spring replacement is about 2% of the total job - I'd keep your springs and see how things look. It's certainly possible a collapsed subframe bushing could cause the car to sag on one side a little bit.
One thing you want to check before you go too far with this plan is the bolts that hold the subframe to the unibody. They are usually very tight and 25 years of living in a fairly corrosive environment doesn't help. If you snap one of these bolts off you are going to have a much bigger job on your hands. Here are some pictures from Dave's website that show various stages of the process. http://www.w124performance.com/images/W124_subframe/
__________________
98 Dodge-Cummins pickup (137K) 13 GLK250 (157k) 06 E320CDI (341K) 16 C300 (89K) 82 300GD Gelaendewagen (54K)
|
|
#5
09-02-2010, 12:24 PM
|
||||
|
||||
|
Quote:
Yes, my bolts do look pretty corroded. Are there steps I can take to make sure I don't snap one (aside from the obvious PB Blaster soaking)? Or is this a case of assuming it's going to snap no matter what. If it's a strong likelihood, I guess I may reconsider ... that could turn into disaster fast.
__________________
1987 300D, arctic white/palomino--314,000 miles 1978 240D 4-speed, Euro Delivery, light ivory/bamboo--370,000 miles 2005 Jeep Liberty CRD Limited, light khaki/slate--140,000 miles 2018 Chevy Cruze diesel, 6-speed manual, satin steel metallic/kalahari--19,000 miles 1982 Peugeot 505 diesel, 4-speed manual, blue/blue, 130,000 miles 1995 S320, black/parchment--34,000 miles (Dad's car)
|
|
#6
09-02-2010, 12:27 PM
|
||||
|
||||
|
to prevent bolt breakage, after you have the car secured on stands, hit all bolts with a BFH I mean wail on them serious, then soak them down with aerokroil or PB blaster. try to get the spray on the bolt threads from inside the framerails if you can.
__________________
John HAUL AWAY, OR CRUSHED CARS!!! HELP ME keep the cars out of the crusher! A/C Thread "as I ride with my a/c on... I have fond memories of sweaty oily saturdays and spewing R12 into the air. THANKS for all you do! My drivers: 1987 190D 2.5Turbo 1987 560SL convertible 1987 190D 2.5-5SPEED!!!  1987 300TD 2005 Dodge Sprinter 2500 158"WB 1994GMC 2500 6.5Turbo truck... I had to put the ladder somewhere!
|
|
#7
11-08-2010, 08:23 PM
|
|||
|
|||
|
Quote:
|
|
#8
09-02-2010, 01:11 PM
|
||||
|
||||
|
PB blaster is no comparison to AeroKroil. The runner-up is Liquid Wrench Penetrant. I use it with excellent results.
__________________
-diesel is not just a fuel, its a way of life- '15 GLK250 Bluetec 118k - mine - (OC-123,800) '17 Metris(VITO!) - 37k - wifes (OC-41k) '09 Sprinter 3500 Winnebago View - 62k (OC - 67k) '13 ML350 Bluetec - 95k - dad's (OC-98k) '01 SL500 - 103k(km) - dad's (OC-110,000km) '16 E400 4matic Sedan - 148k - Brothers (OC-155k)
|
|
#9
09-02-2010, 01:35 PM
|
||||
|
||||
|
Quote:
__________________
1987 300D, arctic white/palomino--314,000 miles 1978 240D 4-speed, Euro Delivery, light ivory/bamboo--370,000 miles 2005 Jeep Liberty CRD Limited, light khaki/slate--140,000 miles 2018 Chevy Cruze diesel, 6-speed manual, satin steel metallic/kalahari--19,000 miles 1982 Peugeot 505 diesel, 4-speed manual, blue/blue, 130,000 miles 1995 S320, black/parchment--34,000 miles (Dad's car)
|
|
#10
09-02-2010, 01:51 PM
|
|||
|
|||
|
Quote:
The subframe bolts use blue threadlock so as with any blue threadlocked fastener a very useful tactic is to use a propane torch to heat the fastener for a minute or two perhaps. The fastener doesnt need much heat, blue threadlock softens at about 150 F so if you get the head of the bolt a little too hot to touch with your finger thats about right. In the case of the subframe bolts heating the head will by convection heat the treaded shaft so you shouldnt have any problem. I have done complete subframe rehabs on 4 or 5 of my personal 124 cars and on a pair of my 201 cars and have never had a problem with a subframe mount bolt, Ive done another dozen or so on other cars and the only problem was one car that had been hit in the rear, the subframe tweaked and as a result the bolt and its receptacle where bent some which put some lateral friction on the bolt as it was being removed. The bolts and nuts securing the various multi links will deserve some attention where a penetrant like Kroil is well worth the $15 a can costs. With regard to the rear springs, try to get a look at the ends of the springs, there is a tendency for the first coil or a portion of it to break off with age and mileage. Its kind of hard to see it because its down inside the rear LCA. I havent priced springs of late but they used to be about $100 for the pair, it would seem a relatively small additional investment to have a new rear suspension! New rubber spacers would be in order also but youll really need to get everything installed and rode in before you can determine the actual ride height and what thickness spacer will be appropriate.
|
|
#11
09-03-2010, 08:06 AM
|
|||
|
|||
|
Quote:
The heat trick sounds like a good play but I'm always a little leery of using heat in the immediate vicinity of rubber (like subframe bushings) once that kind of rubber starts to burn it can be non-trivial to put out the fire, and boy does it generate a lot of black acrid smoke!!! Maybe heating the whole assembly with an electric heat gun would be a good way to go? One other thing worth noting in Dave's pictures is that he jacked up the rear of the car but left the front wheels on the ground - even if you have access to a lift I'd recommend this approach because sometimes if a car is on a lift and you remove a very heavy component (like a subframe) it can actually upset the balance to the point where the car can become unstable on the lift. With the front wheels on the ground (and properly secured) this would not be an issue.
__________________
98 Dodge-Cummins pickup (137K) 13 GLK250 (157k) 06 E320CDI (341K) 16 C300 (89K) 82 300GD Gelaendewagen (54K)
|
|
#12
09-03-2010, 01:10 AM
|
||||
|
||||
|
Bodhi,
The ASME did tests s few years ago on various anti seize products. The best result by far was a 50/50 mix of acetone (nail polish remover) & atf. I guess you have both of these!! Give it a try, it works for me. I get into trouble for "borrowing" nail polish remover, but what the heck!!
__________________
Grumpy Old Diesel Owners Club group I no longer question authority, I annoy authority. More effect, less effort.... 1967 230-6 auto parts car. rust bucket. 1980 300D now parts car 800k miles 1984 300D 500k miles 1987 250td 160k miles English import 2001 jeep turbo diesel 130k miles 1998 jeep tdi ~ followed me home. Needs a turbo. 1968 Ford F750 truck. 6-354 diesel conversion. Other toys ~J.D.,Cat & GM ~ mainly earth moving
|
|
#13
11-08-2010, 08:25 PM
|
|||
|
|||
|
Great
Quote:
|
|
#14
11-09-2010, 01:02 PM
|
||||
|
||||
|
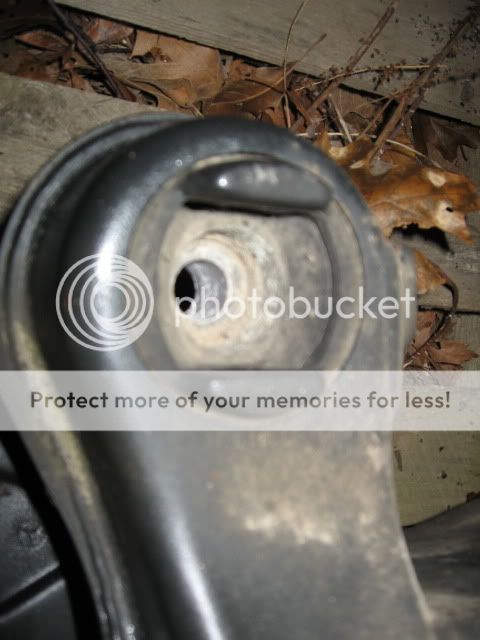
These are not going to come off. For anything. I am never going to finish this stupid project. Should I try firing the torch up bthe bottom of the mounts? I am prying with a huge prybar, and have also tried a chisel and a wood splitter with a big hammer. They don't break because the rubber gives and can't possibly exert enough force. And I can't seem to get anything onto the metal part of the bushing to avoid that.
__________________
1987 300D, arctic white/palomino--314,000 miles 1978 240D 4-speed, Euro Delivery, light ivory/bamboo--370,000 miles 2005 Jeep Liberty CRD Limited, light khaki/slate--140,000 miles 2018 Chevy Cruze diesel, 6-speed manual, satin steel metallic/kalahari--19,000 miles 1982 Peugeot 505 diesel, 4-speed manual, blue/blue, 130,000 miles 1995 S320, black/parchment--34,000 miles (Dad's car)
|
|
#15
11-09-2010, 05:06 PM
|
|||
|
|||
|
Quote:
 The one from above shows why that approach won't work; until you stretch the rubber enough youll never reach the mounts metal bushing. So forget that for now, although some penetrant in and onto the stud could only have helped. From below does your view match this picture? 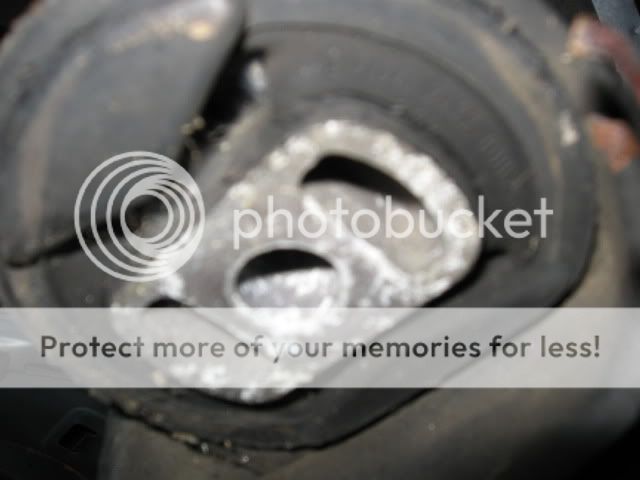 If so that is where your efforts should be directed! It looks like the entire metal bushing is exposed. What you need to accomplish is to hit that hard with a decent hammer and punch/drift/chisel. You want to hit it so that you are rotating it around the tubular stud at its center. Give it a hard whack on one side and then the other, you just need it to break free and move a little. You want to direct your blows in the direction of the poorly drawn Chartreuse arrow points and attempt to get the mount to move in that rotation. 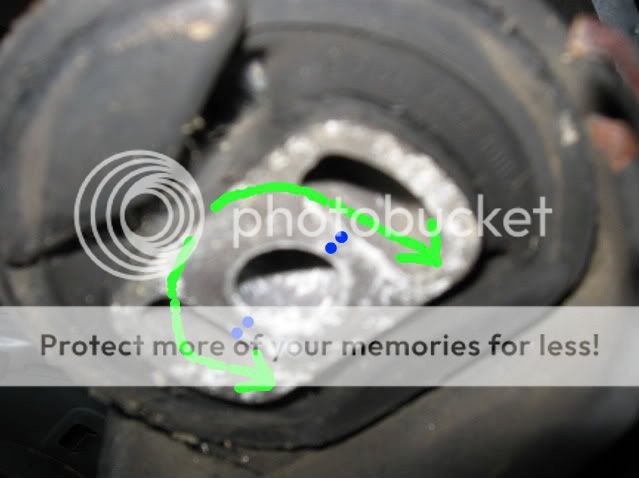 Before doing that if you're worried about the subframe falling just reinstall a couple of the mount bolts, the other rear one and the diagonally opposite front one, that way it can't come crashing down. You don't need them turned all the way home just a couple rotations, clean any residual thread lock off before you do and it will make it a little easier, just be careful and make sure the bolts are straight and square you don't want any cross threading. With everything secured try and hit the metal bushing to turn it, if you dont get some results after the first ten or twenty hits, you could try heating the metal bushing with a torch, just have some water or an air blowgun at hand to keep things from getting out of hand and of course a fire extinguisher so you don't burn the place down. Get it hot, it doesn't need to be red or anything like that, just too hot to touch. Then give it the heavy hammer treatment again. If by some chance you still are unsuccessful, you can destroy the metal bushing itself, hopefully you've got a decent drill and a cobalt bit or two. Depending in the size of the bit you have drill a hole or holes straight upwards in parallel with the tubular stud. I put a couple blue spots in the general place which appears to be the weakest part of the metal bushing where you would drill! That alone might do the trick, especially is you carefully wobble the spinning drill gouging the sided of the hole/holes some. If not after you've removed as much material as possible with the drill, it's time for a cold chisel and a hammer. Put the chisel across where you drilled and there are only webs of material holding it together and use the chisel to destroy the remaining webs. If you have shop air a pneumatic impact hammer might well work in substitute for a swung hammer and chisel n both these methods, trying to turn/loosen the mount and later if need be splitting the mount off the stud. Usually Harbor Freight has them for around $10-15. I'd try it old school first, but your size and strength might not be enough and the air tool will allow you to use its power and your brain to get it done easier perhaps. Good Luck, don't get discouraged, this stuff is the real deal, anyone can change oil and brake pads! Youre doing great! When it gets time to install your nice pretty new rehabbed sub frame , are we going to slather the inside of those metal bushing and the outside of those tubular studs with Permatex Never-Seize? Your damn right we are!!!!
|
 |
| Bookmarks |
|
|


 Hybrid Mode


