

|
|
|
|
|
|
|
|
#1
 11-03-2013, 09:14 AM
|
||||
|
||||
|
W201 steering box refresh and adjust
G'day Folks,
The weather outside is frightful but inside with a W201 steering box on the living room table it is delightful... {[INTERLUDE] After a great summer the bad weather here has been biting back so I'm already starting on the winter stir crazy projects. I don't think this is limited to Europe either tnbob says it is cold enough to freeze the balls off of a brass monkey where he is too <= well he didn't quite say it like that 'cos he's a gentleman but you get the picture I guess [/INTERLUDE]} ...here's one showing how far you can get with a W201 steering box refresh. It isn't as far as the average DIYer can get with a W114/115 W123 W126 steering box which is a shame. The seals in the input shaft shaft cap are more or less unchangeable without special tools. I say “more or less” because the FSM shows a circlip which doesn't exist on either of the steering boxes I own (See para 32 and 56 in chapter 46-220). Perhaps on an earlier or different W201 steering box the front seal on this cap can be changed? I dunno – can anyone help with more information? Anyway to help with the job the FSM is easily and publicly available here => http://www.startekinfo.com/StarTek/outside/11832/Resources/201Create/PDF/10011.pdf I must confess that I've been struggling with the W201. It isn't like my W123 – it is too small for me really – too much packed into a small space – and for that reason I didn't bother to investigate too far into the depths of the engine bay under the gubbins trying to find the screw on the steering box for the centring pin. The plan was to drain the steering fluid via this hole as you would with a W123 / W126 etc => What a feeling it will be! A properly adjusted W123 / W116 / W126 power steering box I'm not sure if this trick will also work on the W201 but even if it did I think there'd be a lot of fluid still left in the steering box because of the strange angle it is positioned in the car. May be when it is dry and it is time to change my power steering fluid I'll give it a go. Nonetheless I've read that W201s often suffer from power steering fluid neglect so perhaps this DIY will encourage the faithful few to hoik the steering box out of their cars and give them a good spring (or autumn) clean. If you're an avid W201er and you're looking for a bit of weight loss you might be interested to learn that there's an aluminium bodied version of the steering box as well as a cast steel one. The aluminium alloy cased one is about 4 kg lighter. I have both – the aluminium alloy one is the subject of this thread and will be fitted to me motah.  As before – as stated in the thread I did previously for the W123 steering box – I have to say that if you can't get the damn thing out of your car you are probably not the person to be trying to adjust it and reseal it! (See What a feeling it will be! A properly adjusted W123 / W116 / W126 power steering box) Unlike the W123 the Pitman arm and the steering coupler on both of my W201 steering boxes came off easily. The Pitman arm has a bolt and nut that looks a bit like a flex disc bolt and nut and a circlip which needs to be removed    You now need to do something that is really important – very very very important! Make absolutely sure that the steering is in the centre position. You have been warned! If you carry on with the next stage and the steering is not centred then you might as well chuck the part in the bin right now. Unscrew the Allen head screws on the cover of the output shaft and remove the Simmonds nut (plastic insert nut) on the adjusting screw by holding the adjusting screw in its existing position. So if necessary you need spanner in one hand and an Allen key in the other – Allen key in end of adjusting screw and spanner working nut loose. Note how this is a “normal” right hand thread. 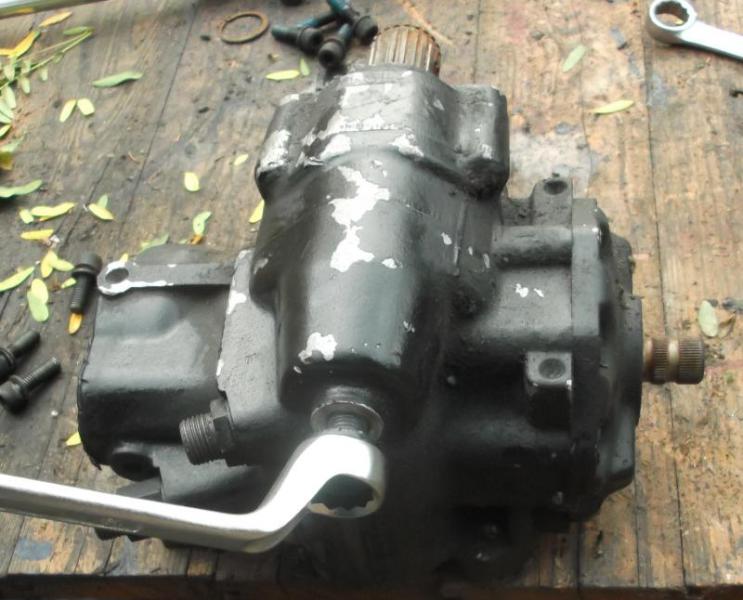
__________________
1992 W201 190E 1.8 171,000 km - Daily driver 1981 W123 300D ~ 100,000 miles / 160,000 km - project car stripped to the bone 1965 Land Rover Series 2a Station Wagon CIS recovery therapy! 1961 Volvo PV544 Bare metal rat rod-ish thing I'm here to chat about cars and to help others - I'm not here "to always be right" like an internet warrior  Don't leave that there - I'll take it to bits! Last edited by Stretch; 11-03-2013 at 10:06 AM. Reason: Added pictures and links and removed a notice 
|
|
#2
11-03-2013, 09:15 AM
|
||||
|
||||
|
Now that you are sure that the input shaft is absolutely in the centre of its travel and that you are absolutely sure that the steering is centred you can turn the adjusting screw in a clockwise direction into the steering box casing.
If you feel any stubborn resistance screw the adjusting screw back out again and check to make sure the steering is centred. If you mess this bit up you'll be singing the “uckety uckety uckety bastard bollocks” song in your garage / workshop / garden for some time afterwards...  Slowly but surely the Pitman shaft creeps out of the steering box case oozing the medieval gunk of unchanged power steering fluid. You can now see how the three teeth on the Pitman shaft / output shaft will make a right mess of the steering box casing if they are not in the correct position. Centre that steering! You can now unscrew the Allen bolts on the cap for the input shaft – twist the cap round if need be and tap the cap and the working piston out of the casing. Use something that won't mark the casing or the cap.  Please note (1) If you unscrew the input shaft out of the working piston (big bit inside steering box) then lots of ball bearings will fall out. It is best to avoid this by screwing the input shaft and cap back into the working piston as you remove it. Please note (2) Those of you who have tried to remove the control valve without removing the working piston will be stuck. The working piston needs to be removed before the control valve can come out. Expect to find some more grotty oil in the steering box casing. 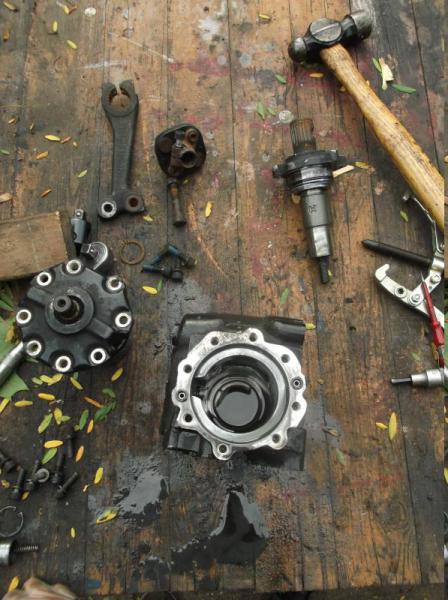 With the working piston out of the casing the control valve cap and eventually the control valve can be removed 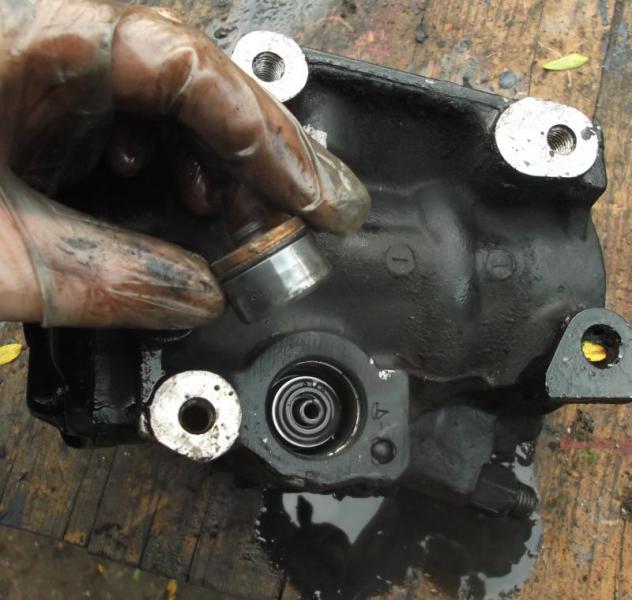 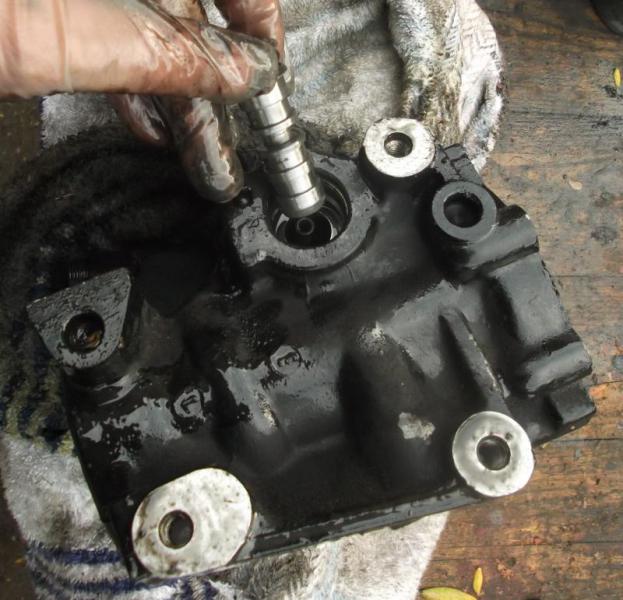 Make sure you don't mix up the springs on the ends of the control valve. The pressure relief valve can also be removed 
__________________
1992 W201 190E 1.8 171,000 km - Daily driver 1981 W123 300D ~ 100,000 miles / 160,000 km - project car stripped to the bone 1965 Land Rover Series 2a Station Wagon CIS recovery therapy! 1961 Volvo PV544 Bare metal rat rod-ish thing I'm here to chat about cars and to help others - I'm not here "to always be right" like an internet warrior Don't leave that there - I'll take it to bits! Last edited by Stretch; 11-03-2013 at 10:09 AM. Reason: Added pictures
|
|
#3
11-03-2013, 09:15 AM
|
||||
|
||||
|
Cleaning the casing is tricky. There are fragile looking roller bearings fitted to the casing that need sympathy whilst you get all of that stinky old power steering fluid out. The outside of the steering box can also be given a good clean and even a repaint if you like. Because this steering box casing is made from an aluminium alloy I decided to degrease and then spray it with black plasti-dip (it is after all a W201). Owners with the cast steel cased versions might want to opt for something like POR15 or Eastwood chassis coatings. Aluminium case owners note – special primer should be used for standard chassis coatings – hence my cheap quick and cheerful one coat plasti-dip solution...
Once the parts are clean find a nice warm dry working environment with some good music and coffee or tea on tap.  The FSM recommends that you check the friction of the ball bearing race in the working piston prior to removing the input shaft and the ball bearings. This is arguably worthwhile doing as it potentially gives you an idea if you are going to have trouble. In a commercial environment you'd probably say “it failed the test” so “replace the lot” - as a DIY mechanic you might want to fiddle about with things to try and coax some extra life out of the parts (especially when you see how expensive the parts are). To measure the friction you either need a fancy torque wrench and an adapter that fits onto the input shaft (both expensive) or you need to improvise a balance bar. You also need to know how to calculate torque. It isn't rocket science – I've explained it in this thread What a feeling it will be! A properly adjusted W123 / W116 / W126 power steering box but for ease of reading I'll add in a quote of what I wrote. However please note the W123 steering box is subtly different to this W201 one. Quote:
So measure up a set of balance weights  Fit your improvised balance bar to the input shaft – make sure it is level – hang your weights on the end of the bar and see where it “just” moves. Calculate the torque and compare with the limit of 5 – 50 Ncm. Note as usual the torque is in newton centimetres NOT metres!  You can now unscrew the input shaft from the working piston and catch all of the ball bearings as they fall out – or hold it vertically!  You should have 17 + 6 = 23 ball bearings in total.  You can now knock the locking tabs away from the bolts on the detachable U tube section of the working piston...  ...and take out the two halves of the detachable race.
__________________
1992 W201 190E 1.8 171,000 km - Daily driver 1981 W123 300D ~ 100,000 miles / 160,000 km - project car stripped to the bone 1965 Land Rover Series 2a Station Wagon CIS recovery therapy! 1961 Volvo PV544 Bare metal rat rod-ish thing I'm here to chat about cars and to help others - I'm not here "to always be right" like an internet warrior Don't leave that there - I'll take it to bits! Last edited by Stretch; 11-03-2013 at 10:40 AM. Reason: Added pictures
|
|
#4
11-03-2013, 09:16 AM
|
||||
|
||||
|
Now that the working piston has been removed from the case and the input shaft has been separated you can see the large tricky six slot nuts that need a special tool for removal. Without the special tool you can't dismantle the cover and replace the seals on the input shaft and the cap; and you can't dismantle the steering nut to check the bearing races within the working piston.
  I'm going to try and design a special tool much like the one I did for the W123 steering box (What a feeling it will be! A properly adjusted W123 / W116 / W126 power steering box) but I have to make some calculations first because there will be a lot of stress applied to the castelations when applying the monster 220 – 240 Nm torque needed for the input shaft cap; and the monster 200 – 240 Nm torque needed for the steering nut assembly. I've got a nasty feeling special tool steel and perhaps heat treating will be required. I have looked for alternative special tools – laser tools in the UK do a good range but I haven't found anything that could be used yet. At the moment this is a low priority though. Assuming you don't have an appropriate tool to loosen and tighten those slotted nuts the next best thing you can do is hope that the seals on the input shaft don't leak! I realise it isn't an ideal situation but I can't see any way for the average DIY bod to do anything else. You can, however, check the friction of the steering nut. Not that there's much you can do about it if it isn't correct but if it is really stiff a quick spray with brake cleaner quickly followed by copious amounts of ATF / power steering fluid might help. If it flops about under its own weight this might be why the power steering seems to have a mind of its own. If you hold the working piston in this position...  ...and the steering nut drops then you might want to consider a replacement steering box or coming up with your own solution to that special tool. The friction should be 6-10 Ncm (Para 74 in FSM) Checking the friction of the input shaft in the cover can also be done.  The friction of input shaft in cap should be between 4 Ncm and 7 Ncm (Para 63) If these values are out of whack you might want to consider finding a second hand replacement steering box. Alternatively you might want to take a risk – reassemble the steering box and see if it is any better. Clean up the working piston, the input shaft and the cap as best as you can before you change the large O ring on the input shaft cap. 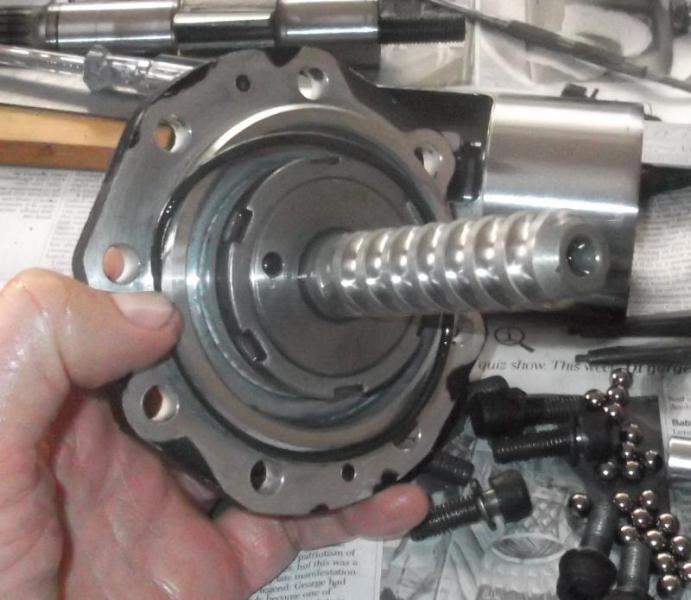
__________________
1992 W201 190E 1.8 171,000 km - Daily driver 1981 W123 300D ~ 100,000 miles / 160,000 km - project car stripped to the bone 1965 Land Rover Series 2a Station Wagon CIS recovery therapy! 1961 Volvo PV544 Bare metal rat rod-ish thing I'm here to chat about cars and to help others - I'm not here "to always be right" like an internet warrior Don't leave that there - I'll take it to bits! Last edited by Stretch; 11-03-2013 at 10:14 AM. Reason: Added pictures
|
|
#5
11-03-2013, 09:17 AM
|
||||
|
||||
|
Note how the two halves of the detachable bearing race fit to the working piston. Remember that this is a recirculating ball steering box if the balls go the wrong way you'll be in trouble! The U tube halves have little extensions that stop this you can't fit them the wrong way round so don't worry.
 Place some grease in one half of the U tube detachable races to temporarily hold six ball bearings in place.  Position the input shaft into the working piston so that the first part of the helix on the input shaft is just visible in the first hole in the back of the steering nut where the ball bearings will be fitted. Drop 17 ball bearings into the steering nut whilst slowly turning the input shaft into the steering nut and working piston assembly. Make sure you put back 17 ball bearings. Make sure you put them in the correct side of the race look at the extensions on the detachable U tube halves if you need a reminder... ...if you get to the point where ball bearings start coming out of the other hole then you've probably left too much of a gap between the ball bearings when inserting them or you started with the input shaft too far into the steering nut. Shake them out start again.  When you have 17 ball bearings in the steering nut / working piston assembly you can join the two halves of the U tube bearing race with the remaining six ball bearings and fit it in position.  After assembly friction of the bearing race circuit in the working piston assembly needs to measured.  All of this friction testing is important because the combined friction of the steering nut, input shaft cap and the recirculating ball bearing circuit is used to set the friction of the whole steering box adjustment later on. If the final adjustment is incorrect then the box will prematurely wear and possibly feel horrible when fitted to the car.
__________________
1992 W201 190E 1.8 171,000 km - Daily driver 1981 W123 300D ~ 100,000 miles / 160,000 km - project car stripped to the bone 1965 Land Rover Series 2a Station Wagon CIS recovery therapy! 1961 Volvo PV544 Bare metal rat rod-ish thing I'm here to chat about cars and to help others - I'm not here "to always be right" like an internet warrior Don't leave that there - I'll take it to bits! Last edited by Stretch; 11-03-2013 at 09:39 AM. Reason: Added pictures
|
|
#6
11-03-2013, 09:17 AM
|
||||
|
||||
|
Before the working piston can be fitted to the casing there's a tricky O ring and PTFE ring that needs to be replaced. Take your time with these seals.
  If you have big hands you might want to change the O ring that is behind the roller bearings in the case next to the adjustment screw thread. It doesn't have to be done just yet though. The control valve also needs to be fitted next because the end of the steering nut (in the working piston) slots into the middle of it. To stop the springs on the control valve from falling out during installation put a bit of grease on the ends. Again make sure you don't mix up the springs on the ends of the control valve.  Fit the control valve in the casing.  
__________________
1992 W201 190E 1.8 171,000 km - Daily driver 1981 W123 300D ~ 100,000 miles / 160,000 km - project car stripped to the bone 1965 Land Rover Series 2a Station Wagon CIS recovery therapy! 1961 Volvo PV544 Bare metal rat rod-ish thing I'm here to chat about cars and to help others - I'm not here "to always be right" like an internet warrior Don't leave that there - I'll take it to bits! Last edited by Stretch; 11-03-2013 at 09:44 AM. Reason: Added pictures
|
|
#7
08-19-2015, 07:09 PM
|
|||
|
|||
|
Quote:
Hi Stretch, can you check the FSM (I don't have access) for those torque values? I'm going off the manual 46-0236, it states the torque for the large 6notch nut is 280-320Ncm... but you have 220-240Nm I decided to try loosen the nut with a tap of the club hammer and a punch, and it came off after a solid touch (but not medium or heavy on the hammer scale). It allowed me to change the input shaft seal. and I've tightened it up with a few touches of the punch and club hammer. 300Ncm is like 3Nm, or 26.5 lb-in, its nothing
|
|
#8
08-20-2015, 04:05 AM
|
||||
|
||||
|
Quote:
The friction of the shaft is in newton centimeters but I can't see a Ncm friction torque in the FSM for that kind of number. If you look in post #1 you will see a link to the FSM on startekinfo - this is the whole chapter 46 PDF I'm a bit nervous for you now you've taken off that nut and have no way of applying the correct torque - you're gonna have to go for five white knuckles or more!
__________________
1992 W201 190E 1.8 171,000 km - Daily driver 1981 W123 300D ~ 100,000 miles / 160,000 km - project car stripped to the bone 1965 Land Rover Series 2a Station Wagon CIS recovery therapy! 1961 Volvo PV544 Bare metal rat rod-ish thing I'm here to chat about cars and to help others - I'm not here "to always be right" like an internet warrior Don't leave that there - I'll take it to bits!
|
|
#9
11-03-2013, 10:19 AM
|
||||
|
||||
|
Please note - when I write up one of these DIYs I don't expect people to disregard the FSM! I try to give additional "I've been there already" information that will help more than a dogmatic reproduction of what has already been written. This DIY isn't 100% complete - I think it is thorough enough - but if you actually do the job you'll see some gaps.
So use the FSM as well. Come up with a special tool that won't cost much money for those castellated nuts!
__________________
1992 W201 190E 1.8 171,000 km - Daily driver 1981 W123 300D ~ 100,000 miles / 160,000 km - project car stripped to the bone 1965 Land Rover Series 2a Station Wagon CIS recovery therapy! 1961 Volvo PV544 Bare metal rat rod-ish thing I'm here to chat about cars and to help others - I'm not here "to always be right" like an internet warrior Don't leave that there - I'll take it to bits!
|
|
#10
11-15-2013, 04:05 PM
|
||||
|
||||
|
Notes for fitting a W201 steering box
You are meant to use a locking bolt tool in the bottom of the steering box during installation.
Several people on this forum have made their own versions of this tool - and you could too. You could also use your MK1 eye ball and a bit of care => Wind the input shaft until you can see the groove in the working piston  (FYI the groove you can see is the little designer notch near to the end of the working piston shown in this picture ) If you just happen to have the engine out of your W201 you'll find it easiest to fit the steering box now! I seriously wouldn't want to do the job any other way. I locked the steering wheel on the steering lock (which isn't ideal but still pretty tight on my car) and slipped the steering coupler with out the fixing bolts on to the end of the shaft that is connected to the steering wheel.  You can then bung the steering box onto the end of the coupler and wiggle it about to get the three bolts into the steering box by pushing them through from the wheel well. Again the FSM quotes a massive torque for fixing these bolts. I decided to ignore this value for my aluminium bodied steering box - I think that at that torque the bolts would strip. I used loctite to hold them in place. I also used loctite on the coupler bolts 
__________________
1992 W201 190E 1.8 171,000 km - Daily driver 1981 W123 300D ~ 100,000 miles / 160,000 km - project car stripped to the bone 1965 Land Rover Series 2a Station Wagon CIS recovery therapy! 1961 Volvo PV544 Bare metal rat rod-ish thing I'm here to chat about cars and to help others - I'm not here "to always be right" like an internet warrior Don't leave that there - I'll take it to bits!
|
|
#11
03-18-2015, 02:18 PM
|
||||
|
||||
|
Quote:
is this bold text part valid for w126/3 box also? cheers ChO .
__________________
w126 500SEC gen II euro, powered by OM617 turbo stolen from 84 300SD  2.88 diff,EGR blinded 2.88 diff,EGR blindednext wish/project: w114 coupe OM603 powered
|
|
#12
03-22-2015, 02:49 PM
|
||||
|
||||
|
Quote:
Quote:
__________________
1992 W201 190E 1.8 171,000 km - Daily driver 1981 W123 300D ~ 100,000 miles / 160,000 km - project car stripped to the bone 1965 Land Rover Series 2a Station Wagon CIS recovery therapy! 1961 Volvo PV544 Bare metal rat rod-ish thing I'm here to chat about cars and to help others - I'm not here "to always be right" like an internet warrior Don't leave that there - I'll take it to bits!
|
|
#13
03-19-2015, 10:16 AM
|
|||
|
|||
|
Every DIY from Stretch =

__________________
'85 300TD "Puff The Magic Wagon" - Rolling Resto '19 Mazda CX-9 Signature - Wife's sled '21 Morgan 3-Wheeler P101 Edition '95 E300d - SOLD '84 300TD "Brown Betty" - Miss this one '81 240D "China Baby" - Farm grocery getter
|
|
#14
08-17-2015, 08:01 AM
|
|||
|
|||
|
Hi stretch, many thanks for the guide. I'm following it at the minute to reseal my 16v box.
I've hit a little hiccup I think. On the input shaft I've removed all the Allen bolts, and the cap is now free spinning. I understand if I unwind it too much I will drop all the ball bearings, so not keen on that. In your picture you have a lump of wood to 'tap' off the cover (whilst winding in the input shaft) . This is the stage I'm at, I've tried tapping and I've tried wacking, but that working gear assembly with input shaft ain't coming out. It feels like it's against something solid. Did you have to hit it hard to remove? And certain that the valve is removed after the working arm? Not before (as it seems with w123) Thanks Think I'm going to have some fun removing the valve body cap too as I have the cast iron casing, which has nicely rusted it in place!
|
|
#15
08-17-2015, 12:53 PM
|
||||
|
||||
|
Quote:
If you look into the hole where the output shaft was you should be able to see the working piston assembly - perhaps a squirt of penetrating oil in there will help? There might be a bit of muck and oil suction working against you.
__________________
1992 W201 190E 1.8 171,000 km - Daily driver 1981 W123 300D ~ 100,000 miles / 160,000 km - project car stripped to the bone 1965 Land Rover Series 2a Station Wagon CIS recovery therapy! 1961 Volvo PV544 Bare metal rat rod-ish thing I'm here to chat about cars and to help others - I'm not here "to always be right" like an internet warrior Don't leave that there - I'll take it to bits!
|
 |
| Bookmarks |
|
|


 Hybrid Mode


