

|
|
|
|
|
|
#1
 01-11-2005, 01:13 AM
|
|||
|
|||
|
Replacing all shifter bushings on W126 - p.1
Hi
I'm new to the forum, and new to the whole DIY car repair occupation. Having bought a gorgeous '81 300SD (231kmi) a few weeks ago, I've been spending lots of time working on that car, and even more time browsing the Web in general and this forum in particular to learn how it's done (I've had zero car repair experience prior to buying this car). The car was bought to be a biodiesel car, btw, it's been running on B100 ever since. First of all, I'd like to thank all forum members to creating such a wonderful resource. It's really been invaluable for me, and I truly learned a lot. Without it, owning a '81 car wouldn't have been anywhere near as much fun (unless one counts taking the car to the dealer to be fleeced as fun, who knows, in a peculiar way it may be). Having spent a good portion of the last weekend on a seemingly simple task of installing new shifter/shift linkage bushings, I'd like to share my experience, in an effort to spare others of my fate (I've really done it the hard way, like those bad guys in the bar in 'Desperado'). The topic is hardly new (nothing under the sun really is), and with enough determination one can find a lot of this info through searching. I couldn't, however, find all of the necessary stuff layed out in a sufficient level of detail so that a newbie like myself could easily peruse it. The instructions are directly applicable to a W126 w/722.303 automatic transmission, but may be relevant to other cars as well. How does one know that new shifter bushings are needed? Symptoms include, but are not limited to, the following: sloppy shifter (aka excessive shifter play), buzz/vibration of the shifter stick at certain speeds, metallic clunk when shifting, and neutral switch pseudo-malfunction (when you turn the key to start the car, nothing happens, not even a starter solenoid click; after moving the shifter in and out of Park the car starts just fine). What pushed me over the edge is what could be a completely unrelated problem: my car recently started to fail to lock gears when the shifter is put into Park (sometimes the gear would lock, sometimes the car would roll back and the gears would click but not lock). Before diagnosing this further, I decided that having a firm, sure shifter would at least eliminate an "in-between-shift" as a possible problem. Plus, shifter buzz was seriously annoying. The job is a perfect DIY experience: the parts cost next to nothing, no special tools are really needed, and the benefit is very much tangible. Note how I'm not saying how long the job should take: that's because I don't know. "As long as you want it to" would be an honest answer. A quick search would turn up a number of threads that discuss replacing 2 shifter linkage bushings located under the car. What is discussed less is replacing the other 4 bushings located inside the shifter box. Yet, these are related, and replacing all of them at once may save one some time and aggravation. There's 3 kinds of bushings involved in shifter operation (2 of each are needed, Fastlane has all of them). All are made from white/semi-translucent hard plastic: 115 267 09 50 Small bushing, no features, basically just a plastic pipe section. Goes inside the bends of the sping that keeps the shifter pushed to the left (on US cars). http://img.eautopartscatalog.com/hires/W01331642923OES.JPG?width=300&height=300 115 267 12 50 Larger bushing, with a flange on one end, flat otherwise. Also goes inside the shifter box, on two ends of the thick rod that the shifter stick connects to. http://img.eautopartscatalog.com/hires/W01331642114OES.JPG?width=300&height=300 115 992 03 10 Medium-size bushing, tapered towards ends, sort of sandwich-shaped. Goes under the care on the shift linkage. http://img.eautopartscatalog.com/hires/W01331643678FEB.JPG?width=300&height=300 Since the under-car bushings are exposed to the elements, chances are that those will be the first to go. One of them is also relatively easy to replace. On my car (which received its share of neglect from PO) these were completely gone, the long rod (connecting the plate sticking down from the shifter box to the lever plate attached to the transmission on the passenger side) was just hanging loosely, nothing but metal-to-metal contact, producing that worderfully harmonic metallic clunk when shifting. Chances are that replacing these two bushings is all you need. The other 4 bushings cannot be easily inspected, and they also lead an easier life. These's several factors to consider, however. First, if your car is sufficiently old, like mine, odds are all 6 bushings are in a sad shape (even those that you can't see and thus ignore). Second, replacing one of the under-car bushings can be made substantially easier by disassembling the shifter box. The third reason only applies to those who are seriously annoyed by seeing pieces of crap (gum wrap, dead flies, a petrified piece of a french fry to name some examples) sitting on the bottom of the shifter box, so that you can see them every time you shift, but can't easily remove (a shrink would probably have had something to say about the reason #3, had I ever wanted to see one, which I don't, unless it's court-appointed, in which case I probably would other things to worry about... but I digress). First of all, some form of under-car access will be needed, e.g. through jacking it up and putting it on jackstands. The rear under-car bushing is located roughly under the driver seat, so if the front of the car is raised, a bit of extra height may be needed to provide enough clearance. It's possible to see both ends of the long shift linkage rod without raising the car, so that you can inspect those bushings, but if you don't know when they were last replaced, might as well not bother and just get new ones. First, get under the car and remove the long linkage rod. It's held in place by two metal circlips. Before you start, note the orientation of the rod, i.e. on which side the circlips are. You can't really attach it the wrong way (and still be able to shift), but you can waste a lot of time trying (yes, it's OK to ask me how I know). If the old bushings are still there, just crush them with pliers and push out, they should come out real easy. It will be easier if the shifter is put in the 'S' position prior to getting under the car (just make sure your wheels are choked and the parking brake is engaged -- as always). Then disconnect the metal lever that's attached to the side of the transmission. It's held in place by a 10mm bolt with a nut and a washer at the bottom of the plate (you'll need counterhold). There's zero spring action in that metal plate, so odds are that removing the bolt alone won't necessarily make the plate easy to pull off. What works is taking a strong flat-blade screwdriver and jamming in the opening on the bottom of the plate where the bolt used to be (that's why it's good to remove the bolt vs. just loosening it). I actually had more trouble putting the plate back on than taking it off, and it took me a while to realize the simple fact that I just need to jam that screwdriver into the opening harder, and the plate will start slipping on/off real easy. Again, note the metal plate orientation; it'd be hard to attach it the wrong way, but I won't say it's impossible. With the plate off, you can get back from under the car, and get busy cramming the bushing into the hole where it's supposed to be (i.e. the hole where the long linkage rod connects to the plate). I've read about various ways of doing this. The bottomline is that the bushing won't just slip in there, it has to be pushed in with a serious amount of force, which can be applied via vice grips/small press/c-clamp/large-jaw pliers, etc. The bushing is also supposed to get "more pliable" when put in boiling water, to the point when it's "easy" to force in. I personally haven't found the latter to be the case, perhaps I haven't used hot enough water. With the tools I got, it was the easiest to force the bushing in by gently hitting it with a ruber mallet, while resting the plate with the bushing on top of a sufficiently large socket to allow the bushing to protrude on the other side. Whichever way you choose, it'll give you a good idea of what it'll be like to install the other bushing in the other metal shifter linkage plate, the one protruding from the bottom of the shifter box, with the said plate staying in place. This is definitely doable, and is not necessarily hard when done right, but one sure can make it hard (I did). The choice here is to just do it, and disregard the other 4 bushings, or take the plunge and disassemble the shifter, in which case the second plate comes out of the car. I've had my cake and ate it two by doing both (I wasn't sure I'd be able to take the shifter apart, so I first installed the second bushing from under the car). Intermission. Get a beer, then see Part 2. Last edited by whunter; 10-13-2010 at 03:36 PM. Reason: repair links 
|
|
#2
01-11-2005, 01:15 AM
|
|||
|
|||
|
Replacing all shifter bushings on W126 - p.2
Part 2.
If you decide to install the second bushing from under the car, you'll need either a very stong set of fingers or an improvised puller device made out of a sufficiently long bolt, some washers and some spacers, assembled in this order: bolt head, washer, bushing, metal plate, spacer, washer, nut. The idea is to push the bushing with a washer while allowing it to protrude on the other side of the plate by having a sufficiently spacious spacer. Then you just tighten that nut and the bushing will pop right in -- if, and only if, your puller assembly is done perfectly, which is a big if. First, save yourself some aggravation and find a sufficiently long bolt. Second, the washer adjacent to the bushing has to have large enough outside diameter, enough to cover all of the bushing (or it'll start sliding to one side), and small inside diameter to hug that bolt tighly (or the bushing will start sliding inside). Third, the spacer will need to be aligned just so. I used the box end of a 3/4" wrench as a spacer, which is not the best spacer there is, but at least I didn't have to run out to buy it. Doing this right will let you slip that bushing in with minimal cussing (tip: if you contemplated doing with without wearing protective goggles, e.g. because you forgot them topside and it'd be a pain to crawl out from under the car to get them, don't). So that was doing it the hard (but relatively quick) way. Doing it the easy way involves some disassembly inside the car, but you can do it with your softer underside on a leather seat vs. your back on hard cold concrete. First of all, the wooden plate covering the shifter has to be removed. Open your ash tray, and pull the metal tray itself out (it's not fastened, just pull it up and out), then pull the entire drawer further out, ans remove two screws on the top edge. At this point the whole drawer could be taken out. There's some wires going in the back of it, you may just remove them or leave them in, there should be enough slack to just rest the tray next to the central tunnel. Next pull out the coin tray (also not fastened once the ash tray is removed). Next, gently, and I mean very gently, pull the wooden plate covering the shifter box forward, to disengage some plastic tabs, and then slightly up. It'll be held in place by all those switches (window, mirrors, etc). The switches can be easily removed by slipping a finger under the wooden plate and pushing on the spings on each end of each switch, it'll let you to pop it up, at which point the switches can be disconnected (by pulling) and set aside, and the wooden plate can be removed. At this point you'll realize that the shifter box hasn't been made that much more accessible. That's because there's fat black plastic plenum vents, which serve the noble and largely useless purpose of delivering fresh air to rear seats. You'll be able to see 4 10mm bolts that will quite obviously need to be undone, and it's actually possible to slip in a socket on a 1/4" extension and unscrew them. This, however, won't get you far; the shifter box will be loose, but you'd be still unable to pull it out because of the plenum vents. Try it, and you'll realize that the vents have to go. I was intimidated by those vents, and suspected that most of the front console will need to be removed to get to them, and thus tortured myself for a while trying to take the shifter apart with the vents in place. Don't do it. First, remove the driver armrest. This can done as follows: remove two screws at the very bottom of the back of the driver seat, and the back of the seat will come off (not without some pulling though). Inside, you'll find a surprising amount of machinery (given the location). Disregard it and unscrew a large nut on the inside wall of the seat that holds the armrest (don't know the nut size; I used some SAE socket that fit loosely, the nut is not very tight anyway), there's also a toothed washer there; then pull the armrest out. Next, pull the plastic knob off of the lever sticking out from the rear seat fresh air vents, on the back of the central tunnel, and pull out the plastic grill. Remove the piece of carpet covering the "place for all that junk" (formerly right under the driver armrest) and you'll see a hole that contains a Phillips-head screw, most likely concealed by a layer of junk. Remove that screw, and magic will happen: the entire plastic piece covering the central tunnel can now be efforlessly lifted up on one end. You don't really need to lift it too high, but if you feel like it, pull out the radio and undo two screws holding down the wooden plate covering the central instrument console (ACC, rear defroster, etc). Once you lift up the plastic tunnel cover slightly, just pull on the black plenum vents, back and up -- and they'll just come off (it's actually a single Y-shaped piece), leaving the shifter box nicely exposed. Now you can leisurely undo and remove the four 10mm bolts holding the shifter box down. On my car the box was also held by a plastic tie connecting a tab at the bottom of the box to some wires that go around. I just cut it and decided that it's not really needed there. The box actually consists of two pieces, which a thin layer of some porous fabric-like material glued to front and back, holding the top and bottom together. Gently detach that, and the top portion of the box will become loose. You still can't remove it, because the shifter knob gets in the way. No, you can't unscrew the knob at the top on this car, the knob and the stick are one piece, and it screws into a U-shaped piece inside of the shifter box, held down by a 15mm locking nut. Once the top portion of the box is loose, you can slip an open-end wrench in an loosen that nut, and then unscrew knob+stick. Now you can just pull out the top and then the bottom portion of the box. Once you do that, you'll be holding right there in your hands that metal plate that was formetly sticking out from under the car. In my case, I was able to enjoy examining the newly installed bushing there, and observe that I didn't really do a stellar job (not all of the inner ridge popped out from inside the plate). Now it's the time to install those other 4 bushings. It'll be pretty clear where they are supposed to go once you look at the box, and in how bad a shape they are, especially the small ones that go into around the pin that holds the U-piece to the main rod. When talking about bushings, a term "just about disintegrated" in often used. In my case, it was inaccurate. There was nothing "about" about my disintegrated bushings. There was no room for them to fall apart while inside the box, but when I started to pick the thing apart, they just fell out like sand. The larger bushings that go on the main rod were in a slightly better shape, but if you got that far, you just need to replace them, period. Taking the assembly apart and putting it together is fairly straightforward (especially if you have those special ring pulling pliers). The only problem I had is trying to put a locking ring on one end of the rod. With the new bushings in place, there's less of a rod sticking out. In my case, there were two thin washers on the rod, plus the locking ring, and the rod was not sticking out far enough to allow putting both washers on and then installing the locking ring, the ring groove wasn't out far enough. I tried compressing the whole thing by placing it between two sockets and working it with a mallet, with a limited success, but ended up simply leaving one washer on instead of two. I'm sure that with enough persistence I'd be able to leave both washers on, but WTH. That's about it. Like they say, reassembly is the reverse of disassembly. Putting those circlips on the long linkage rod may require some strong language, but otherwise it's straightforward. I wouldn't know how a shifter on a new MB feels, but with all those new bushings my shifter is super-firm now.  yuri
|
|
#3
01-11-2005, 01:44 AM
|
||||
|
||||
|
rurik,
Welcome to the board and thanks for the write-up. You GOTTA get a digital camera to go with the prose, because your energy level tells me we can take advantage of your forays into MB DIYing. 
__________________
The Golden Rule 1984 300SD (bought new, sold it in 1988, bought it back 13 yrs. later)
|
|
#4
01-11-2005, 09:52 AM
|
|||
|
|||
|
a picture is worth a thousand words
yeah, I know, some pics would have been helpful. My digital camera is currently travelling abroad though, in my better half's purse.
You obviously got a mistaken impression regarding my energy level. I'm actually quite lazy, and I'm honestly not just trying to be modest here. This car, however, has the tendency of making me work hard with little persuasion. yuri
|
|
#5
07-04-2006, 09:36 AM
|
||||
|
||||
|
A cheap digital is all you need = one you can slime or drop in the oil drain pan, and not cry over.
Maximum resolution is 800 X 600 Filetype Max Filesize Max Width Max Height bmp 65.0 KB 800 600 doc 65.0 KB - - gif 65.0 KB 800 600 jpe 65.0 KB 800 600 jpeg 65.0 KB 800 600 jpg 65.0 KB 800 600 pdf 65.0 KB - - png 65.0 KB 800 600 psd 65.0 KB 800 600 txt 65.0 KB - - zip 65.0 KB - - have a great day.
__________________
ASE Master Mechanic asemastermechanic@juno.com Prototype R&D/testing: Thermal & Aerodynamic System Engineering (TASE) Senior vehicle instrumentation technician. Noise Vibration and Harshness (NVH). Dynamometer. Heat exchanger durability. HV-A/C Climate Control. Vehicle build. Fleet Durability Technical Quality Auditor. Automotive Technical Writer 1985 300SD 1983 300D 1984 190D 2003 Volvo V70 2002 Honda Civic https://www.boldegoist.com/
|
|
#6
07-24-2007, 10:01 AM
|
|||
|
|||
|
Shifter rod bushings
Called Classic MB parts, got the part number for the rod bushings which are medium hard but flexible black (nylon?) , black, and have flanges on both sides. $1.50 each and perfect fit.
Greatly enjoyed your DIY. Very good and relevant write up. Excellent help to me and many others I am sure. Can you help me soften the shift from 2nd to 3rd on my 1976 300D? I do not believe this transmission shifts with vacuum input. Was thinking about just indexing all of the shifter rods, then making slight documented adjustments to find the right setting for me. But I do not want to do this unknowing of what the consequences would be. Thanks,, Rich
|
|
#7
07-24-2007, 10:06 AM
|
||||
|
||||
|
"a picture is worth a thousand words"
He certainly has enough of those.
__________________
http://i284.photobucket.com/albums/l...aman/Fleet.jpg Peach Parts W124.128 User Group. 80 280SL 85 300SD 87 300TD 92 300D 2.5 Turbo 92 300TE 4Matic
|
|
#8
03-15-2008, 06:40 PM
|
|||
|
|||
|
jbach36 is where it's at!
All hail jbach36. That cat knows how to write AND post pictures. He did a GREAT post on the DIY forum on how to replace the shifter bushing under the car. Nearly a God, jbach36 is the best at explaining DIY situations!
jbach36, 1991 300d
|
|
#9
03-15-2008, 08:15 PM
|
|||
|
|||
|
Quote:
John
__________________
Certified Registered Nurse Anesthetist (CRNA) 2002 F250 powerstroke with Plantdrive WVO conversion 1983 300SD 190K miles ,sold 2006 E320 CDI
|
|
#10
11-15-2009, 09:27 PM
|
|||
|
|||
|
Got sold several other bushings before I figured out the ones to have. been having the "park" failure and the failure of hitting the gears right. New bushings will make me feel like a new car owner. Now, if I could only get the hard 1-2 shift gone and lower RPM shifts I'd feel even better. This 1980 CD has no connections to the trans at all. No rod or vac line----sooooo whats to adjust????????? Who's up to the answer to this one??
Sparky
|
|
#11
12-02-2009, 06:36 PM
|
||||
|
||||
|
Answer
Quote:
http://www.peachparts.com/shopforum/diesel-discussion/96048-broken-neutral-safety-switch-replacing-shifter-bushings.html#post646647
|
|
#12
12-19-2009, 01:13 AM
|
||||
|
||||
|
I don't want to hijack the thread, to gs sparhawk: The 1-2 shift timing and hardness of the shifts depend quite a bit on the vacuum and the engine's torque output. check out the "ITS CRITICAL -- How you set your vacuum..." thread that pops up on the first page from time to time, and also try using something like Diesel Lube (Power Service in the white bottle) to up the torque a little, along with double-checking your fuel and air filters and tire pressures. Back to the vacuum, though, make sure you don't have leaks in the vacuum system. the door lock pods on my '84 are shot, so I blocked the vacuum lines to them until I get new pods, and the difference in the shifts was like day and night. Although on the '84 I can influence the shifts with ALDA adjustments, but that's a whole different, turbo-charged can of worms.
__________________
 1981 300SD - Sunburn Gold, 200ish k. 1981 300SD - Sunburn Gold, 200ish k.1984 300D Turbo "The Green Lantern" - Mango Green (DD) - 183k with no more fingers to count on 1979 300SD "The Whale" - Black (Back-up mega-sled, soon to be for sale!) - 160k and no longer keeping track... Confucius say: Man who run behind car get exhausted, man who run in front of car get tired.
|
|
#13
12-19-2009, 09:24 AM
|
||||
|
||||
|
Link
Quote:
It's CRITICAL... how you set your transmission's vacuum system on your diesel MBZ...
|
|
#14
12-19-2009, 02:38 PM
|
|||
|
|||
|
Sorry to burdon the thread---since we are on it---I have not found any adjustable connection to the trans. No connection by vac tube, wire, etc. Maybe I'm missisng something. It is a 1980 300 CD--American. Torque is very good. Always have to back off on the pedal & wait.
Thanks for the offers on this one. Maybe I should look for something that is missing. Sparky
|
|
#15
10-13-2010, 03:01 PM
|
|||
|
|||
|
I'm beginning the process of replacing the bushings on my 1985 300 SD California version. I'm having difficulty understanding how the lever disconnects at the transmission. It looks like the lever sits behind the neutral safety switch. Do I remove the switch to get to the lever or is there another way to accomplish this task? Pics are of the lever in Park and in "2".
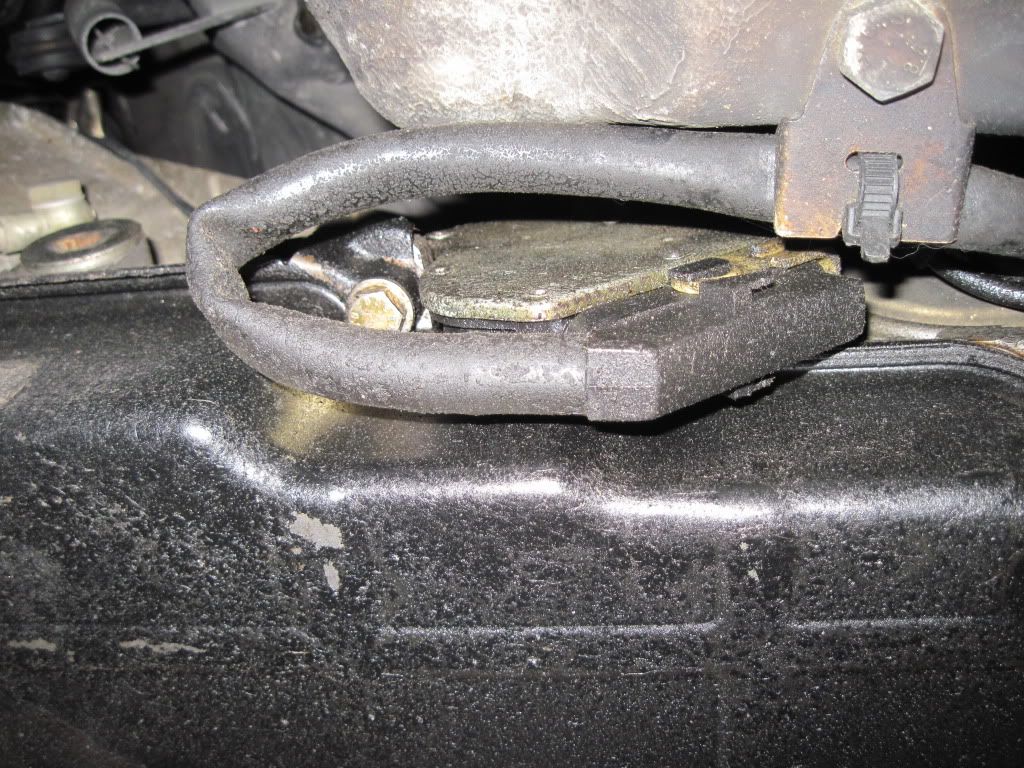 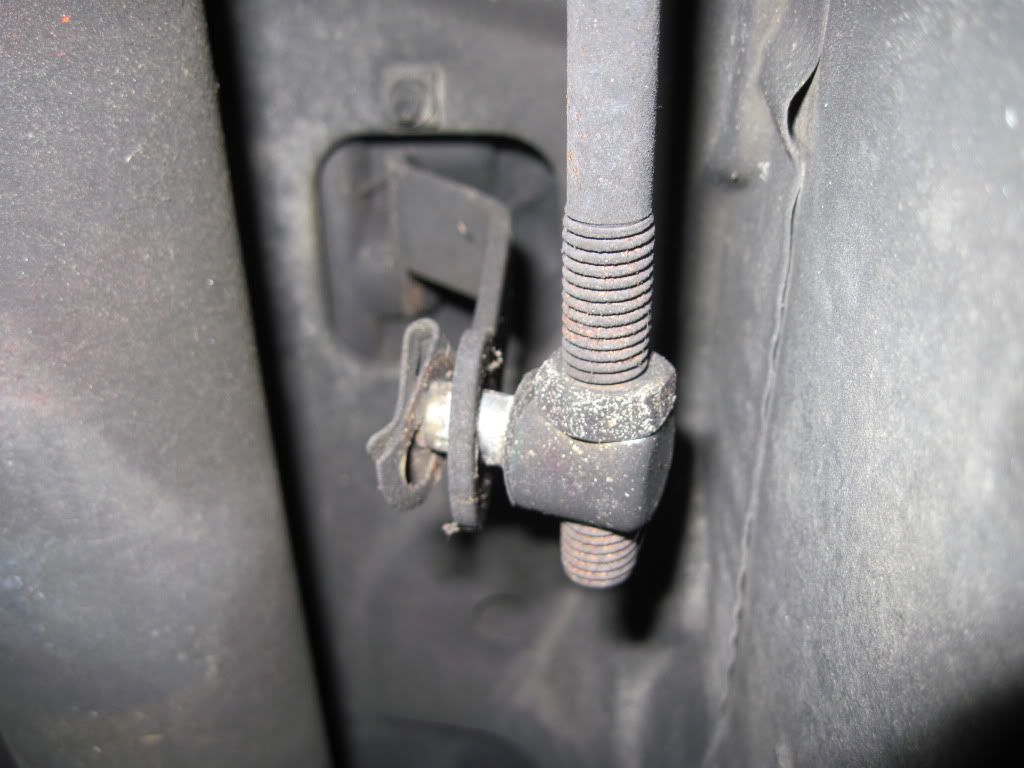 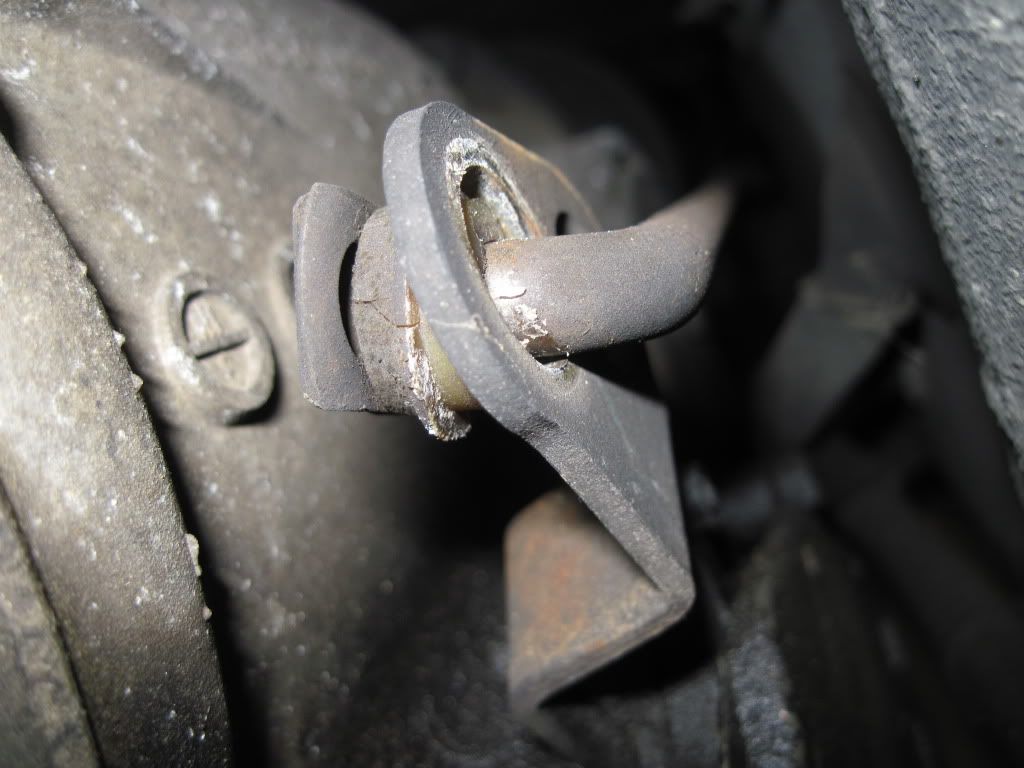 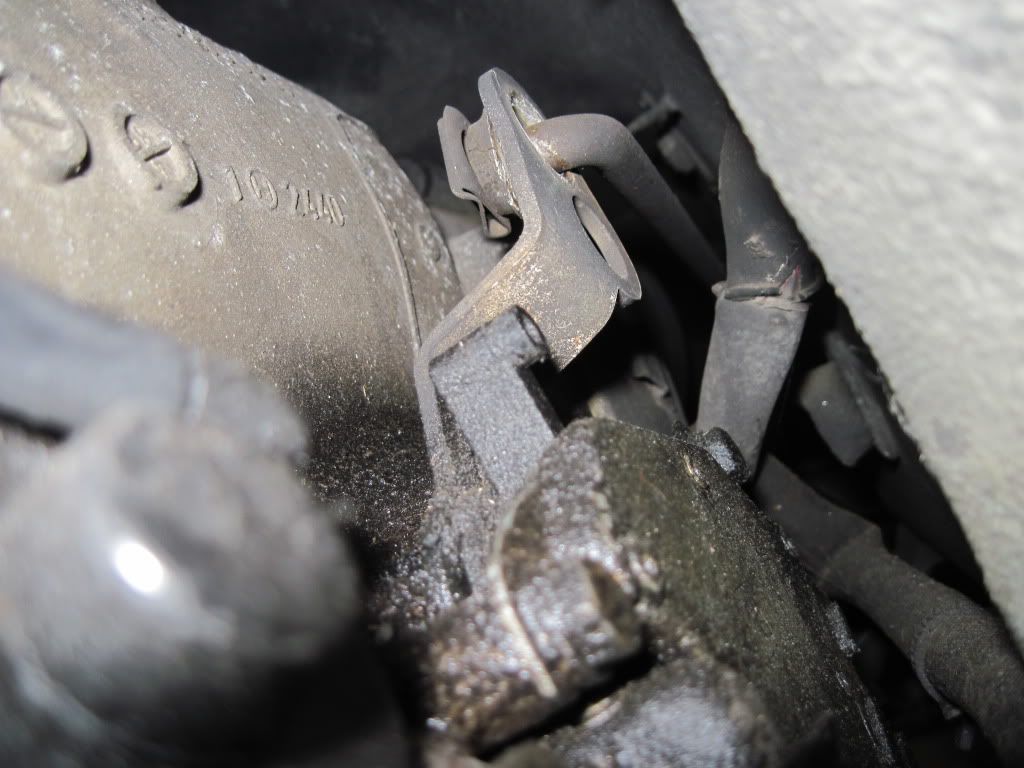 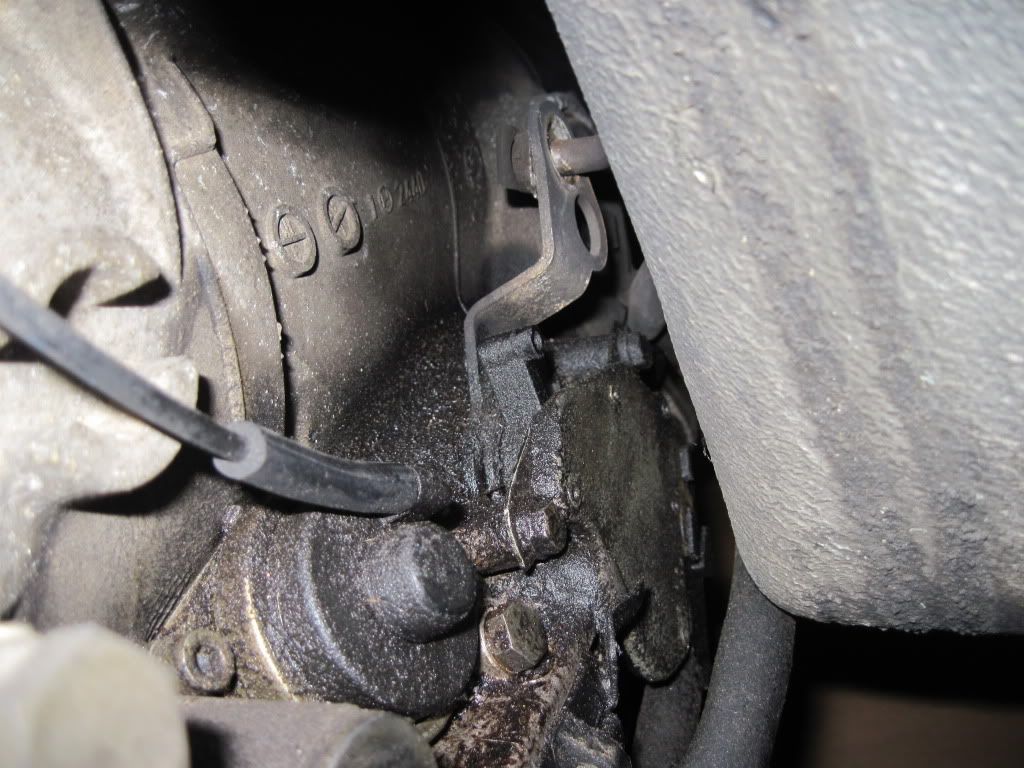 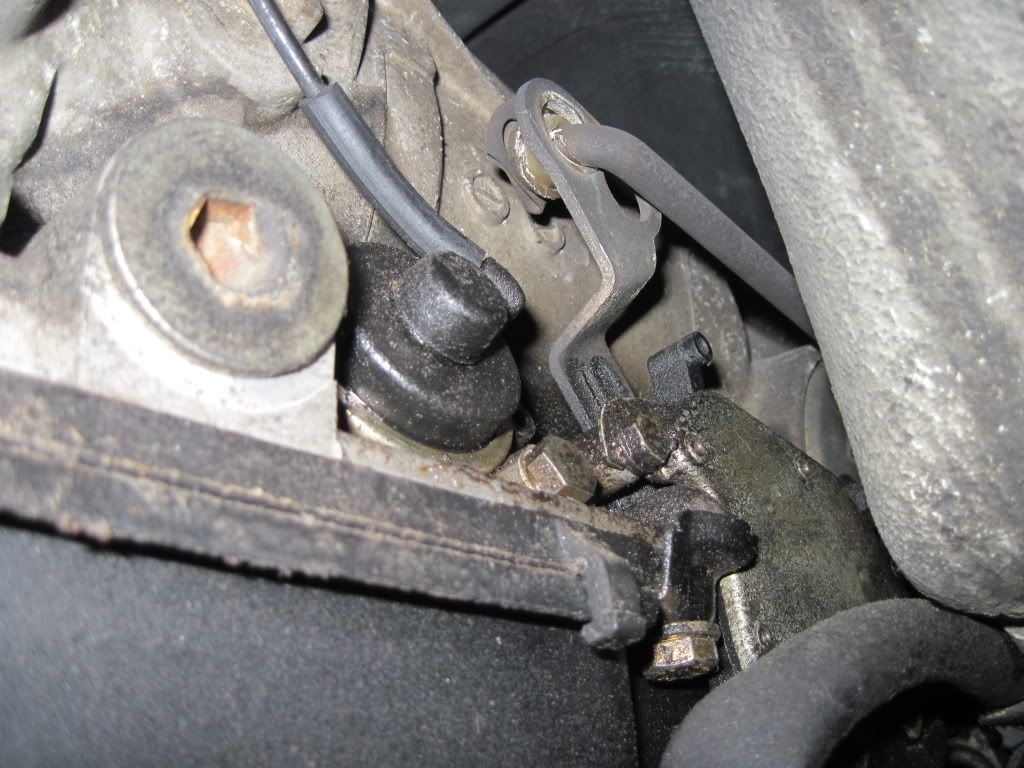 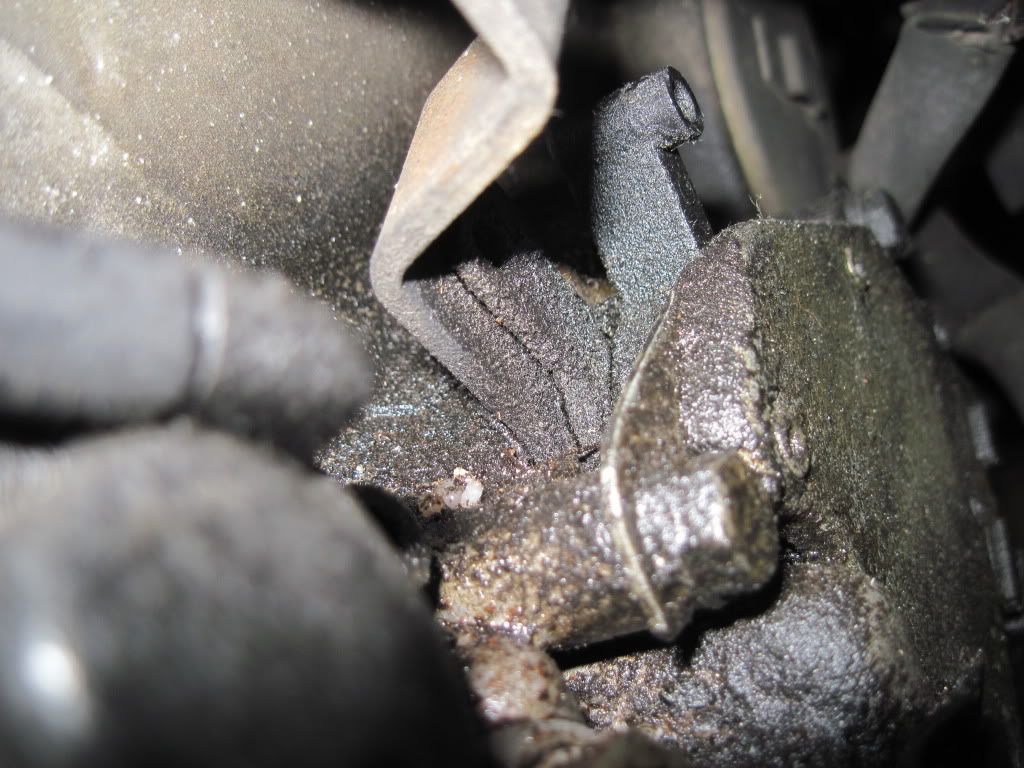 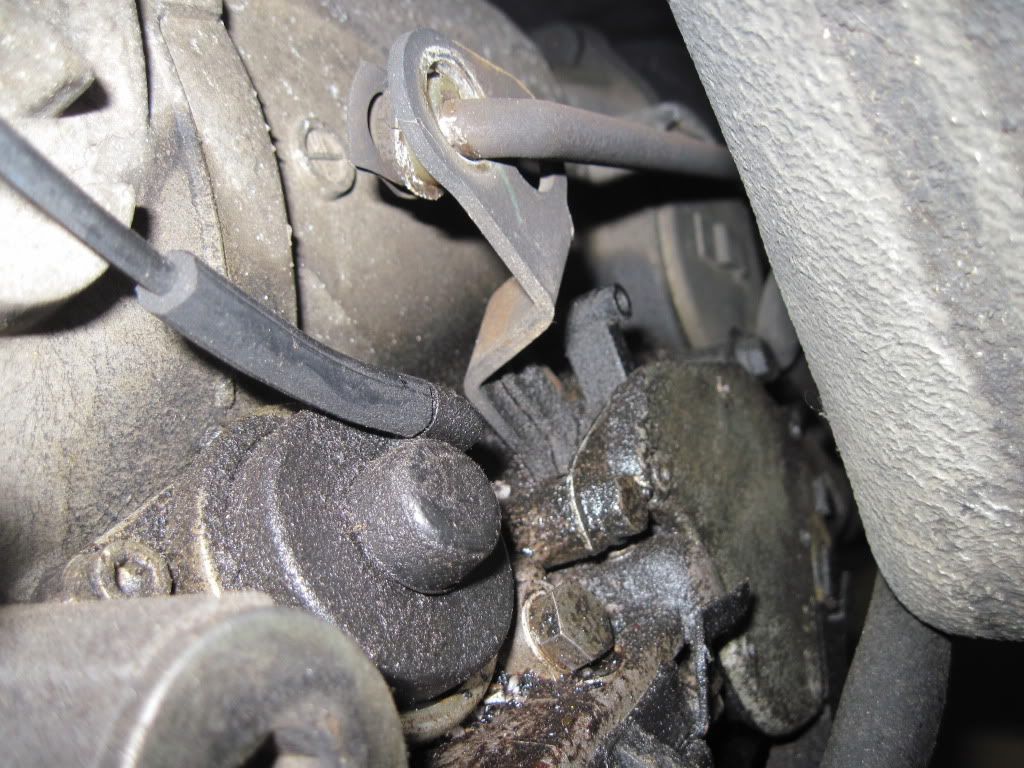
Last edited by whunter; 01-22-2011 at 09:39 AM. Reason: attached pictures
|
 |
| Bookmarks |
|
|


 Linear Mode


