

|
|
|
|
|
|
|
|
#1
 02-10-2011, 05:09 AM
|
||||
|
||||
|
An OM617 starter motor is for LIFE not just for Christmas!
Christmas has come and gone and the current spate of cold weather has meant that most of us (in the northern hemisphere anyway) have probably been churning away for a little bit longer than normal...
Most fixing starter threads posted on this forum go through the process of removing a starter and then replacing it with another one why? I don't know! Check out your old one first. If you haven't seen the insides before take a quick look through the photographs I've posted I bet you'll be surprised how simple they are. I think it is worth while taking these things apart and assessing what needs to be done before junking them. Before starting on a bit of a clean up of my starter motor I found some good information on vintagetest.net. In particular the following pdf file:- http://www.vintagetest.net/chassis/elis78/V2I783032.pdf Step one - take the starter motor off of your car on a non-turbo engine just unbolt it and take it off with a turbo have look through the wiki:- http://www.peachparts.com/Wikka/OM617StarterMotor
__________________
1992 W201 190E 1.8 171,000 km - Daily driver 1981 W123 300D ~ 100,000 miles / 160,000 km - project car stripped to the bone 1965 Land Rover Series 2a Station Wagon CIS recovery therapy! 1961 Volvo PV544 Bare metal rat rod-ish thing I'm here to chat about cars and to help others - I'm not here "to always be right" like an internet warrior  Don't leave that there - I'll take it to bits! 
|
|
#2
02-10-2011, 05:10 AM
|
||||
|
||||
|
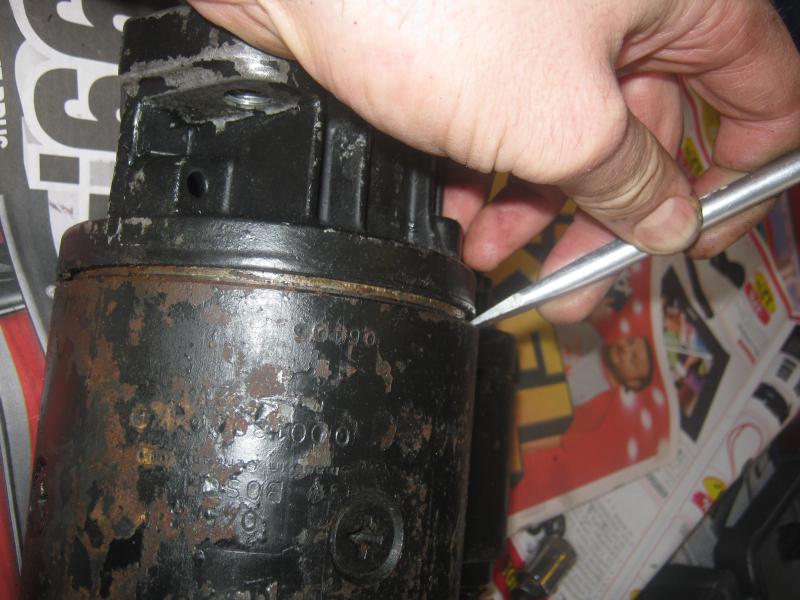
Taking it to bits(1)
After removing the starter motor from the engine give it a wipe and start undoing the bits at the end.
Remove the wiring between the motor and the solenoid. 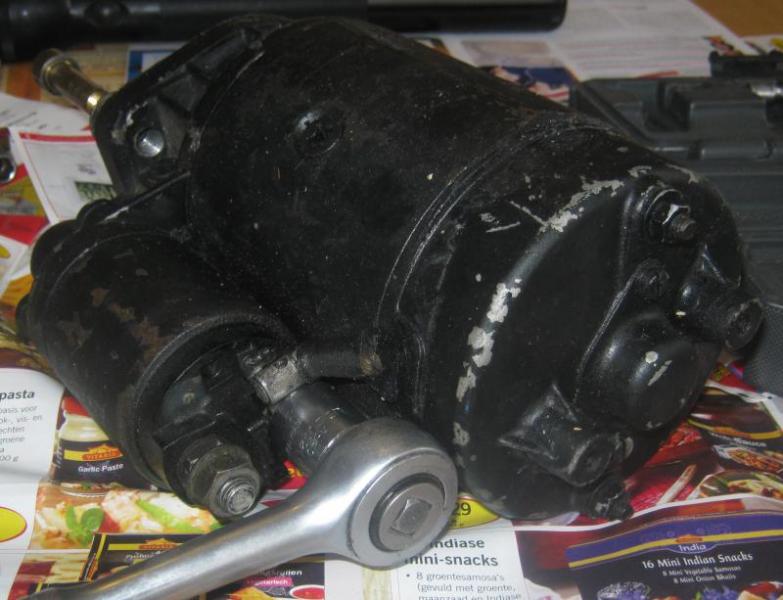 Remove the end cap that covers the end of armature axle.  Inside you'll find a rubber sealing ring...  ...and a C clip that is used with several shims to set the axial end play of the armature axle shaft.
__________________
1992 W201 190E 1.8 171,000 km - Daily driver 1981 W123 300D ~ 100,000 miles / 160,000 km - project car stripped to the bone 1965 Land Rover Series 2a Station Wagon CIS recovery therapy! 1961 Volvo PV544 Bare metal rat rod-ish thing I'm here to chat about cars and to help others - I'm not here "to always be right" like an internet warrior Don't leave that there - I'll take it to bits! Last edited by Stretch; 02-10-2011 at 05:21 AM.
|
|
#3
02-10-2011, 05:10 AM
|
||||
|
||||
|
Taking it to bits(2)
Next undo the bolts that hold on the end cap...
 ...and if the cap is stubborn to remove use a puller.  Don't be tempted to pry this bit off. The main casing is steel and the cap is a nicely cast piece of aluminum alloy. When you've got the cap off you will be able to see the commutator and the four brushes.  At the other end of the starter motor remove the nut and bolt that holds the actuating arm in place.  This actuating arm is the bit that gets pushed by the solenoid and engages the starter motor driving cog into the flywheel.
__________________
1992 W201 190E 1.8 171,000 km - Daily driver 1981 W123 300D ~ 100,000 miles / 160,000 km - project car stripped to the bone 1965 Land Rover Series 2a Station Wagon CIS recovery therapy! 1961 Volvo PV544 Bare metal rat rod-ish thing I'm here to chat about cars and to help others - I'm not here "to always be right" like an internet warrior Don't leave that there - I'll take it to bits! Last edited by Stretch; 02-10-2011 at 06:10 AM.
|
|
#4
02-10-2011, 05:11 AM
|
||||
|
||||
|
Taking it to bits(3)
Once you've got the actuating arm locating bolt out and the end cap off you can loosen the main outer sleeve. You might be able to pull it off if not carefully persuade it with a screw driver blade (eeek be careful) better still tap it with a rubber hammer!
 You can now withdraw the mechanism that engages with the flywheel (the drive assembly) away from the nice aluminum alloy casting which also holds the solenoid.  I do like these castings! These Bosch starter motors are very well made which is why it is a shame to junk them. Take out the actuating arm and yoke.  You'll also find a rubber cover and a plate here. You can now pull out the armature assembly away from the outer casing.  Inside the main casing you'll see four field coils.  To see how an electric motor works have a look here:- http://en.wikipedia.org/wiki/Starter_motor That's as far as I went you can pull the drive assembly away from the armature but mine was nice and clean freely moving so I left well alone. To see more on how to do this have a look in the pdf file link posted above.
__________________
1992 W201 190E 1.8 171,000 km - Daily driver 1981 W123 300D ~ 100,000 miles / 160,000 km - project car stripped to the bone 1965 Land Rover Series 2a Station Wagon CIS recovery therapy! 1961 Volvo PV544 Bare metal rat rod-ish thing I'm here to chat about cars and to help others - I'm not here "to always be right" like an internet warrior Don't leave that there - I'll take it to bits! Last edited by Stretch; 02-10-2011 at 06:11 AM.
|
|
#5
02-10-2011, 05:11 AM
|
||||
|
||||
|
Taking it to bits(4) and cleaning it up
To remove the solenoid you in principle need to remove three 40mm M5 screws. Mine were stuck and needed to be drilled out.
 The solenoid comes apart just like this:-   Cleaning it up a bit As my starter motor was fully functioning before I took it apart I just needed to clean it all up a bit. I used brake cleaner to degrease the commutator and I very very lightly rubbed it with a plastic scouring pad to clean it up a bit. You are not meant to use emery cloth or anything too aggressive here. You want a nice smooth surface so that the brushes don't snag and chip.  If you find a worn / scored commutator you can get it turned (on a lathe) so long as there is enough meat still on it. Any decent machine shop should be able to help you here. I chose to posh my starter motor up a bit and stripped and repainted the outside surfaces. I used a self etching primer for the aluminum alloy parts followed by Eastwood's under hood black, and for the steel parts I used plain old POR15. I cleaned the brushes with brake cleaner and cleaned the four coils in the main cover the same way. Avoid drenching the whole assembly in brake cleaner. You don't really want that hanging about inside the parts you are cleaning. Think cleaning delicate tender wound not let's pressure wash this muck off of the face of the earth.
__________________
1992 W201 190E 1.8 171,000 km - Daily driver 1981 W123 300D ~ 100,000 miles / 160,000 km - project car stripped to the bone 1965 Land Rover Series 2a Station Wagon CIS recovery therapy! 1961 Volvo PV544 Bare metal rat rod-ish thing I'm here to chat about cars and to help others - I'm not here "to always be right" like an internet warrior Don't leave that there - I'll take it to bits! Last edited by Stretch; 02-10-2011 at 05:40 AM.
|
|
#6
02-10-2011, 05:12 AM
|
||||
|
||||
|
Reassembly (1)
Once you've taken one apart it is quite easy to see how it all goes back together again. After cleaning and painting parts I greased up the drive assembly... (Please note Bosch recommends oil on all moving parts - it was my personal choice to use grease)
 ...attached the solenoid actuating arm and placed it into its housing.  I applied grease to the bearing surface here too. I believe these bearings are meant to be soaked in oil prior to insertion to the assembly I decided to use grease but you could try oil with the bearings in place. Good luck with that! (Yet again - Please note Bosch recommends oil on all moving parts - it was my personal choice to use grease) Next I fitted the bolt that holds the actuating arm in place... 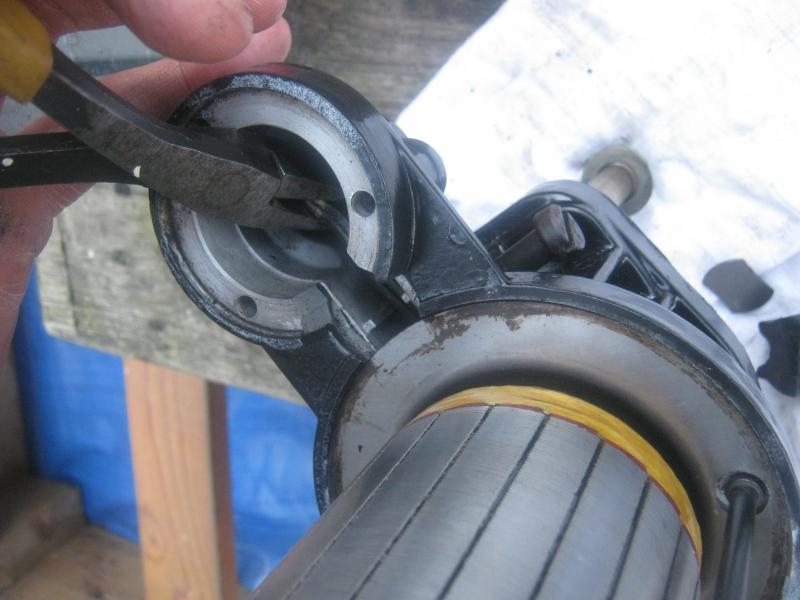 ...and put the metal cover and rubber top in place. 
__________________
1992 W201 190E 1.8 171,000 km - Daily driver 1981 W123 300D ~ 100,000 miles / 160,000 km - project car stripped to the bone 1965 Land Rover Series 2a Station Wagon CIS recovery therapy! 1961 Volvo PV544 Bare metal rat rod-ish thing I'm here to chat about cars and to help others - I'm not here "to always be right" like an internet warrior Don't leave that there - I'll take it to bits! Last edited by Stretch; 02-10-2011 at 09:47 AM. Reason: Added in a warning about using grease!
|
|
#7
03-16-2011, 02:53 PM
|
||||
|
||||
|
Quote:
__________________
85 300D turbo pristine w 157k when purchased 167,870 July 2025 83 300 D turbo 297K runs great. SOLD! 83 240D 4 spd manual- parted out then junked
|
|
#8
02-10-2011, 07:23 AM
|
||||
|
||||
|
Army,
You never took the gear off the end !! Its a PITA to get off. First push the collar towards the starter, then remove the spring wire ring, then slide it all off the end. I had to replace the gear/clutch once.
__________________
Grumpy Old Diesel Owners Club group I no longer question authority, I annoy authority. More effect, less effort....  1967 230-6 auto parts car. rust bucket. 1980 300D now parts car 800k miles 1984 300D 500k miles  1987 250td 160k miles English import  2001 jeep turbo diesel 130k miles  1998 jeep tdi ~ followed me home. Needs a turbo. 1968 Ford F750 truck. 6-354 diesel conversion. Other toys ~J.D.,Cat & GM ~ mainly earth moving
|
|
#9
02-10-2011, 08:03 AM
|
||||
|
||||
|
Quote:
"Packing it in and packing it up And sneaking away and buggering up And chickening out and pissing about Yes, bravely he is throwing in the sponge"
__________________
1992 W201 190E 1.8 171,000 km - Daily driver 1981 W123 300D ~ 100,000 miles / 160,000 km - project car stripped to the bone 1965 Land Rover Series 2a Station Wagon CIS recovery therapy! 1961 Volvo PV544 Bare metal rat rod-ish thing I'm here to chat about cars and to help others - I'm not here "to always be right" like an internet warrior Don't leave that there - I'll take it to bits!
|
|
#10
02-10-2011, 08:32 AM
|
||||
|
||||
|
Great pictures and write-up. Thanks for that!
As I understand it, pulling the starter is a tough job, filled with possible issues... It would be neat to at least see the pictorial for how you reinstall it!
__________________
Current Diesels: 1981 240D (73K) 1982 300CD (169k) 1985 190D (169k) 1991 350SD (116k) 1991 350SD (206k) 1991 300D (228k) 2008 ML320 CDI (199k) 1996 Dodge Ram CTD (442k) 1996 Dodge Ram CTD (267k) Past Diesels: 1983 300D (228K), 1985 300D (233K), 1993 300D 2.5T (338k), 1993 300SD (291k)
|
|
#11
02-10-2011, 08:41 AM
|
||||
|
||||
|
Quote:
Without the turbo fitted to the car it is a piece of cake... sorry turbo owners... but you just lean on in there hold it with one hand and screw in the bolts...
__________________
1992 W201 190E 1.8 171,000 km - Daily driver 1981 W123 300D ~ 100,000 miles / 160,000 km - project car stripped to the bone 1965 Land Rover Series 2a Station Wagon CIS recovery therapy! 1961 Volvo PV544 Bare metal rat rod-ish thing I'm here to chat about cars and to help others - I'm not here "to always be right" like an internet warrior Don't leave that there - I'll take it to bits!
|
|
#12
02-10-2011, 11:36 AM
|
||||
|
||||
|
Your own photo approves of this post.
  I have a 603 starter in my garage that went out a few years ago....I would imagine that the principles are basically the same as the 617 starter? Thanks for the link as well.....now I want one of these http://en.wikipedia.org/wiki/Starter_motor#Hydraulic_starter 
__________________
1982 300GD Carmine Red (DB3535) Cabriolet Parting Out 1990 300SEL Smoke Silver (Parting out) 1991 350SDL Blackberry Metallic (481)  "The thing is Bob, its not that I'm lazy...its that I just don't care."
|
|
#13
08-08-2014, 11:21 AM
|
||||
|
||||
|
I love this write-up.
The vintagetest.net site hosting the referenced Bosch starter pdf seems to have vanished. Tried archive.org without success but was able to locate it here: http://vintage.mitchell1.com/PClubData/chassis/elis78/V2I783032.pdf Just trying to give back a tiny little when I am able. Hope this helps someone.
|
|
#14
08-08-2014, 12:39 PM
|
||||
|
||||
|
Quote:
__________________
1992 W201 190E 1.8 171,000 km - Daily driver 1981 W123 300D ~ 100,000 miles / 160,000 km - project car stripped to the bone 1965 Land Rover Series 2a Station Wagon CIS recovery therapy! 1961 Volvo PV544 Bare metal rat rod-ish thing I'm here to chat about cars and to help others - I'm not here "to always be right" like an internet warrior Don't leave that there - I'll take it to bits!
|
|
#15
04-16-2018, 10:04 PM
|
|||
|
|||
|
Part names and number
Do you know the Part names and number (from Bosch)?
By the way, do you know the material (aluminium??) of the cast where the selenoide is fixed? My starter broke there and I want to try soldering it back.
|
 |
| Bookmarks |
|
|


 Hybrid Mode


