

|
|
|
|
|
|
#76
 12-14-2011, 10:57 PM
|
||||
|
||||
|
It's been a little slow on the project as it's been raining and I'm doing most of my work outside (though under cover).
I focused most of my effort on fabricating the lower radiator bracket. After considering a number of options I decided to use the sheet metal from the 300D since it was there and had the mounting holes and grommets in the right place. I could just fabricate some angle brackets to tie into the 380SL chassis. I finished after dark, so pictures will have to wait until another time. I also got tired of trying to find a 30mm thin wall, 12 point, deep socket to get the nut off the transmission yoke so I could swap the one from the 380 to the 300's transmission. So I decided to just fabricate one. I bought a 1-3/16 socket (which is just a hair larger than a 30mm) and cut the 1/2" drive end off it and then welded it to a cheap 15/16" socket I got at Harbor Freight. This gave a nice ledge to weld to as opposed to a straight butt weld. Worked perfect and cost all of $7. It's not pretty, but at this point all I care about is function.  Ordered a bunch of parts from FastLane including what I need to get the oil pan mounted, the transmission leaks fixed and other things to be able to put the engine back in the car and start hooking stuff up.
__________________
Current Stable

|
|
#77
12-15-2011, 06:53 AM
|
||||
|
||||
|
Cool socket
 . Something I may also have to do. . Something I may also have to do.Did you have any trouble holding the yolk to undo the nut or was it not on too tight.
|
|
#78
12-15-2011, 09:29 AM
|
||||
|
||||
|
FYI
Quote:
|
|
#79
12-15-2011, 10:54 AM
|
||||
|
||||
|
Quote:
__________________
Current Stable
|
|
#80
12-15-2011, 08:16 PM
|
||||
|
||||
|
Here are pictures of mounting the 300D radiator and oil cooler in the 380SL.
I used the radiator mounting bits from the 300D and then fabricated brackets to tie it into the 380SL chassis.  Here is a detail of the mounting of the bracket to the car.  Another angle  There's not much in the way of weight and in the interest of ease of fabrication, I elected to use pop rivets.  Here is the radiator in the car. It sorta, kinda looks like it belongs.  I still have to decide on the upper mounting. I may or may not use the original clips.
__________________
Current Stable
|
|
#81
12-15-2011, 09:30 PM
|
||||
|
||||
|
Very neat !!
__________________
1979 300D 220 K miles 1995 C280 109 K miles 1992 Cadillac Eldorado Touring Coupe 57K miles SOLD ******************** 1979 240D 140Kmiles (bought for parents)  *SOLD. *SOLD.SAN FRANCISCO/(*San Diego) 1989 300SE 148 K miles *SOLD
|
|
#82
12-16-2011, 05:41 AM
|
||||
|
||||
|
Hmm
Quote:
I hope you used STEEL pop rivets, the aluminum ones will not survive the vibration.
|
|
#83
12-16-2011, 10:36 AM
|
||||
|
||||
|
Quote:
__________________
Current Stable
|
|
#84
12-16-2011, 01:17 PM
|
||||
|
||||
|
Exelent
Quote:
 .
|
|
#85
12-22-2011, 02:48 PM
|
||||
|
||||
|
Finished the rest of the radiator installation today. I was originally going to use the stock radiator clips from the 300D but they turned out to be too tight, mostly because I had to install a 1/8" shim to keep the radiator from hitting the mounting bracket of the A/C radiator. I just used some 1/8" aluminum stock and bent the brackets as needed. It is very solid. I wish I had been able to cut better slots, but didn't have the right tools.
 Also got the subframe back in the car with the spacers and the longer bolts. Started to install the tie rods and discovered that one had the end of the bolt messed up and I can't get the nut on. The threads are messed up and the hex portion is stripped... on the list for the next junk yard run.
__________________
Current Stable
|
|
#86
12-23-2011, 12:47 AM
|
||||
|
||||
|
Good News - Bad News
Pulled the driveshaft today and this is what I found.
 That's the bad news - the good news is the bearing feels good and the U-joint also feels good....both very smooth.
__________________
Current Stable
|
|
#87
12-27-2011, 09:45 PM
|
||||
|
||||
|
Made some progress today. Mainly got the oil pan reinstalled on the engine. I had to make a junk yard run yesterday to source the pan bolts that I was missing and then got it buttoned up today. Also got the remote oil filter bracket drilled and tapped in preparation for getting AN fittings and building my oil hoses.
Ran into a snag on the transmission. All along I was kind of assuming that I could just install the existing plug for the neutral safety switch on the 300D's transmission, but turns out they are different.  It's only 4 wires (two circuits) so it shouldn't be a big deal, but it's one more thing to figure out and create the proper connection. I decided I'd like to keep the electric speedometer, so if I can swap the tail cones, I can do this easily. Trying to figure out whether this can be done in this thread - Swap Transmission Tail Cones??? It absolutely looks like the bolt pattern is the same, but I'd like to be sure before I rip them apart.
__________________
Current Stable
|
|
#88
12-28-2011, 09:39 PM
|
||||
|
||||
|
Today was good progress. Decided to drop the engine in to assess all the "hook up" issues and to verify clearance issues.
 With all the practice, I'm down to 50 minutes to get it in. That 617 looks right at home in the car.  Here's an assessment of the under-hood "hook up" issues on the project - Fuel - no issues, hook up the hoses Exhaust - the down tube needs a new flex joint welded in at a different angle to clear the idler arm. 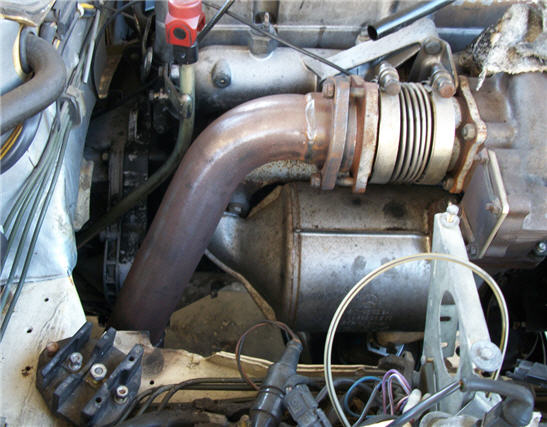 Cooling - no problems with radiator, main hoses, etc. Will need some new hoses for heater, etc. The front bay should work for the overflow with a little fab work for a bracket. Oil - I'll need all custom hoses for remote oil filter, oil cooler and turbo. I'll also need to fab a connector for the electrical oil pressure sensor. Transmission - need to add 1" to the shift linkage Electrical - no real issues other than hook up and configure Throttle - Easier than I was expecting. The linkage from the pedal to the torsion arm needs to extended about an inch. I can use the firewall mount from the 300D and just cut off the 380's existing firewall bracket and screw it to the firewall. 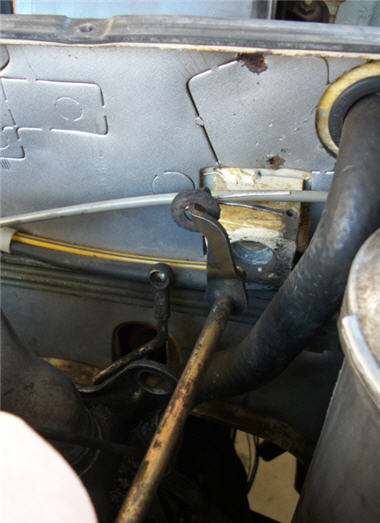 Power Steering - The stock 380 low pressure hose was too short (high pressure was perfect) but I was able to grab one off the 300D and with a little adjustment to the angles on the ends, works just fine. Vacuum - no issues other than lots of hook up and research and testing Engine Shock - I've got room to fab a bracket for the right side if needed. Air Cleaner - No problem - Room for a cone type filter or something similar Driveshaft - Length is ok - no mods required A/C - this will be a phase II project, but there is room for a Sanden compressor Once I get my hoses built I can pull the engine for the last time and begin final assembly in preparation for one last drop in.
__________________
Current Stable
|
|
#89
12-28-2011, 10:05 PM
|
|||
|
|||
|
I REALLY want to do this, REALLY WANT TO. I will bookmark this thread for sure. I may need a few pointers via private messages, hehehe. Seriously though, way to blaze that trail.
__________________
1987 300SDL #1, 1987 300SDL #2, 1980 240D, 1982 300SD, 1994 S350, 1990 350SDL, 1991 350SD, 1985 300D, 2005 E320CDI Gone, but not forgotten: 1981 300SD, 1982 300SD, 1987 300SDL, 1983 300TD, 1980 300CD, 1981 300SD #2, 1987 300D, 1987 300TDT, 1980 300D
|
|
#90
12-28-2011, 10:46 PM
|
||||
|
||||
|
Its amazing that you are doing this by yourself !
Dang  Yup that engine looks like it in home base !
__________________
1979 300D 220 K miles 1995 C280 109 K miles 1992 Cadillac Eldorado Touring Coupe 57K miles SOLD ******************** 1979 240D 140Kmiles (bought for parents) *SOLD.SAN FRANCISCO/(*San Diego) 1989 300SE 148 K miles *SOLD
|
 |
| Bookmarks |
|
|


 Linear Mode


