

|
|
|
|
|
|
#1
 02-05-2012, 12:10 PM
|
||||
|
||||
|
DIY - Wood Key Head
I've made several wood key heads for myself and folks here on the forum. Around 10, two for myself and the rest y'all. I thought I do a write-up to help you other wood working types along. Any type of hard wood will work. Stay away from the soft woods they'll brake too easily(i.e. conifers - pine, fir, cedar, etc). Mercedes uses Zebra wood or Zebrano as they call it, which is what I'm using in this writeup. I've also used Myrtle wood, and I'm about to make one with Purple Heartwood. Just for reference zebra wood is $17 a board foot. Oak is $3-$4 a board foot. Fortunately you only need a tiny bit for a key. Anyway on to the juicy stuff.
I start with a little block that is a little wider than the height of the key head. Then I cut two thin slices, about and 1/8" thick, out of it with a band saw, table saw works as well but take more wood out of the block so the grain may not match up as well on the sides of the key. The block 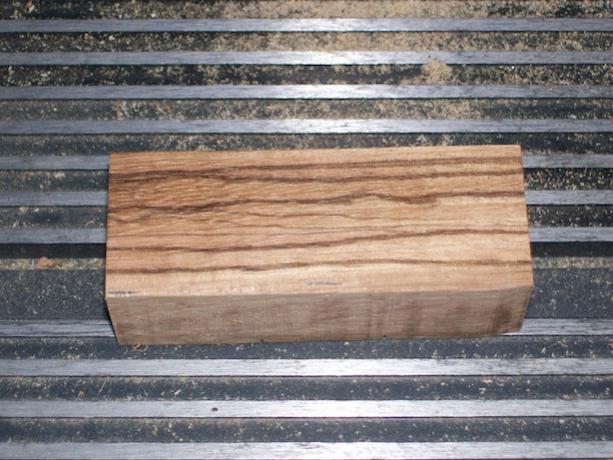 Two halves of the key head  Then I decide which half I want to cut out the notch for the key head. I used to cut half the thickness of the key into each half of the wood. But it's really hard to get things to line up properly. So I started cutting the notch into one side and then gluing the two together. Has worked much better for the last several keys I've made. I square up the key on the wood and trace the T shaped end onto the wood.  Then using a Dremel tool I start removing the wood. I mainly use the two round tipped bits, occasionally I use the cone shaped one to get nice sharp corners. I used the larger of the two round bits to remove most of the material. Then switch to the little one to clean up the corners. I try to make the key fit tightly, but a little slop is okay, because I use polyurethane glue which will expand and fill the open spaces and actually glue the key into the wood. But the tighter it fits the better. You can't tell in the photos but the T head part of the key is not symmetrical, so you have to make sure you keep the orientation the same through this process.   Then I glue the to halves together. I use Probond Polyurethane glue. It will expand out the edges, but it cleans off easily. Here is it after I've clean off the little bits of glue that oozed out.  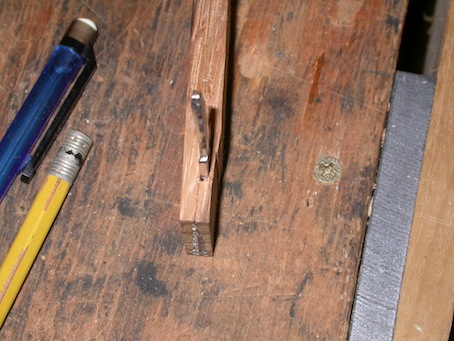 Then I trace the key head shape. Cut it out on the band saw. Then I sand the edges down to the line and make sure I have a good shape going. Then I trace the hole onto it. I use a small drill bit and drill as much of the hole material out, then using the dremel with the cone shaped bit I clean it up and shape it. Once the shape of the key and hole are they way I want them, then I start rounding and shaping the key. Shape to you preference. I like nice round edges, and I actually shape the face of the key to a convex shape, making it thinner on the edge than in the middle. This keeps the strength of the thickness of the wood but makes it look a little daintier. I usually keep the metal key part taped up to keep it from getting scratched. Note: Since both halves are cut to the same thickness you have to sand down the side that you didn't notch for the key so you have equal thickness passed the width of the key. Or you can cut one half thinner to start with. 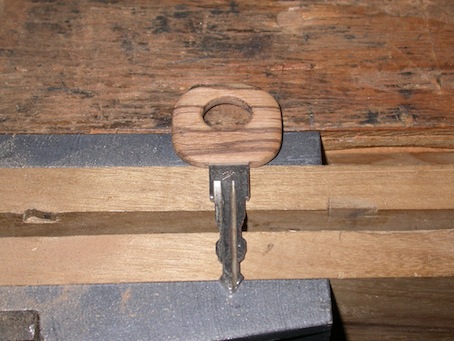 Now it's ready for staining and clear coat. Stain to your preference. I also keep the key taped up through this process as well. Zebra wood is extremely hard and it doesn't absorb stain very well. I use a 50/50 mix of a red stain and a chocolate brown stain. This makes it match the wood trim in the car pretty well. I put a couple coats on. I wipe it on pretty thick, then let it sit for couple minutes or so. Then wipe it off. Let it dry for a good while, then do it again. Once the stain is all dry. I start the clear coat. I use Minwax Fat-Drying Polyurethane Clear Gloss. I usually end up putting 6-8 coats on. The first few coats aren't real smooth because of all the pours in the wood. I put a coat on. Let it dry for 24 hours. Then hit it gently with some fine steel wool, wipe it off, and put another coat on. I continue this process until I have a nice smoooooth finish. I always apply real thin coats. If you coat is too thick you'll get drips, and then you get to sand it down and before you can continue. Stained  1 coat of clear The Finished Product. 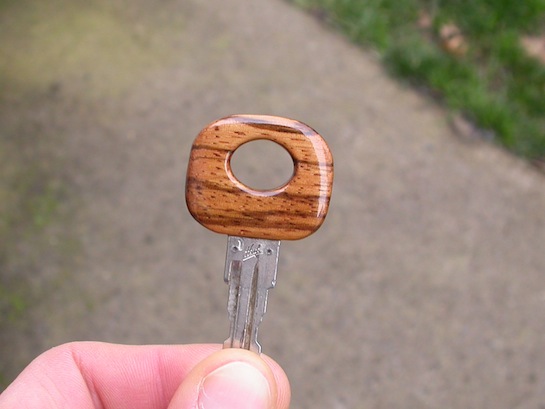
__________________
Andrew '04 Jetta TDI Wagon  '82 300TD ~ Winnie ~ Sold '77 300D ~ Sold
Last edited by Biodiesel300TD; 02-06-2012 at 02:47 PM. 
|
|
#2
02-05-2012, 12:10 PM
|
||||
|
||||
|
More Pics
__________________
Andrew '04 Jetta TDI Wagon '82 300TD ~ Winnie ~ Sold '77 300D ~ Sold
|
|
#3
02-05-2012, 12:11 PM
|
||||
|
||||
|
The last 3 pics
__________________
Andrew '04 Jetta TDI Wagon '82 300TD ~ Winnie ~ Sold '77 300D ~ Sold
|
|
#4
02-05-2012, 12:35 PM
|
||||
|
||||
|
Whoo Hoo!!
Thanks. That's my key! In my pocket now.
__________________
83 SD 84 CD
|
|
#5
02-05-2012, 12:58 PM
|
||||
|
||||
|
Quote:
__________________
Andrew '04 Jetta TDI Wagon '82 300TD ~ Winnie ~ Sold '77 300D ~ Sold
|
|
#6
02-05-2012, 02:31 PM
|
||||
|
||||
|
Cool.
__________________
83 SD 84 CD
|
|
#7
02-13-2012, 07:37 PM
|
||||
|
||||
|
Here is the latest key. Toomany's 2nd one in fact. It's a valet style key. I think I like this shape better for these wood keys.

__________________
Andrew '04 Jetta TDI Wagon '82 300TD ~ Winnie ~ Sold '77 300D ~ Sold
|
|
#8
02-13-2012, 08:23 PM
|
||||
|
||||
|
Thanks Andrew, I'll post a pic of the two together.
__________________
83 SD 84 CD
|
|
#11
02-19-2012, 07:55 PM
|
|||
|
|||
|
Thats awsome!
A very good alternative to the cheap dealer key heads that last only a month or so on a deisel that seems to have an ignition that is harder to turn than usual. I'm making one. Thanks
|
|
#12
02-22-2012, 01:55 PM
|
||||
|
||||
|
Here they are, together again.
Andrew does very fine work, highly recommended.
__________________
83 SD 84 CD
|
|
#13
02-22-2012, 02:05 PM
|
||||
|
||||
|
On the 87 and 95 s classe I have, cocobolo seems to be a better grain and color match... Wouldn't it be easier to cut 2 thicknesses of strips for the head, use the thinner one on the side that isn't going to be internally shaped to receive the key head?? It would make for less sanding I mean... one could do some interesting carving on one of those too and add some color 'dust inlay'. Just thinking outloud. I haven't done any of these, and have no right to criticize....
It's an absolutely beautiful job. Keep up the good work... I may rip apart one of my keys just to do that for it...
__________________
All it takes for evil to prevail is for good men to stand by and do nothing. Too many people tip toe through life, never attempting or doing anything great, hoping to make it safely to death... Bob Proctor '95 S320 LWB '87 300SDL '04 E500 wagon 4matic
|
|
#14
02-22-2012, 03:12 PM
|
||||
|
||||
|
Id like at least two of these.
__________________
Current Diesels: 1981 240D (73K) 1982 300CD (169k) 1985 190D (169k) 1991 350SD (116k) 1991 350SD (206k) 1991 300D (228k) 2008 ML320 CDI (199k) 1996 Dodge Ram CTD (442k) 1996 Dodge Ram CTD (267k) Past Diesels: 1983 300D (228K), 1985 300D (233K), 1993 300D 2.5T (338k), 1993 300SD (291k)
|
|
#15
02-22-2012, 03:36 PM
|
||||
|
||||
|
Quote:
I have started using one side that is thinner than the other. If you look at the pics you can see one side is thinner than the other. But it doesn't always happen that way. It just depends on what I have cut sometimes. Once you have the key cut to side it doesn't take that much sanding since the surface area is pretty small.
__________________
Andrew '04 Jetta TDI Wagon '82 300TD ~ Winnie ~ Sold '77 300D ~ Sold
|
 |
| Bookmarks |
|
|


 Linear Mode


