

|
|
|
|
|
|
#1
 10-24-2012, 02:17 PM
|
|||
|
|||
|
Valve cover, valves, chain stretch--240D
Hi folks!
I've got the time and money now to properly work on my WVO 240D. I will be replacing the radiator and adding necessary additional WVO heat as soon as the parts are delivered to my door. It was recommended back in my follow-up thread that I: check the valves check the timing chain stretch and replace the leaky valve gasket since i have to replace the gasket whenever I check it anyway. So I have some questions: 1: I need special parts to do this. What are they and what's the best place to buy them? 2: Is checking the timing chain stretch for the 240D the same as for the 300SD listed here? 3: Is there a good blow-by-blow on checking the valves? 4: What does checking the valves mean/do? 5: How long should all this take? There's an awfully important football game on this weekend. 

|
|
#2
10-24-2012, 02:45 PM
|
||||
|
||||
|
1. dial indicator magnetic base, and a dial indicator, a set of feeler gauges, and preferably a set of bent 14mm wrenches, a good light.
2. yes. 3. Mercedes Diesel Valve Adjustment Procedure 4. see step three.. 5. about a hour.
__________________
John HAUL AWAY, OR CRUSHED CARS!!! HELP ME keep the cars out of the crusher! A/C Thread "as I ride with my a/c on... I have fond memories of sweaty oily saturdays and spewing R12 into the air. THANKS for all you do! My drivers: 1987 190D 2.5Turbo 1987 190D 2.5Turbo 1987 190D 2.5-5SPEED!!!  1987 300TD 1987 300TD 1994GMC 2500 6.5Turbo truck... I had to put the ladder somewhere!
|
|
#3
10-24-2012, 02:56 PM
|
|||||
|
|||||
|
Quote:
A set of the three valve adjusting wrenches is best - especially for a novice mechanic. Quote:
Quote:
Quote:
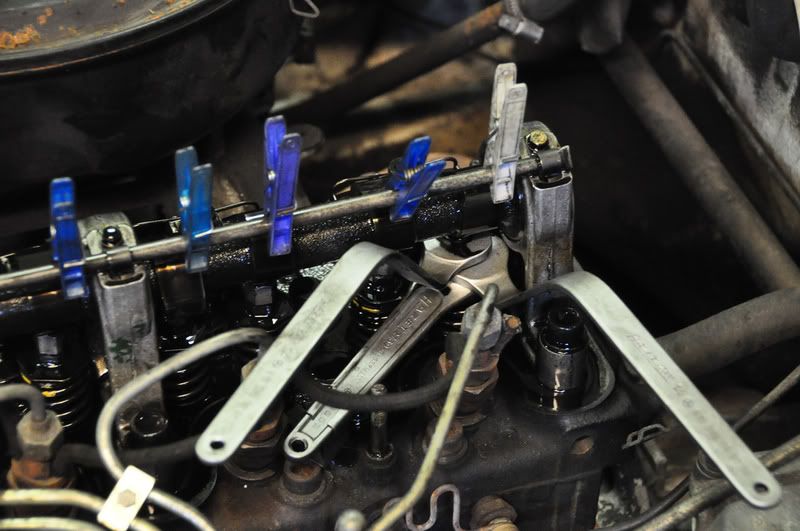
These values are different when the engine is cold and when the engine is warm. The definition of what is cold and warm is given in the factory service manual (FSM). You need to get hold of a copy of the FSM at www.startekinfo.com (it is free for the W123) You need to turn the camshaft - by turning the crank in a clockwise direction (taken as though you are standing in front of the engine looking at it). Do not attemt to turn the camshaft (by hand) in any other way. Do not turn the engine "backwards" the timing chain is known to snag when going backwards on these engines. Some people say to turn the crank / camshaft via the utility belts - I don't like the idea as you can end up damaging stuff. Think about it this way; the power steering pump was designed to be driven not to drive the engine... You need to turn the crank slowly in a controlled manner so that you can position a cam lobe in a vertical direction. To do this easily you are best off removing all of the glow plugs so that you don't have to fight compression. This also means that the engine won't start (there's no compression so it can't) by some sheer fluke of unluckiness... ...even so you should check to make sure that the stop lever is at its stop position on the IP so you don't get unwanted fuel in the cylinders which then leaks through into the engine oil diluting it (again this would be an unlucky fluke occurance). Anyway, once you've got a cam lobe up in the air - use your eyes and look through between the gap below the camshaft and the top of the rocker arm. You should be able to see through between these two parts. You now know where to stick your feeler gauge! Choose a small thickness (smaller than the prescribed value in the FSM) and GENTLY stab it into the gap. If it goes through make the thickness thicker by adding in a thin gauge and meaure again. Keep on going until you can no longer slide the feeler gauge(s) through the gap. With practice you'll get to know about the "feel" of a feeler gauge that is just right => it will slide through the gap without causing any damage. It will be slightly tight... ...it is a bit difficult to explain but basically if you try and add the thinnest gauge to the thickness you already have and it will no longer go through then you've got it right. Please note - you need to use mental arithmetic to add up the pack of the gauge thicknesses you have. Don't be lazy and get all up set when you don't have exactly the single thickness in one gauge that you want! If in doubt adjust the valve clearances on these engines on the slightly loose side as they tend to tighten with use. You keep on going until you've checked each valve. Make sure you don't get confused between intake and exhaust - they have different values - see the FSM. Many people either write down which one they have checked or make a chalk mark / pen mark on the spray bar above each cam lobe. To adjust a valve clearance you need to use the special tool valve adjusting wrenches. At the top of the valve spring there is a hex shaped "nut" that often needs to be held in position to stop the valve from turning. Loosen the other two nuts. The adjustment is made by turning the top of these two top nuts. The lower top nut is the lock nut. Check the valve clearance again after you have tightened the lock nut. Quote:
__________________
1992 W201 190E 1.8 171,000 km - Daily driver 1981 W123 300D ~ 100,000 miles / 160,000 km - project car stripped to the bone 1965 Land Rover Series 2a Station Wagon CIS recovery therapy! 1961 Volvo PV544 Bare metal rat rod-ish thing I'm here to chat about cars and to help others - I'm not here "to always be right" like an internet warrior  Don't leave that there - I'll take it to bits! Last edited by Stretch; 10-24-2012 at 04:13 PM. Reason: Spelling and then correcting an error
|
|
#4
10-24-2012, 03:42 PM
|
||||
|
||||
|
Advice
__________________
ASE Master Mechanic asemastermechanic@juno.com Prototype R&D/testing: Thermal & Aerodynamic System Engineering (TASE) Senior vehicle instrumentation technician. Noise Vibration and Harshness (NVH). Dynamometer. Heat exchanger durability. HV-A/C Climate Control. Vehicle build. Fleet Durability Technical Quality Auditor. Automotive Technical Writer 1985 300SD 1983 300D 1984 190D 2003 Volvo V70 2002 Honda Civic https://www.boldegoist.com/
|
|
#5
10-24-2012, 04:02 PM
|
|||
|
|||
|
Quote:
 Quote:
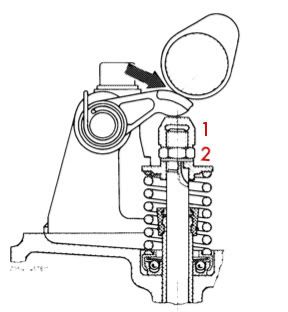 When you lock the adjusting nut, the adjusting nut will come up in the thread a bit, causing the valve clearance to decrease, so you have to be a bit on the loose side before you lock the adjusting nut.
|
|
#6
10-24-2012, 04:13 PM
|
||||
|
||||
|
I'm getting tired - thanks for the correction Govert. (I'll edit my text in post #3)
__________________
1992 W201 190E 1.8 171,000 km - Daily driver 1981 W123 300D ~ 100,000 miles / 160,000 km - project car stripped to the bone 1965 Land Rover Series 2a Station Wagon CIS recovery therapy! 1961 Volvo PV544 Bare metal rat rod-ish thing I'm here to chat about cars and to help others - I'm not here "to always be right" like an internet warrior Don't leave that there - I'll take it to bits!
|
 |
| Bookmarks |
|
|


 Linear Mode


