

|
|
|
|
|
|
|||||||
|
|
LinkBack | Thread Tools | Display Modes |
|
#1
 01-27-2014, 12:45 PM
|
||||
|
||||
|
W123 seats -- disassembly, skin removal padding refurbish, misc. notes
Hello All!
So I've noticed that in the car community a lot of people are not afraid of taking on projects such as floor welding, transmission replacement, or engine work, but somehow seem to shy away from simple upholstery work such as skin swapping and pleat restoration. Since I am going to be doing some seat work in the next few days, I figured I’d write up what I’m doing so that you don’t have to spend $$$ at an upholstery shop for what you can easily do at home. First, we’ll take two seats apart – a 1984 or 1985 driver’s seat in Blue (code 152) and a 1983 driver's seat in some sort of tan (Palomino? I don't know) and take them apart. The idea with this project is to end up with two blue seats for my 'SD (I'm swapping to manual seats to save weight & reduce complexity), and to that end I have a third seat with destroyed tracks and rotten springs/padding but a half-decent skin in blue. I will also restore the pleats in the seat and perhaps add some padding in general. Part of this DIY was completed with cat as my sidekick.  Here are the two patients:  We will tackle the Palomino (?) one first. A good place to start in stripping the seat is the bottom. The first step will be to stand on the seat like this and then reach in and push & pull the skin out. It is tucked into a crevice in the seat frame that you need to push it out of, and crouching on the seat creates slack in the padding that allows you to pull it out. The closer you stand towards the front, the more the front will be compressed. Try to find a position that just allows you to get your fingers in there and still creates slack in the skin.  It finally came out when I used the handle of a pair of scissors to push up on the padding. You can see a strip of some sort of cardboard material that gives the edge of the skin the stiffness required to stay in the groove.  On this seat, the skin was quite easy to slip out once I got it started. 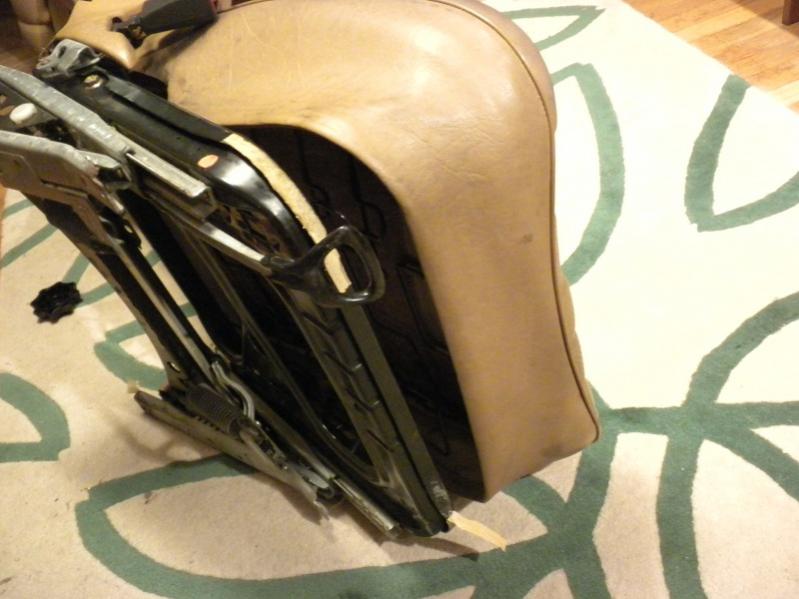 Here you can see both what creates those pleats and why they go so flat. There are insert -- the gray strips -- that are sewn into "pockets" and create the pleats. In this seat, you can see that the cloth backing that forms those "pockets" is totally disintegrated.  So the skin is completely removed in the front and on the sides, but not on the back. To remove it on the back, you need to create slack there. I have found that the best way of doing this is to completely recline the seat and then stuff the upholstery backwards through the crevice between the seat bottom and back while tilting the seatback back up.  I ended up getting the back end off by slipping my finger in and pulling down as such:   I then pulled the skin off by pulling from the front away from the seat (if the seat were mounted in the car, towards the dash). Some of the skin got caught in the rear corners of the cushion and I had to work it off by hand; but this was not too hard.  Next, the seatback.
__________________
"Senior Luna, your sense of humor is still loco... but we love it, anyway." -rickymay ____ "Your sense of humor is still loco...  " -MBeige ____ "Señor Luna, your sense of humor is quite järjetön" -Delibes " -MBeige ____ "Señor Luna, your sense of humor is quite järjetön" -Delibes1982 300SD -- 211k, Texas car, tranny issues ____ 1979 240D 4-speed 234k -- turbo and tuned IP, third world taxi hot rod 2 Samuel 12:13: "David said to Nathan, I have sinned against the Lord. And Nathan said to David, The Lord also has put away your sin; you shall not die." 
|
| Bookmarks |
|
|


 Threaded Mode


