

|
|
|
|
|
|
#1
 11-03-2013, 09:14 AM
|
||||
|
||||
|
W201 steering box refresh and adjust
G'day Folks,
The weather outside is frightful but inside with a W201 steering box on the living room table it is delightful... {[INTERLUDE] After a great summer the bad weather here has been biting back so I'm already starting on the winter stir crazy projects. I don't think this is limited to Europe either tnbob says it is cold enough to freeze the balls off of a brass monkey where he is too <= well he didn't quite say it like that 'cos he's a gentleman but you get the picture I guess [/INTERLUDE]} ...here's one showing how far you can get with a W201 steering box refresh. It isn't as far as the average DIYer can get with a W114/115 W123 W126 steering box which is a shame. The seals in the input shaft shaft cap are more or less unchangeable without special tools. I say “more or less” because the FSM shows a circlip which doesn't exist on either of the steering boxes I own (See para 32 and 56 in chapter 46-220). Perhaps on an earlier or different W201 steering box the front seal on this cap can be changed? I dunno – can anyone help with more information? Anyway to help with the job the FSM is easily and publicly available here => http://www.startekinfo.com/StarTek/outside/11832/Resources/201Create/PDF/10011.pdf I must confess that I've been struggling with the W201. It isn't like my W123 – it is too small for me really – too much packed into a small space – and for that reason I didn't bother to investigate too far into the depths of the engine bay under the gubbins trying to find the screw on the steering box for the centring pin. The plan was to drain the steering fluid via this hole as you would with a W123 / W126 etc => What a feeling it will be! A properly adjusted W123 / W116 / W126 power steering box I'm not sure if this trick will also work on the W201 but even if it did I think there'd be a lot of fluid still left in the steering box because of the strange angle it is positioned in the car. May be when it is dry and it is time to change my power steering fluid I'll give it a go. Nonetheless I've read that W201s often suffer from power steering fluid neglect so perhaps this DIY will encourage the faithful few to hoik the steering box out of their cars and give them a good spring (or autumn) clean. If you're an avid W201er and you're looking for a bit of weight loss you might be interested to learn that there's an aluminium bodied version of the steering box as well as a cast steel one. The aluminium alloy cased one is about 4 kg lighter. I have both – the aluminium alloy one is the subject of this thread and will be fitted to me motah.  As before – as stated in the thread I did previously for the W123 steering box – I have to say that if you can't get the damn thing out of your car you are probably not the person to be trying to adjust it and reseal it! (See What a feeling it will be! A properly adjusted W123 / W116 / W126 power steering box) Unlike the W123 the Pitman arm and the steering coupler on both of my W201 steering boxes came off easily. The Pitman arm has a bolt and nut that looks a bit like a flex disc bolt and nut and a circlip which needs to be removed    You now need to do something that is really important – very very very important! Make absolutely sure that the steering is in the centre position. You have been warned! If you carry on with the next stage and the steering is not centred then you might as well chuck the part in the bin right now. Unscrew the Allen head screws on the cover of the output shaft and remove the Simmonds nut (plastic insert nut) on the adjusting screw by holding the adjusting screw in its existing position. So if necessary you need spanner in one hand and an Allen key in the other – Allen key in end of adjusting screw and spanner working nut loose. Note how this is a “normal” right hand thread. 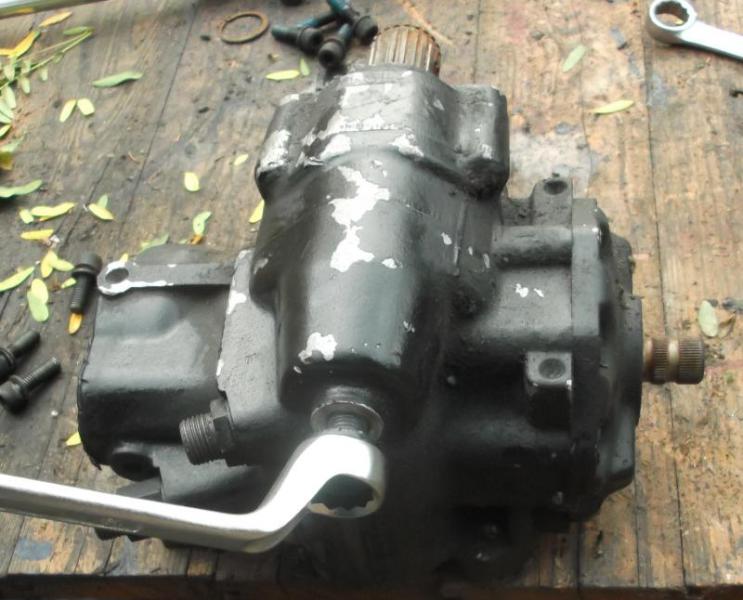
__________________
1992 W201 190E 1.8 171,000 km - Daily driver 1981 W123 300D ~ 100,000 miles / 160,000 km - project car stripped to the bone 1965 Land Rover Series 2a Station Wagon CIS recovery therapy! 1961 Volvo PV544 Bare metal rat rod-ish thing I'm here to chat about cars and to help others - I'm not here "to always be right" like an internet warrior  Don't leave that there - I'll take it to bits! Last edited by Stretch; 11-03-2013 at 10:06 AM. Reason: Added pictures and links and removed a notice 
|
| Bookmarks |
|
|


 Threaded Mode


