

|
|
|
|
|
|
#1
 07-06-2003, 09:33 PM
|
||||
|
||||
|
EDIT: For the record, I created this post to show how to remove the OM60x ALDA with the intake manifold in place. The idea is to remove it, adjust with shims or the setscrew, and re-install.
I do NOT endorse removing the ALDA permanently! Now back to our regulary scheduled programming: ====================================== Hi all, Well, I finally finished twiddling with the ALDA on my blue car (you know, the one that isn't totaled). I pulled it in & out so many times I could almost do it blindfolded. I took some photos, and figured I'd write a little explanation for them (see below). But first the results of the adjustment: This ALDA wasn't leaking, but it wasn't perfectly sealed either. I took it apart and replaced the seal (thanks, Jim!) and made it seal perfectly. Then, adding a 1.25mm shim was too much. 0.75mm equals 1 full turn, 1.25mm is equivalent to 1.67 turns. As I had no other shims to play with, I pried the plastic seal out and managed to save the metal cap intact. One full turn out was pretty good, with no visible smoke leaving a stop sign. An extra quarter turn (1.25 turns total) gave the little black puff leaving a stop, which is what I was aiming for, with good power. I might turn it back a hair but for now I'll leave it. With just the shim (~1.67 turns), it smoked VERY noticeably at almost all speeds, spewing a large black cloud while leaving a stop sign, and part-throttle acceleration in 3rd/4th gear also left a good smoke trail. Not good - way too rich! Note that my sister's car didn't smoke like this, and my 84 doesn't either, even with their ALDAs turned WAY up. I think both of those were limited by the internal full-load setting, where my blue car has a higher internal limit? This is the first car where I was actually able to MAKE it smoke, like Marshall keeps saying it should, when too rich! ;-) OK, here's the procedure: Required tools: 24mm open-end wrench, Channel-Lock pliers or similar, Phillips screwdriver (for pressure hose clamps), 10mm socket and flat screwdriver for adjustment (if you don't use shims). Preceding work - remove the windshield washer reservoir, and ALDA signal line. Now: 1- Do some reconnaissance and locate the enemy (er, ADLA) and study it: 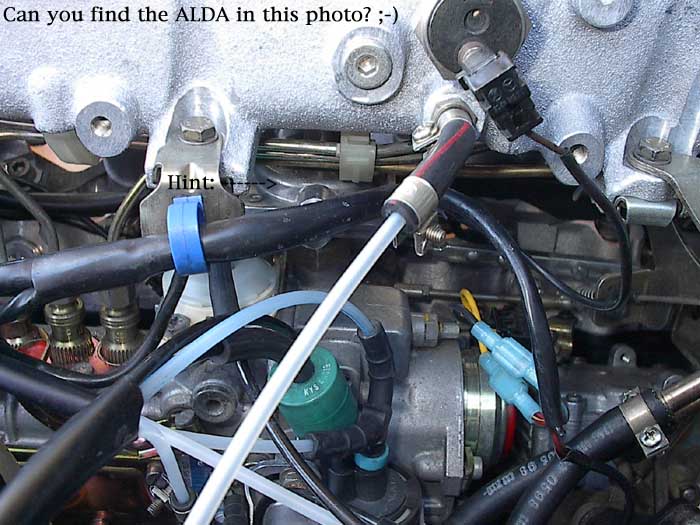 2- Slide the 24mm wrench under the ALDA, so it's up tight against the body (away from the nut underneath). Get the pliers on to the nut. Make sure the wrenches are not touching the same flats or it won't loosen. Turn the ALDA slightly CCW, or turn the nut slightly CW, to loosen. Should be less than 1/8 turn to break them free: 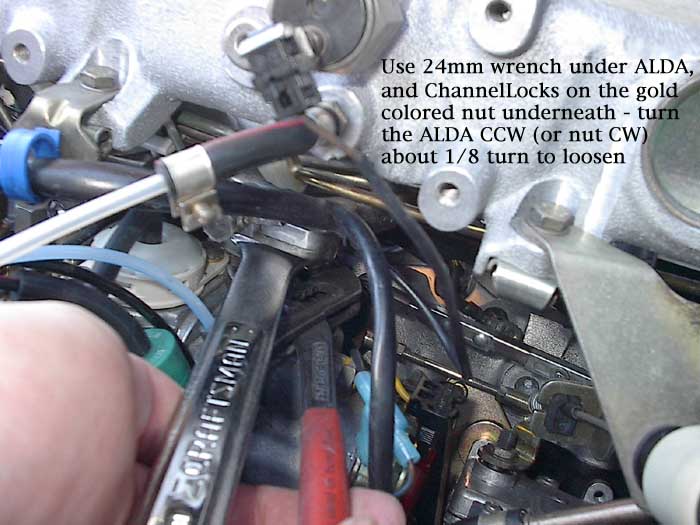 3- Now that the nut is loose, squeeze you hands in there and spin the nut off the ALDA (spin nut CW). 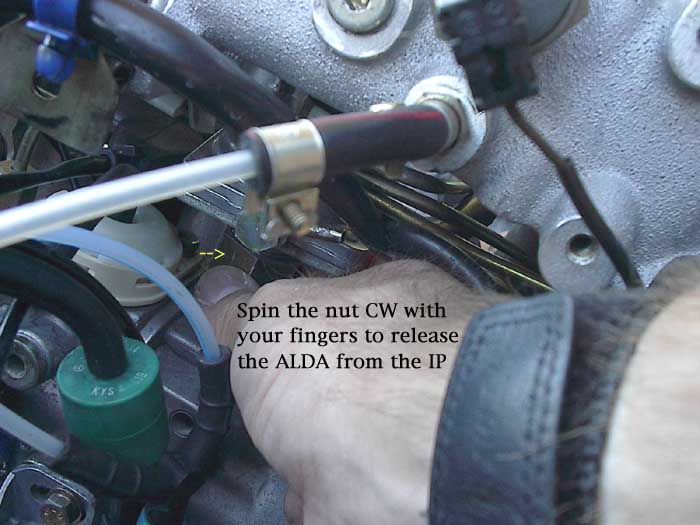 4- The ALDA is now free of the IP. However there are lots of hard parts trapping it down there. Wiggle it all over and it should eventually come out. Worst case, if it absolutely won't come free, you will need to loosen and/or disconnect the rear 3 metal injection lines - then it WILL come out: 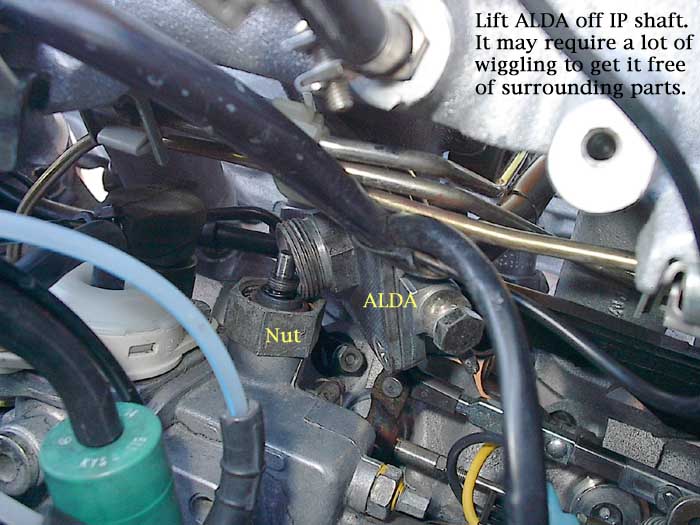 5- The typical factory shim is 1.00-1.25mm thick. My one car had an extra 0.10mm shim as well. One turn of the setscrew equals 0.75mm of shim thickness. More shims richens the mixture (same as turning setscrew CCW). Try 0.5-1.0 turns to start, or 0.37-0.75mm in shims, depending on your preference: 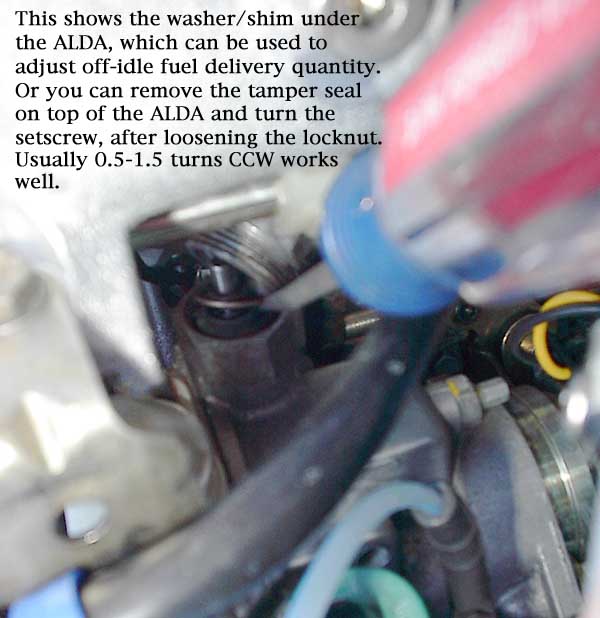 6- Proof that yes, it CAN be removed with the intake manifold in place. I timed my last R&R. With the tools in hand, hood up, ready to wrench... It took under 2 minutes to have the ALDA loose in my hand, another 1 minute to adjust (via setscrew), then 3 more minutes to re-install. That's 6 minutes total, ready to re-start the engine & drive. Not bad, eh? The OM617 guys just lost one more item to gloat about being "difficult" on the 603... ;-) 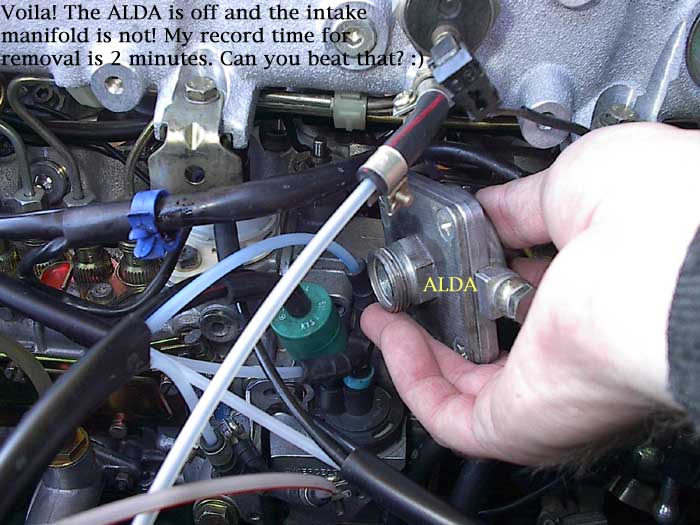  Best regards,
__________________
Check out my website photos, documents, and movies! Last edited by whunter; 07-28-2011 at 01:52 PM. Reason: attached pictures 
|
|
#2
07-06-2003, 09:49 PM
|
|||
|
|||
|
Dave:
How did you get that engine compartment so clean? Mine is covered with ingrained black dirt, not that I've ever really tried to clean it or anything! Peter
__________________
1972 220D ?? miles 1988 300E 200,012 1987 300D Turbo killed 9/25/07, 275,000 miles 1985 Volvo 740 GLE Turobodiesel 218,000 1972 280 SE 4.5 165, 000 - It runs!
|
|
#3
07-06-2003, 10:24 PM
|
||||
|
||||
|
Peter,
Well, it's partially because that engine got the new head 10kmi ago. While it was apart I scrubbed everything in sight. It has stayed pretty clean since then, and a periodic pressure-wash at the coin-op car wash works wonders. I always cover the two electrical switches & senders at the water neck up front, they get cranky when wet (aux fan stays on high all the time). If your engine compartment has been attacked by rust (north east or coastal environment), it may be impossible to EVER get your engine looking like this California engine... pesky corrosion is tough to get rid of! 
__________________
Check out my website photos, documents, and movies!
|
|
#4
07-06-2003, 11:01 PM
|
|||
|
|||
|
Woohoo! Dave the OM603 master does it again! Seriously, I really needed that outline! I'll be attacking the ALDA on the "slow" car this week. Regarding the cleanliness, engine degreaser at the local do-it-yourself car wash will do wonders! Although not QUITE as good as those hot water pressure washers. Gotta be careful with those around old vacuum lines - they can get blown to pieces!
|
|
#5
07-07-2003, 01:21 AM
|
|||
|
|||
|
But is there a chance of the ALDA breaking? I thought I read somewhere on the mbz.org archives, that there was a chance of destroying the ALDA.
|
|
#6
07-07-2003, 04:02 AM
|
||||
|
||||
|
The risk comes from futzing with the set screw on top of the ALDA. There's little risk if you change shims between the ALDA and the IP.
What's nice about changing shims is that you can honestly tell a prospective buyer that you've never adjusted the ALDA. See, the seal is still intact >  What gets me about Dave is not how clean his engine is but how clean his hand is with the ALDA out! My hands get dirty popping the hood and that's on one of them corrosion free California cars. Sixto 95 S420 91 300SE 87 300SDL 83 300SD
|
|
#7
09-24-2003, 10:59 AM
|
|||
|
|||
|
CCW and CW
Hi, Dave:
I am thinking about replacing the shut-off valve on my 87 300TDT. If I attach a hand vacuum pump to the valve directly, it takes two hard pump to shut off the engine. The vacuum hose to the valve has good vacuum once the key is turned off. So I think I have a leak in the shut-off valve. In your second picture, you said "Turn the ALDA slightly CCW, or turn the nut slightly CW". Does that mean you are looking from the top? So the wrench moves to your right and the channel loclkmoves to the left. Thanks. Bo
|
|
#8
09-24-2003, 01:24 PM
|
||||
|
||||
|
Bo, that is correct. You just want to loosen the ALDA locking nut slightly, so you can get your fingers in there & spin it off by hand. Don't ever crank the ALDA or nut very far when it's tight or you could destroy the top of the pump - don't laugh, a guy in Tennessee (?) did this on a 3.5L recently, while trying to remove the ALDA so he cound change his shutoff valve!
 Tip: If you can't get the ALDA out once it's loose, you may need to loosen the injector lines at the pump, for lines 4, 5, and 6. Then pry them up gently while wiggling the ALDA out. You may need to loosen the bracket to the intake manifold if it's present and clamping the lines in place like it should (many don't, the plastic clips are long broken). Also, the new shutoff valve won't include a new O-ring, order one separately. And the new valve has its fitting on the top, not the side, so you'll need a few inches of 3.5mm ID rubber vacuum hose as well. Have fun,
__________________
Check out my website photos, documents, and movies!
|
|
#9
09-24-2003, 02:30 PM
|
|||
|
|||
|
Thanks
Thanks, Dave.
I just ordered the valve, the O-ring, and some vacuum lines and rubber connectors. Maybe that is why MB wants its techs to take off the intake manifold to change the shut-off valve. BTW, I took a look at the washer reservoir, it does not seem to have anything connected to it. Does it simply lift up? This is for a 87 300 TDT.
|
|
#10
09-24-2003, 03:33 PM
|
||||
|
||||
|
Yep - the reservoir just lifts up. You may need to disconenct the electrical wires going to it. If you pull the pump motors, it will leak all the fluid out unless you plug the holes with something. I haven't yet devised an elegant solution for that nuisance.
__________________
Check out my website photos, documents, and movies!
|
|
#11
06-27-2004, 10:23 AM
|
|||
|
|||
|
I am trying to adjust the ALDA by the shim method to avoid damaging the top screw. In trying the get the ALDA out, so far I've broken free the big nut and turned that nut about 2 turns clockwise (I can't really turn the ALDA because one side butts up against an electrical connenctor) and the ALDA feels nice and loose. I can see it's going to also butt up against the fuel lines at the top so I won't be able to remove it to install shims without removing fuel lines (not something I want to do). At this point I decided to take it for a drive and after trying everything else previously to cure sluggish acceleration, the differance now is like night and day. It has so much more power than before! It does have some black smoke at full throttle but I can live with that. The question now is can I just leave it the way it is, lightly unscrewed? It can't loosen or tighten itself from engine vibations because it's confined by the above mentioned restrictions.
|
|
#12
06-27-2004, 11:13 AM
|
||||
|
||||
|
Interesting concept - loosening the nut a bit does have the same effect since it lets the ALDA rise vertically from spring pressure. Never thought of that.
 I personally would not want to leave it like that but I guess you could try. You need to spin the locknut a lot more than twice to get it loose. The ALDA will hit the fuel lines but should wiggle out by turning it sideways. If it absolutely won't come out due to the fuel lines, then yes you may need to loosen the #4/5/6 lines to make room. Most cars don't need that, it comes out with a couple minutes of (frustrating) fiddling. I personally would not want to leave it like that but I guess you could try. You need to spin the locknut a lot more than twice to get it loose. The ALDA will hit the fuel lines but should wiggle out by turning it sideways. If it absolutely won't come out due to the fuel lines, then yes you may need to loosen the #4/5/6 lines to make room. Most cars don't need that, it comes out with a couple minutes of (frustrating) fiddling. BTW - if you're getting black smoke, it's probably a little too rich, and you'll want to tighten it down some. Power may be OK but your MPG will probably suffer, and you may just be depositing carbon internally.
__________________
Check out my website photos, documents, and movies!
|
|
#14
10-11-2006, 04:29 PM
|
|||
|
|||
|
Thanks. Its very simple on the SD/SDL. Plenty of room to just release it and slide it out in < 10 seconds. I used an adjustable for the bottom, and a thick screwdriver carefully wedged between a bracket on the side of the intake manifold, and the ALDA to keep the unit from turning along with the wrench.
I removed the ALDA's on my diesels with no noticeable gain in off-the-line acceleration (they'd already been tweaked). But that wasn't my intended purpose. I just do not want to be dependent upon the ALDA for my full and low boost conditions since the tiniest bit of crud can block one of the boost lines and send a false signal simulating a no boost condition. Absolutely sick of it. Happened every two weeks.
|
|
#15
10-12-2006, 02:37 PM
|
||||
|
||||
|
For the record, I posted this to show how to remove the OM60x ALDA with the intake manifold in place. The idea is to remove it, adjust with shims or the setscrew, and re-install.
I do NOT endorse removing the ALDA permanently, despite what the "other" thread on this topic suggests! :fork_off:
|
 |
| Bookmarks |
|
|


 Linear Mode


