

|
|
|
|
|
|
|
|
#1
 03-09-2011, 09:14 AM
|
||||
|
||||
|
Update
Progress is slow - I blame the weather and not my inability to get organised...
The front wings / fenders are still getting the treatment:- POR15 to stop the rust (on both sides) and then the epoxy based POR15 tie coat primer, anti stone chip on the underside fronp bits, and then primer undercoat... "Ebony and ivory live together in perfect harmony"... 
__________________
1992 W201 190E 1.8 171,000 km - Daily driver 1981 W123 300D ~ 100,000 miles / 160,000 km - project car stripped to the bone 1965 Land Rover Series 2a Station Wagon CIS recovery therapy! 1961 Volvo PV544 Bare metal rat rod-ish thing I'm here to chat about cars and to help others - I'm not here "to always be right" like an internet warrior  Don't leave that there - I'll take it to bits! 
|
|
#2
03-13-2011, 12:04 PM
|
||||
|
||||
|
And the warm days just keep on coming!
Wow look a bonnet in self etching primer. It isn't even Easter yet...

__________________
1992 W201 190E 1.8 171,000 km - Daily driver 1981 W123 300D ~ 100,000 miles / 160,000 km - project car stripped to the bone 1965 Land Rover Series 2a Station Wagon CIS recovery therapy! 1961 Volvo PV544 Bare metal rat rod-ish thing I'm here to chat about cars and to help others - I'm not here "to always be right" like an internet warrior Don't leave that there - I'll take it to bits!
|
|
#3
03-20-2011, 12:43 PM
|
||||
|
||||
|
I'm watching you Army! Keep it coming.
__________________
 1981 300TD "The Green Lantern" 1980 300TD 1983 300D Euro "China Cat"
|
|
#4
03-20-2011, 02:35 PM
|
||||
|
||||
|
Quote:
Do you know of any unforgiving light sources that can be used to check my finishes? Sharp white LED lights?
__________________
1992 W201 190E 1.8 171,000 km - Daily driver 1981 W123 300D ~ 100,000 miles / 160,000 km - project car stripped to the bone 1965 Land Rover Series 2a Station Wagon CIS recovery therapy! 1961 Volvo PV544 Bare metal rat rod-ish thing I'm here to chat about cars and to help others - I'm not here "to always be right" like an internet warrior Don't leave that there - I'll take it to bits!
|
|
#5
03-22-2011, 09:29 AM
|
||||
|
||||
|
Problems problems
After waiting for two days you would have thought the bloody stuff would have been dry enough to sand... but no!
Here's a picture of what happens when you sand too soon:- 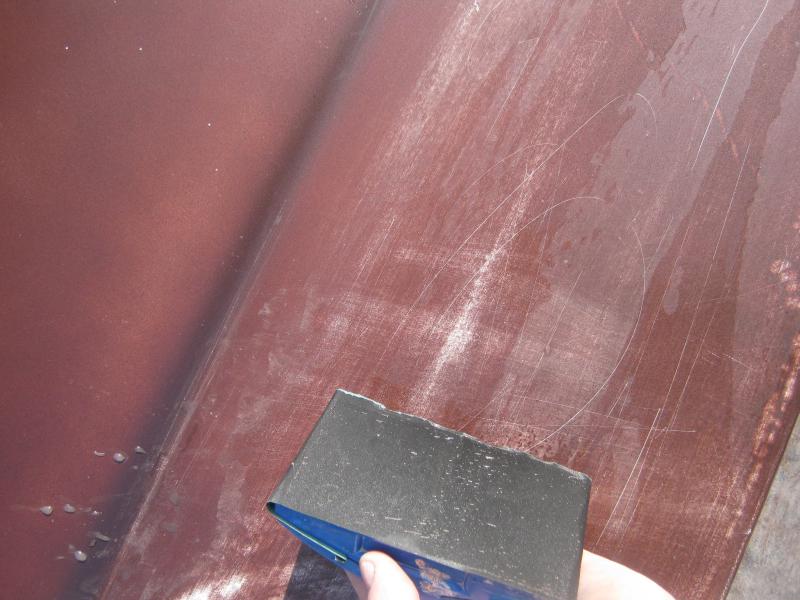 Can see the scratches in the surface? On the surface of the sand paper the paint balls up into bits that drag along into the surface causing the scratches. Got to be patent - otherwise you end up making more work for yourself... EDIT:- I forgot to say a trick to help stop the balling of the paint on the sand paper is to use a bit of soap. Tip courtesy of http://www.mig-welding.co.uk/primer.htm
__________________
1992 W201 190E 1.8 171,000 km - Daily driver 1981 W123 300D ~ 100,000 miles / 160,000 km - project car stripped to the bone 1965 Land Rover Series 2a Station Wagon CIS recovery therapy! 1961 Volvo PV544 Bare metal rat rod-ish thing I'm here to chat about cars and to help others - I'm not here "to always be right" like an internet warrior Don't leave that there - I'll take it to bits! Last edited by Stretch; 03-23-2011 at 03:12 PM. Reason: Added more information
|
|
#6
03-23-2011, 03:24 PM
|
||||
|
||||
|
Sanding - the highs and the lows!
Here's a picture of my far too thick guide coat - waste of paint as I sanded most of it all off again... The point of the exercise was to identify where the dents and uneven surfaces on the bonnet were. The white colour is the self echting primer which is under the brown colour coat.
 It has taken me quite a long time to get the feeling that perhaps I'm almost getting a vague idea of what I'm doing - so far I've probably used about four times as much paint as a professional would and I've lost count of the hours I've put into this - but I'm enjoying myself and think I stand a good chance of getting a finish that I'll be happy with for my future daily driver. I plan to tape off the garage and spray the top clear coat in a more sterile environment than my outdoor efforts I've shown so far. Painting outside isn't ideal but I can report it is much better to paint outside in the spring and not in the autumn: there's much less junk in the air at this time of the year!
__________________
1992 W201 190E 1.8 171,000 km - Daily driver 1981 W123 300D ~ 100,000 miles / 160,000 km - project car stripped to the bone 1965 Land Rover Series 2a Station Wagon CIS recovery therapy! 1961 Volvo PV544 Bare metal rat rod-ish thing I'm here to chat about cars and to help others - I'm not here "to always be right" like an internet warrior Don't leave that there - I'll take it to bits!
|
|
#7
03-26-2011, 11:43 AM
|
||||
|
||||
|
Show no fear!
Well I've started on the roof... the front and rear window rubbers were rotten and were leaking so the glass had to come out anyway (!?).
I was expecting to find loads of rust - but I didn't - hence this thread => A happy I found no (well hardly any) rust on my W123 thread! I had to remove the side trim which is covered in this thread => W123 exterior trim removal The main problem with the paint finish on the roof was a load of nasty blistering. Colour 480 (Manganese brown) seems to suffer in the sun. Here's an example of how it looked. 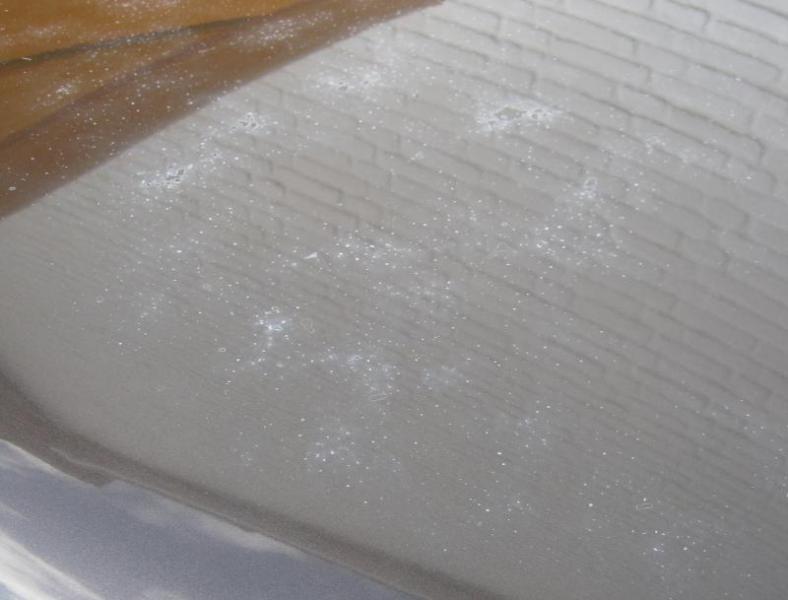 Keeping it clean and polished will only help for a while - at some point or other it will start to corrode... so this is how it looks at the moment:- 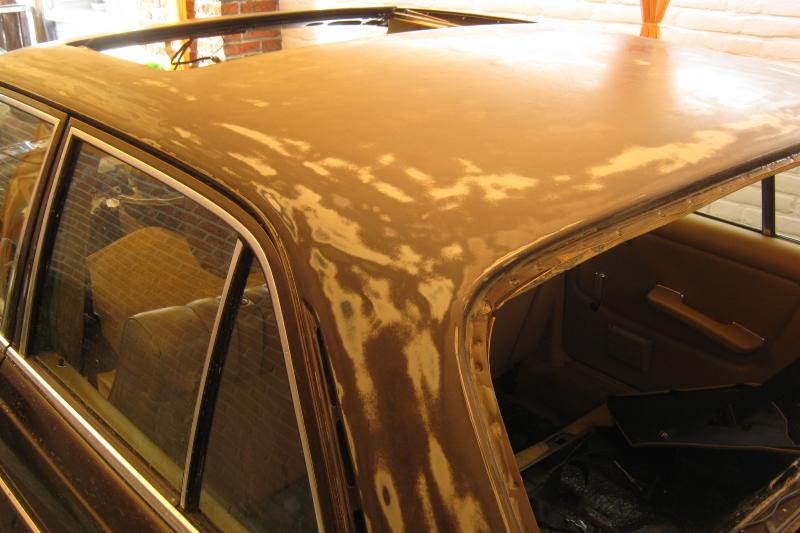  The brown colour is (obviously) the top coat - underneath there's a white primer - and under that there's a black rust proofing coating that I've tried to preserve.
__________________
1992 W201 190E 1.8 171,000 km - Daily driver 1981 W123 300D ~ 100,000 miles / 160,000 km - project car stripped to the bone 1965 Land Rover Series 2a Station Wagon CIS recovery therapy! 1961 Volvo PV544 Bare metal rat rod-ish thing I'm here to chat about cars and to help others - I'm not here "to always be right" like an internet warrior Don't leave that there - I'll take it to bits!
|
|
#8
04-07-2011, 02:55 AM
|
||||
|
||||
|
My tips so far
I thought I'd add some of my tips from the perspective of someone who has only ever painted wood and stone before! (I've only ever done house painting)
When you paint bare wood you sand it and lay down a primer. This is similar to what you do with car paint. However, with wood paint when you add another layer the first layer doesn't get disturbed. If you make a mistake with wood paint you can wipe it off with a rag. If you try this with car paint you'll find that the new layer of paint behaves more like paint stripper - you'll wipe back to bare metal. The same can be said for decent quality filler. So my number one tip is:- When painting with car paint don't touch it until it is dry. Further, when you are planning to sand a surface make sure that it is really dry and hard. In temperatures below 15 degrees Celsius you will struggle to get a hard surface within a few days - so don't bother - wait until it gets warmer or move to a nice warm place. Also when sanding - cleanliness is very important - start off with a clean surface, and whilst sanding remove as much sludge was possible from the surface you are sanding and the paper on your sanding block. Don't forget that when you are sanding you are scratching the surface - the size / depth of the scratches that you will make will be proportional to the grit size of the sand paper and the chunks of gunk that you remove during the sanding process. If like me you are normally sanding wood - forget about 80 grit! Start out with a really fine sand paper - say 800 grit - and then see if that removes enough of the surface for you or not. And don't forget, always use loads of water to clean as you go. So far I have found that different light sources give different impressions of your finished product - LED lights and flashes on cameras seem to show up patchiness, whilst bright sunlight tends to show up scratches better if you move your line of vision about a bit. When spraying you do indeed need to be a bit more like a robot than like an artist - spray in parallel overlapping lines. However, when spraying, spray like you are the stingiest meanest person on the planet. Use as little paint as possible. The plan is to use just enough paint to cover the surface and not a drop more. I can see that a good sprayer could improve the look of a rough surface - but if the surface isn't as smooth as a baby's backside then you're unlikely to be able to correct the roughness with a spray gun. I therefore think that it is harder to sand than it is to spray. My penultimate tip is to find a safe place to store drying panels if you have removed them from the car. Car paint spends an awful lot of the time being soft and weak - if you are not careful you'll be redoing a lot of your hard work because you've dropped something on it... And my best tip of all? Be patient. If you are in a hurry - don't start to paint your car.
__________________
1992 W201 190E 1.8 171,000 km - Daily driver 1981 W123 300D ~ 100,000 miles / 160,000 km - project car stripped to the bone 1965 Land Rover Series 2a Station Wagon CIS recovery therapy! 1961 Volvo PV544 Bare metal rat rod-ish thing I'm here to chat about cars and to help others - I'm not here "to always be right" like an internet warrior Don't leave that there - I'll take it to bits! Last edited by Stretch; 04-07-2011 at 02:06 PM. Reason: Added more information
|
|
#9
04-07-2011, 03:43 PM
|
|||
|
|||
|
Quote:
Sand, sand and sand some more. I don't know how many times I told my wife I will be done in a week or so.  If I didn't have the help of my father-in-law for several weeks it would still not be finished. If I didn't have the help of my father-in-law for several weeks it would still not be finished.I did find that a couple hundred dollars paid to a ding and dent guy to remove a bunch of the initial dings makes for a easier time during the body work and less chance for errors, misses, waves etc. I missed several dings and small dents on my tailgate for some reason. After all that work, it really pissed me off. I had a ding and dent guy fix them all after the fact in 30 minutes, for $100. That's when the thought came to do them in advance.
__________________
 1987 300TD 147,000 miles- Palomino leather interior, 1995 facelift and body cladding, E350 wheels, Rebuilt suspension and sport springs, rebuilt turbo, New Monarch injection pump and injectors....and the list goes on and on...
|
|
#10
04-08-2011, 01:56 PM
|
||||
|
||||
|
Ahh dings and dents... yeah well we'll all see in the end if mine are still detectable... Oh to live in a country where you can get few little things fixed for a small fee - here everyone tries to take home a thousand euros a day, which makes even the smallest job seriously expensive.
Hey 1stbenznc I take it you went from white to blue? Have you any pictures of your work online?
__________________
1992 W201 190E 1.8 171,000 km - Daily driver 1981 W123 300D ~ 100,000 miles / 160,000 km - project car stripped to the bone 1965 Land Rover Series 2a Station Wagon CIS recovery therapy! 1961 Volvo PV544 Bare metal rat rod-ish thing I'm here to chat about cars and to help others - I'm not here "to always be right" like an internet warrior Don't leave that there - I'll take it to bits!
|
|
#11
04-08-2011, 11:39 PM
|
|||
|
|||
|
With the guide coat you are doing and all the sanding, you should be in the clear and looking great! I rushed the rear tailgate and thats when the errors happened!!
I am just about done putting the interior back together and hope to do a final photo shoot and make a few posts about it. One will be of the body work. I basically stripped the car down as much as possible. The only thing on the exterior that I didn't pull was the two roof racks.....and I should have. Painting behind them was a pain and came out a litlte thin. Otherwise, very pleased with a backyard paint job. I showed a couple painters and couldn't believe I did it. They said it was about a $5000-$6000 job with the detail put in and body upgrade to 1995. I had to jam the whole car going from white to Blue so all weather stripping came off as well as bumpers, handles, grill, rear glass (3). The only white is behind the headlights and in the engine bay. Believe me, nothing is free or cheap here either. Many shops wanting outrageous fees for work and time. Keep it going!!!
__________________
1987 300TD 147,000 miles- Palomino leather interior, 1995 facelift and body cladding, E350 wheels, Rebuilt suspension and sport springs, rebuilt turbo, New Monarch injection pump and injectors....and the list goes on and on...
|
|
#12
04-09-2011, 07:19 AM
|
||||
|
||||
|
Quote:
(Go on post some pictures somewhere)
__________________
1992 W201 190E 1.8 171,000 km - Daily driver 1981 W123 300D ~ 100,000 miles / 160,000 km - project car stripped to the bone 1965 Land Rover Series 2a Station Wagon CIS recovery therapy! 1961 Volvo PV544 Bare metal rat rod-ish thing I'm here to chat about cars and to help others - I'm not here "to always be right" like an internet warrior Don't leave that there - I'll take it to bits!
|
|
#13
04-13-2011, 08:09 AM
|
||||
|
||||
|
I'm still having fun - how are you doing today?

__________________
1992 W201 190E 1.8 171,000 km - Daily driver 1981 W123 300D ~ 100,000 miles / 160,000 km - project car stripped to the bone 1965 Land Rover Series 2a Station Wagon CIS recovery therapy! 1961 Volvo PV544 Bare metal rat rod-ish thing I'm here to chat about cars and to help others - I'm not here "to always be right" like an internet warrior Don't leave that there - I'll take it to bits!
|
|
#14
05-23-2011, 07:57 AM
|
|||
|
|||
|
Thanks for the link to this thread. Although I don't have time at the moment, I am very interested in your project, and look forward to reviewing it before I start on mine.
__________________
 [SIGPIC] [SIGPIC]Tom SE Connecticut 1975 W115 300D visit my blog: http://mercedesdieselrebuildingdiederich.blogspot.com/
|
|
#15
06-21-2011, 07:50 AM
|
||||
|
||||
|
I've just discovered that my taking months to paint a car approach isn't ideal. Take a look at this thread for the answer to my question in the previous post.
Cleaning paint work whilst painting! I've got to get a shift on and get that bloody clear coat on a whole lot quicker!
__________________
1992 W201 190E 1.8 171,000 km - Daily driver 1981 W123 300D ~ 100,000 miles / 160,000 km - project car stripped to the bone 1965 Land Rover Series 2a Station Wagon CIS recovery therapy! 1961 Volvo PV544 Bare metal rat rod-ish thing I'm here to chat about cars and to help others - I'm not here "to always be right" like an internet warrior Don't leave that there - I'll take it to bits!
|
 |
| Bookmarks |
|
|


 Hybrid Mode


