

|
|
|
|
|
|
|
|
#1
 05-24-2011, 03:24 PM
|
||||
|
||||
|
Heres how I cleaned my diesel injectors. You can pay a shop to do the job for you but its actually fairly easy to DIY. Injector cleaning is a job that doesnt get done as often as it should (at least every 100,000 miles, maybe more often). If you have a problem with rough idle, smoking, poor fuel economy, etc., one of the things that you might want to try is to clean your injectors. Folks who experiment with alternative fuels (WVO, etc.) should clean their injectors more often. Anyone buying a car that has run WVO should ask when the injectors were last cleaned.
 This is one of the injectors from my 1987 300D Turbo (W124, OM603). My engine now has a #20 head with inclined injectors; the original #14 head had different injectors. Other diesel engines will have still other injectors but they will all be similar so that you can modify my instructions to fit your injectors. Some injectors have needles with holes in their tips; my injectors dont have that so I dont cover that part of the cleaning process. Diesel Giant has a good DIY on his site for OM617-type injectors. Warning: dont swap parts between injectors.  First, pull off the little return lines. Dont cut them off; you could damage the little barb connectors and cause a leak. Next, disconnect the metal hard line at the injector. In most Mercedes engines this requires a 14 mm wrench. A crowfoot adapter for your socket set allows you to get at the connector without damaging anything. Once you have the line free at the injector, use a cord to gently tie the hard line just far enough out of the way so that you can remove the injector. The injector has two flats on the top half of the body and a hex on the bottom. Do not put a wrench on the flats; you might cause the top half to come loose. This gets done in the next step but now is not the time. Use a deep 6-point 27 mm or 1-1/16 inch socket and make sure that it will clear the little barbs for the return lines and not damage them. Mercedes has a special socket for this but I found one at a local store that worked fine. Once you have broken the torque the injector should come out easily. Now is a good time to fish the old heat shield (crush washer) out of the top of the prechamber and throw it away. Youll need a new one for each injector. Stuff a rag in the hole where the injector came out so that dirt doesnt get into the prechamber. If you put a rubber cap on the end of the hard line you wont lose any fuel and the engine will be easier to start when you are finished.  Now turn the injector upside down (a little fuel may leak out) and put it in a bench vice. Use sheet metal to pad the jaws of the vice so they dont damage the injector. 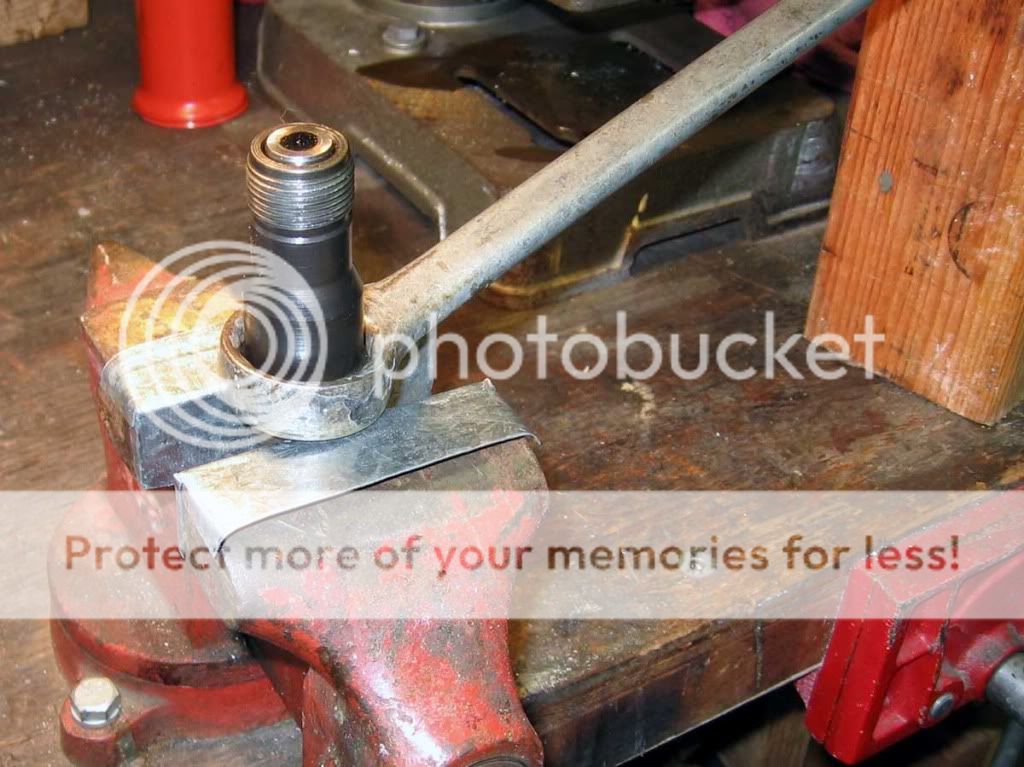 You can use either a wrench or a socket to separate the two halves of the injector. A torque wrench and socket will be needed to reassemble the halves. The wrench size is the same as used to remove the injector from the engine: 27 mm or 1-1/16 inch. Once you have loosened the two halves (they are tight -- the torque spec is typically 70-80 NM or 55 foot-pounds) you should be able to unscrew the injector by hand. The good news here is that there is nothing inside to go sproing and send parts all over the garage. However, you should hold the injector horizontally over a box lid lined with a shop towel so that anything that might fall out is contained.  The above picture shows the two halves. All of the bits and pieces are still inside. You may be able to tip the halves over and the pieces will fall out but if the injector is badly clogged with French fry grease then you may have to do a little prying. Each half has three pieces in it. The one that I found hardest to remove was the shim (like a small fat washer, it puts tension on the spring to set the pop pressure of the injector). It tends to stick in the top half of the injector.  Here I have laid out in order the injector halves and all their internal pieces, before cleaning. This injector was actually pretty clean and really didnt need cleaning but I had already decided to do all six. As expected, the shim was firmly stuck in the top half of the injector body. I left it there, knowing it would drop out in the acetone bath.  To clean all of the parts of the injector, I used acetone, because that was what I had in my cabinet. You could also use carburetor cleaner, gasoline, or some other solvent. Be careful using any of these chemicals indoors; consider doing this part of the process outside. Wear rubber gloves and eye protection. Keep the chemicals away from kids, pets, and fire. I put the parts and the acetone in a beaker and put the beaker in a small ultrasonic cleaner with water. If you use a plastic container, make sure your chosen solvent wont dissolve it. You dont have to use ultrasonic but it saves a lot of time. If you dont have an ultrasonic cleaner, put the container of parts and solvent into a pan of hot water. Cover the container so the solvent wont evaporate. Go away for an hour. When you come back, the solvent and the ultrasonic should have removed all of the crud from the parts. Take the parts out of the solvent and rinse them in alcohol, then allow them to dry. Without ultrasonic, you may want to soak the parts overnight.  My injectors each have four surfaces that must be lapped so that they will seal properly (there are no o-rings or other rubber parts in the injector). All of the parts are metal and the sealing is metal to metal. The picture above shows the surfaces that must be smooth: the top half of the injector body, the two sides of the intermediate disk, and the top of the nozzle. These surfaces are bare steel and will corrode if water gets in the fuel. Corrosion causes an imperfect seal and the injector then will leak.  You can use a surface plate if you have one. I used 2000 grit wet/dry sandpaper made for fine finishing. I cut a small piece and taped it to a flat glass plate. A piece of window glass will be flat enough. Use a little diesel fuel as a lubricant and gently rub each surface around in circles on the sandpaper until it is clean and shiny. Rinse in alcohol and wipe dry. The needle and nozzle need a little special attention. Use a brass wire brush to clean the tip of the needle. Be very careful not to damage the tip. The end of the nozzle will have some carbon on it from combustion in the prechamber. Any that doesnt come off in the solvent can be gently scraped off with a razor blade. The inside of the nozzle (where the needle goes) may need a little scrubbing with a Q-tip and alcohol. When you are finished, dip the needle in filtered diesel fuel and put it in the nozzle. Once the fuel has wetted the surfaces, you should be able to lift the needle up a few millimeters and it will slide back into the nozzle under its own weight. If it sticks, clean it again. Now you can reassemble the injector. The pieces, now clean, wont stick together like they did before so be very careful handling them. Make sure everything is clean and lint-free, especially the four sealing surfaces. The spring and the shim can go in either way but all of the other parts must go in facing the same direction as when you took the injector apart. The metal pressure pin on the end of the spring is especially difficult to keep in place. Once each injector half has its three pieces, carefully bring the halves together and hand-tighten them. You should feel pressure as the spring begins to compress for the last couple of turns. Make sure the pressure pin doesnt slip out of place and end up sideways.  Put the injector back in the vice and tighten the two halves using your torque wrench. The spec for my injectors is 70-80 NM or about 55 foot-pounds. Now the injector is ready to go back into the engine with a new heat shield or crush washer. The picture above shows the right and wrong way to position the heat shield relative to the injector. Of course you put the heat shield in the hole and screw the injector in on top of it. I photographed them on the injector because its easier to see that way. Torque the injector to spec (most are 70-80 NM but a note in FSM for the OM602/603 engine says that inclined injectors should be torqued to only 30 NM, about 22 foot-pounds). This lower spec for inclined injectors has been questioned by some readers and needs further investigation. The lower spec is apparently because inclined injectors screw into the prechamber itself rather than the locking ring. Caution is advised. Now reattach the hard lines (torque spec 20-30 NM) and the little rubber jumpers. Start the engine and check for leaks. If you havent lost much of the fuel in the hard lines the engine should start with only a little more cranking than normal. You may need to tighten the hard lines a little more if they leak. That's all there is to it -- nowhere near as hard as I had imagined. Jeremy
__________________
 "Buster" in the '95 Our all-Diesel family 1996 E300D (W210) . .338,000 miles Wife's car 2005 E320 CDI . . 113,000 miles My car Santa Rosa population 176,762 (2022) Total. . . . . . . . . . . . 627,762 "Oh lord won't you buy me a Mercedes Benz." -- Janis Joplin, October 1, 1970 Last edited by whunter; 07-02-2011 at 09:17 PM. Reason: attached pictures 
|
|
#2
05-24-2011, 04:46 PM
|
|||
|
|||
|
Fantastic job.
Would this also apply to a 1999 606.962 E300 injector
__________________
1999 Mercedes E300TD daily driver sold at 238K miles 106K miles were mine, rust worm got it :-( 2006 Mercedes CDI new daily driver! 56,000 miles May 2016 now 85,625 Apr 2018 and Apr 2019 101,000 miles Apr 2020 109,875. March 2024 135,250, Dec 2024 145,000 miles
|
|
#3
05-24-2011, 07:47 PM
|
||||
|
||||
|
Thank you
Quote:
__________________
"Buster" in the '95 Our all-Diesel family 1996 E300D (W210) . .338,000 miles Wife's car 2005 E320 CDI . . 113,000 miles My car Santa Rosa population 176,762 (2022) Total. . . . . . . . . . . . 627,762 "Oh lord won't you buy me a Mercedes Benz." -- Janis Joplin, October 1, 1970
|
|
#4
05-24-2011, 07:51 PM
|
||||
|
||||
|
Why is your engine so dirty?

__________________
Cheers! Scott McPhee 1987 300D
|
|
#5
05-24-2011, 09:39 PM
|
||||
|
||||
|
Did you pop test them before you put them back on the motor?
__________________
Grumpy Old Diesel Owners Club group I no longer question authority, I annoy authority. More effect, less effort....  1967 230-6 auto parts car. rust bucket. 1980 300D now parts car 800k miles 1984 300D 500k miles  1987 250td 160k miles English import  2001 jeep turbo diesel 130k miles  1998 jeep tdi ~ followed me home. Needs a turbo. 1968 Ford F750 truck. 6-354 diesel conversion. Other toys ~J.D.,Cat & GM ~ mainly earth moving
|
|
#6
05-24-2011, 10:48 PM
|
||||
|
||||
|
Pop! goes the injector
Quote:
__________________
"Buster" in the '95 Our all-Diesel family 1996 E300D (W210) . .338,000 miles Wife's car 2005 E320 CDI . . 113,000 miles My car Santa Rosa population 176,762 (2022) Total. . . . . . . . . . . . 627,762 "Oh lord won't you buy me a Mercedes Benz." -- Janis Joplin, October 1, 1970
|
|
#7
05-25-2011, 03:03 AM
|
||||
|
||||
|
Nice set of pictures - thanks - I'm inspired.
__________________
1992 W201 190E 1.8 171,000 km - Daily driver 1981 W123 300D ~ 100,000 miles / 160,000 km - project car stripped to the bone 1965 Land Rover Series 2a Station Wagon CIS recovery therapy! 1961 Volvo PV544 Bare metal rat rod-ish thing I'm here to chat about cars and to help others - I'm not here "to always be right" like an internet warrior  Don't leave that there - I'll take it to bits!
|
|
#8
05-25-2011, 07:37 AM
|
|||
|
|||
|
Nice job, great pictures, covers the whole process very nicely. The only thing I'd add is that once the injectors are back together, they should be tested for opening pressure and spray pattern. Bosch certified shop in my town charges about $15 per injector for this service, will adjust them if required so that opening pressures fall within a 5 bar range.
__________________
Respectfully, /s/ M. Dillon '87 124.193 (300TD) "White Whale", ~392k miles, 3.5l IP fitted '95 124.131 (E300) "Sapphire", 380k miles '73 Balboa 20 "Sanctification" Charleston SC
|
|
#9
05-25-2011, 02:51 PM
|
||||
|
||||
|
Good suggestion
Quote:
but that includes cleaning. I should ask them what they charge for only test/adjust. I had the injectors tested there when I bought the head and they did a quick check of pop pressure and spray pattern for free.
__________________
"Buster" in the '95 Our all-Diesel family 1996 E300D (W210) . .338,000 miles Wife's car 2005 E320 CDI . . 113,000 miles My car Santa Rosa population 176,762 (2022) Total. . . . . . . . . . . . 627,762 "Oh lord won't you buy me a Mercedes Benz." -- Janis Joplin, October 1, 1970
|
|
#10
06-30-2011, 03:39 PM
|
|||
|
|||
|
Cheapo injector cleaning.
I use the info here to clean the injectors and nozzles and the result is night and day. The 300D used to shake at idle real bad and I need almost full throttle to start it when cold. Also I need to start it a few times because the engine would not stay on. This is what I did and it makes a world of difference.
1) I do not know how long have the injectors been in service but the car has 340+K miles. I can see the flat surface of the nozzle is pitted so it must have in use for a while. I do not have a pop tester so I scratched a mark between the 2 halves before I disasmbled it. 2) Soaked them in gas and cleaned all the parts well. Use compress air to blow out all dirt and reassemble them. I did one injector at a time making sure all parts were put back in the same orientation, including the shim. 3) Re-torque the 2 halves and make sure the scratch mark aligned. By aligning the mark, I presume the pop pressure should be very close to what it was before. 4) Repeat for all injectors. 5) Reinstall and replace all heat shields. The difference is amazing. The car now starts first time every time with a slight touch of the pedal, idles well and accelerates smoothly. I cannot compare what the car would be like with new and fully balance nozzles but all the rough start or shaking are gone. The bottom line is that I am very happy with the result at minimum costs.
__________________
Not MBZ nor A/C trained professional but a die-hard DIY and green engineer. Use the info at your own peril. Picked up 2 Infractions because of disagreements. NOW reversed.  W124 Keyless remote, PM for details. http://www.peachparts.com/shopforum/mercedes-used-parts-sale-wanted/334620-fs-w124-chasis-keyless-remote-%2450-shipped.html 1 X 2006 CDI 1 x 87 300SDL 1 x 87 300D 1 x 87 300TDT wagon 1 x 83 300D 1 x 84 190D ( 5 sp ) - All R134 converted + keyless entry.
|
|
#11
06-30-2011, 03:45 PM
|
||||
|
||||
|
Great pictures, but for someone to ONLY do this as DIY, IMO isnt the smartest. Popping and balancing should be done.
Would opening the injectors like this effect the pop pressure?
__________________
Current Diesels: 1981 240D (73K) 1982 300CD (169k) 1985 190D (169k) 1991 350SD (116k) 1991 350SD (206k) 1991 300D (228k) 2008 ML320 CDI (199k) 1996 Dodge Ram CTD (442k) 1996 Dodge Ram CTD (267k) Past Diesels: 1983 300D (228K), 1985 300D (233K), 1993 300D 2.5T (338k), 1993 300SD (291k)
|
|
#12
07-01-2011, 11:53 AM
|
|||
|
|||
|
Quote:
In my experience, the affects of disassembly are rather unpredictable from one injector to the next. Reinstalling them without testing is a total crap shoot. You can get away with it some of the time, but not all the time.
|
|
#13
07-01-2011, 11:41 AM
|
|||
|
|||
|
Joining in with everyone else -- great pictures. Based on my experience, paying attention to the lapping process is critical to prevent leaks. A table vise and a good torque wrench is a must. I got a manual pop-tester from Mercedes Source and it works pretty good. Two sets of injectors, and they all popped between 2050 - 2100 psi. Dis-assembly did not seem to affect pop pressure as long as the injector parts are not mixed.
__________________
Larry in Mobile, AL '83 300SD "Goldfinger" 145K Mi W126 E-617.95 T-722.3 15" Bundts
|
|
#14
07-01-2011, 12:00 PM
|
||||
|
||||
|
don't forget that when you lap the surfaces, you are removing metal. this will bring parts closer together, and it will change the pop pressure.
test the pressure before you disassemble, then again after lapping and reassemble, I bet it's different.
__________________
John HAUL AWAY, OR CRUSHED CARS!!! HELP ME keep the cars out of the crusher! A/C Thread "as I ride with my a/c on... I have fond memories of sweaty oily saturdays and spewing R12 into the air. THANKS for all you do! My drivers: 1987 190D 2.5Turbo 1987 560SL convertible 1987 190D 2.5-5SPEED!!!  1987 300TD 2005 Dodge Sprinter 2500 158"WB 1994GMC 2500 6.5Turbo truck... I had to put the ladder somewhere!
|
|
#15
07-01-2011, 01:25 PM
|
|||
|
|||
|
Quote:
Quote:
A typical "old" 135 bar injector will typically pop at 120-125 bar. After cleaning and lapping, you might get a 1-2 bar increase. In most cases, the "delta" is in the right direction, but lacking in magnitude. Last edited by tangofox007; 07-01-2011 at 01:55 PM.
|
 |
| Bookmarks |
|
|


 Hybrid Mode


