

|
|
|
|
|
|
#31
 10-25-2013, 11:32 AM
|
||||
|
||||
|
One small step...
...didn't have much time today but I got a chance to play with my new cheapo bearing removing tool. It is amazing how heavy those red plastic cases are compared with the monkey metal tools within!!!
{If this tool is any good I might be buying a better branded version but I want to see if it will actually be useful first so I bought the cheapest junk out there to see if it might be a good thing or not} Removal of little cog for the ABS sensor on the pinion shaft  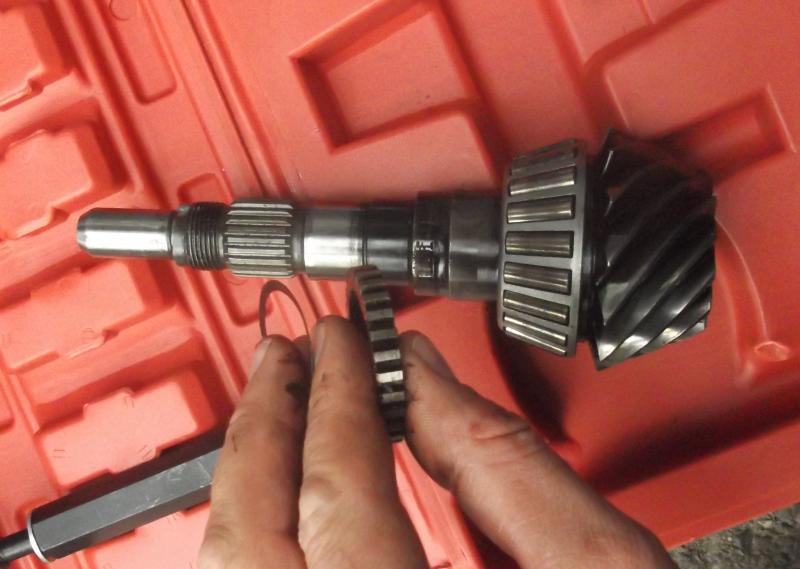 Already usefulness of new tool is limited - doesn't help with the removal of the tapered roller bearing still on the pinion shaft. Jaws are too wide...
__________________
1992 W201 190E 1.8 171,000 km - Daily driver 1981 W123 300D ~ 100,000 miles / 160,000 km - project car stripped to the bone 1965 Land Rover Series 2a Station Wagon CIS recovery therapy! 1961 Volvo PV544 Bare metal rat rod-ish thing I'm here to chat about cars and to help others - I'm not here "to always be right" like an internet warrior  Don't leave that there - I'll take it to bits! Last edited by Stretch; 10-25-2013 at 01:14 PM. Reason: Spelling 
|
|
#32
11-02-2013, 01:28 PM
|
||||
|
||||
|
Slight progress
__________________
1992 W201 190E 1.8 171,000 km - Daily driver 1981 W123 300D ~ 100,000 miles / 160,000 km - project car stripped to the bone 1965 Land Rover Series 2a Station Wagon CIS recovery therapy! 1961 Volvo PV544 Bare metal rat rod-ish thing I'm here to chat about cars and to help others - I'm not here "to always be right" like an internet warrior Don't leave that there - I'll take it to bits!
|
|
#33
11-02-2013, 01:30 PM
|
||||
|
||||
|
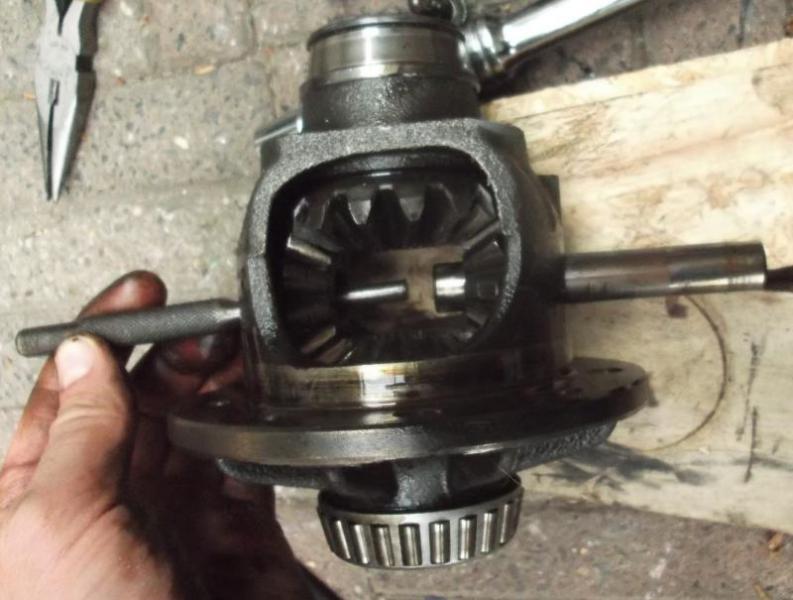
With slight progress comes a question
Is {Mercedes} differential assembly friction really 40 - 90 Nm {not Ncm}?
Could be due to PTFE bearings?  These ones are normal metal shims =>
__________________
1992 W201 190E 1.8 171,000 km - Daily driver 1981 W123 300D ~ 100,000 miles / 160,000 km - project car stripped to the bone 1965 Land Rover Series 2a Station Wagon CIS recovery therapy! 1961 Volvo PV544 Bare metal rat rod-ish thing I'm here to chat about cars and to help others - I'm not here "to always be right" like an internet warrior Don't leave that there - I'll take it to bits!
|
|
#34
11-07-2013, 05:46 AM
|
||||
|
||||
|
Not the PTFE bearings!
I got some PTFE bearings from the dealer yesterday. It caused quite a stir. The parts department didn't think it was possible to buy two items from Mercedes that have a total cost under one euro including sales tax (VAT / BTW)! But after several checks they relented and let me pay my 82 euro cents and leave...
A visual inspection shows little difference in thickness between new and old. I can't measure them easily with the bunt nosed ends of my micrometer - and I don't want to damage the new ones (they cost a fortune!)... ...so I don't think the wear parts are the PTFE bearings in these differentials. I have noticed, however, the metal thrust washers do have wear lips on their outer circumferences => I've kept the shims with the cogs as they came out of the casing and the measurements are 1.34mm for the one next to the crown wheel and 1.3mm for the other one
__________________
1992 W201 190E 1.8 171,000 km - Daily driver 1981 W123 300D ~ 100,000 miles / 160,000 km - project car stripped to the bone 1965 Land Rover Series 2a Station Wagon CIS recovery therapy! 1961 Volvo PV544 Bare metal rat rod-ish thing I'm here to chat about cars and to help others - I'm not here "to always be right" like an internet warrior Don't leave that there - I'll take it to bits!
|
|
#35
11-07-2013, 06:00 AM
|
||||
|
||||
|
Method of estimating shim thicknesses
The book (FSM) says that the four little cogs that go in the central part of the differential should be fitted with shims so that there is a friction of 40 to 90 Nm.
This seems like a mental amount of friction to me but I haven't been able to find any information that this is in fact an incorrect value. It is consistently used in the FSM and WIS so I guess it is OK. The way to adjust this friction is by shimming the position of the cogs that are attached to the output shafts of the differential (these are defined as side cogs in post #39). The other two cogs that idle between have the PTFE bearings discussed above (these are defined as spider cogs in post #39) The FSM doesn't really give any advice other than to use the special tool mandrel to those two idler (spider) cogs and add or remove the shims on the other cogs (side cogs) accordingly. I figured that if you place the end of this inner casing on the crown wheel (ring gear) end and assemble the four cogs (spider and side cogs) with the shims you already have then you can measure any gap with feeler gauges Once you've got this gap measured - be careful these cogs rock and wobble a bit when loosely assembled with out the special tool mandrel (!!!!) then you can estimate which one of the shims you need to buy from the dealer. 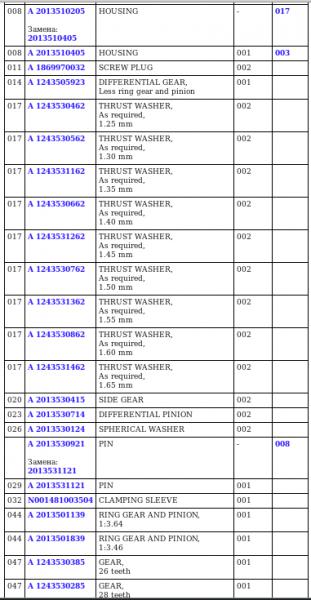 These thrust washers / shims are all item numbers 17 in this picture  As you can see the shims are available in steps of 0.05mm starting at a thickness of 1.25mm going all the way up to 1.65mm To give you an idea of where to add the shims - on top of the "upper cog" (orientation as shown in picture above - not the same as when fitted to car!) or under the "bottom cog" spin the casing 90 degrees to see visually whether the pin in the two idler (spider) cogs will slide on through => 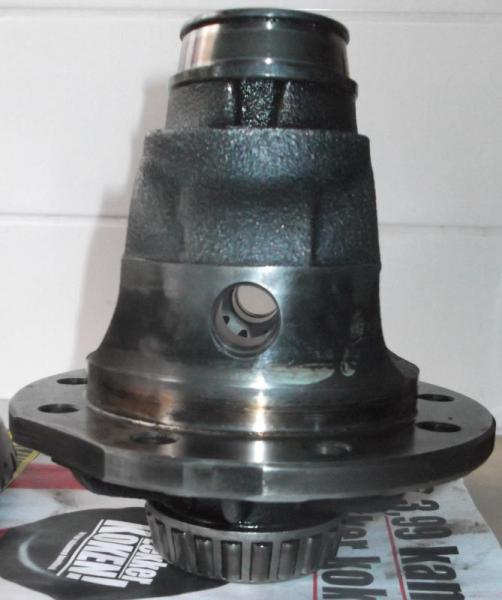
__________________
1992 W201 190E 1.8 171,000 km - Daily driver 1981 W123 300D ~ 100,000 miles / 160,000 km - project car stripped to the bone 1965 Land Rover Series 2a Station Wagon CIS recovery therapy! 1961 Volvo PV544 Bare metal rat rod-ish thing I'm here to chat about cars and to help others - I'm not here "to always be right" like an internet warrior Don't leave that there - I'll take it to bits! Last edited by Stretch; 11-08-2013 at 02:40 PM. Reason: Added in terminology as defined in post #39
|
|
#36
11-08-2013, 12:37 PM
|
||||
|
||||
|
Removal of axial bearing races
Got to do a little bit of work on the car today - not much - all I have time for at the moment are small steps and hope that in the end it all gets done.
The dealer has ordered the shims I was talking about yesterday but they haven't turned up yet so I moved on to the next part => removing the bearing races on this inner cage. (Note to self go and look at wikepedia or something like that and start using the proper names instead of guessing them) Anyway - removal of a bearing on a shaft up against a shoulder can be tricky. FSM says buy special tools - I say bugger that! If you look about on the interweb you'll see lots of advice for doing this - mostly the advice is oxy-acetylene cutting torch advice. Whilst I do actually have a gas welding kit (now) I think this is more often than not something that the lesser spotted DIYer will not have. So here is another way of doing the same job. (Please note this method is also all over the interweb so I'm not claiming it as my own) First cut the roller bearing cage  Remove the cage and tapered roller bearings so that the inner race on the shaft is visible  Tipping my hat to the procedure in the FSM and the special tools I tried to use a 2 legged puller to get the inner race off of the shaft. "Wouldn't it be good..."  Of course it didn't work. So I got a little cutting disk fitted to my proxxon multitool thing (dremmel) and carefully cut a slot in the bearing. Then with a cold chisel you give it a whack with a hammer making sure that there's a bit of wood underneath the thing you are hitting so there's a bit of "safety give"  Make sure the cut is deep enough - but not so deep that you mark the shaft underneath. You don't need to really really smack the %$^%^%& out of it if you've got a decent depth to the cut. Think of a "firm but fair regime" rather than "mass genocide"...  As you can see there's a nice little crack along the gutter of the slot that was cut in the inner bearing race. That's more or less what you're aiming for. No chisel penetration through to the shaft underneath and I didn't need to use two hands and a wild frothing at the mouth swinging over my head swipe with the hammer...
__________________
1992 W201 190E 1.8 171,000 km - Daily driver 1981 W123 300D ~ 100,000 miles / 160,000 km - project car stripped to the bone 1965 Land Rover Series 2a Station Wagon CIS recovery therapy! 1961 Volvo PV544 Bare metal rat rod-ish thing I'm here to chat about cars and to help others - I'm not here "to always be right" like an internet warrior Don't leave that there - I'll take it to bits!
|
|
#37
11-08-2013, 12:51 PM
|
||||
|
||||
|
Quote:

__________________
John HAUL AWAY, OR CRUSHED CARS!!! HELP ME keep the cars out of the crusher! A/C Thread "as I ride with my a/c on... I have fond memories of sweaty oily saturdays and spewing R12 into the air. THANKS for all you do! My drivers: 1987 190D 2.5Turbo 1987 560SL convertible 1987 190D 2.5-5SPEED!!!  1987 300TD 2005 Dodge Sprinter 2500 158"WB 1994GMC 2500 6.5Turbo truck... I had to put the ladder somewhere!
|
|
#38
11-08-2013, 01:39 PM
|
||||
|
||||
|
Quote:

__________________
1992 W201 190E 1.8 171,000 km - Daily driver 1981 W123 300D ~ 100,000 miles / 160,000 km - project car stripped to the bone 1965 Land Rover Series 2a Station Wagon CIS recovery therapy! 1961 Volvo PV544 Bare metal rat rod-ish thing I'm here to chat about cars and to help others - I'm not here "to always be right" like an internet warrior Don't leave that there - I'll take it to bits!
|
|
#39
11-08-2013, 02:36 PM
|
||||
|
||||
|
Time to stop being lazy and use some terminology
Here's a picture showing the main parts and names of a differential.
 The side gears are the gears that have the shims The spider gears are the gears that have the PTFE bearing backing washers The ring gear is what I've been calling the crown wheel
__________________
1992 W201 190E 1.8 171,000 km - Daily driver 1981 W123 300D ~ 100,000 miles / 160,000 km - project car stripped to the bone 1965 Land Rover Series 2a Station Wagon CIS recovery therapy! 1961 Volvo PV544 Bare metal rat rod-ish thing I'm here to chat about cars and to help others - I'm not here "to always be right" like an internet warrior Don't leave that there - I'll take it to bits!
|
|
#40
11-09-2013, 09:25 AM
|
||||
|
||||
|
Pinion shaft bearing work
After cutting off the cage for the big inner bearing on the pinion shaft I found the inner race to be in pretty bad shape.
 I didn't think the inner race would be that bad - it is in worse condition than the outer race that is more easily inspected and the roller bearings didn't look this bad either. I'm glad I've removed it. This inner race is a lot larger than the axial bearing races so it needs just that little more cutting. I ended up using a 125mm grinding disc and an angle grinder to remove a lot of the thickness and then I used the mini proxxon multi tool thing to cut a slot as before. I went a bit too deep and I nicked the pinion shaft - you can just see it in this picture  Whilst this isn't ideal it isn't a total disaster - the pinion shaft will be used! I'll just dress out the nicks and probably use a bit of loctite bearing glue to make sure the new bearing doesn't spin on the pinion shaft.
__________________
1992 W201 190E 1.8 171,000 km - Daily driver 1981 W123 300D ~ 100,000 miles / 160,000 km - project car stripped to the bone 1965 Land Rover Series 2a Station Wagon CIS recovery therapy! 1961 Volvo PV544 Bare metal rat rod-ish thing I'm here to chat about cars and to help others - I'm not here "to always be right" like an internet warrior Don't leave that there - I'll take it to bits!
|
|
#41
11-09-2013, 09:29 AM
|
||||
|
||||
|
No longer the dirtiest diff in town!
At last I have finished degreasing and removing rust from the outer casing. After extensive rust removal with an angle grinder and wire brush attachment and a quick morning's soak in POR15 metal ready I gave it a coat of POR15 engine enamel (because I have a lot of it left and it seems to stick quite well to these castings).
 Tomorrow I should be able to start fitting the new bearings and begin operation adjustment
__________________
1992 W201 190E 1.8 171,000 km - Daily driver 1981 W123 300D ~ 100,000 miles / 160,000 km - project car stripped to the bone 1965 Land Rover Series 2a Station Wagon CIS recovery therapy! 1961 Volvo PV544 Bare metal rat rod-ish thing I'm here to chat about cars and to help others - I'm not here "to always be right" like an internet warrior Don't leave that there - I'll take it to bits!
|
|
#42
11-10-2013, 09:38 AM
|
||||
|
||||
|
After careful consideration...
...I've decided not to try and replicate the procedure detailed in the FSM for setting up the pinion shaft position.
The process in the FSM is really involved and it requires special tools that I'm not even remotely going to consider buying. The gist of the procedure is that you measure the distance from the central point of the crown wheel (ring wheel) to the surface of the pinion cog once it is fitted to the case. You can do this in such a way with a "fake pinion shaft" special tool so that you can estimate the thickness of a shim that goes behind the inner bearing cup => {Here's a couple of pictures to refresh your memory}  If you were starting from scratch then this procedure in the FSM would be valuable - and therefore the special DTI mounted on a arm that is mounted in the axial holes of the differential case is probably necessary - however, someone has already done this before and calculated the shim thickness... ...this is a guesstimate => but if you just install the shim and new bearing cup (if you are replacing bearings like me) or the old bearings you should be in the right ball park. You can then use engineer's blue to see how the pinion and crown wheel mesh (I'll show this later one) Reading through the FSM gives me the impression that even if you follow the process to the letter with the special tools you still end up having to check the position of the pinion shaft AFTER you've installed it with the crush washer and output flange etc etc etc. The limits at which the face of the pinion shaft may be out of alignment is 0.2mm towards the crown wheel and 0.1mm away from it. This is a very small distance which (although I've never tried it) I think would be hard to measure even with the special tools - and by this I mean to measure and get a repeatable answer each time. Anyway couple this specification with a used pinion and crown wheel - the prescribed distance might be a ridiculous goal to try and achieve - I think you are better off looking at the contact patterns of the gears directly.
__________________
1992 W201 190E 1.8 171,000 km - Daily driver 1981 W123 300D ~ 100,000 miles / 160,000 km - project car stripped to the bone 1965 Land Rover Series 2a Station Wagon CIS recovery therapy! 1961 Volvo PV544 Bare metal rat rod-ish thing I'm here to chat about cars and to help others - I'm not here "to always be right" like an internet warrior Don't leave that there - I'll take it to bits!
|
|
#43
11-10-2013, 10:03 AM
|
||||
|
||||
|
So fitting the pinion shaft
Press the inner bearing cup together with the shim into the casing. I used my hydraulic press and an appropriate diameter bearing installation "plug". I did the same with the outer bearing race.
I then fitted the inner bearing to the pinion shaft. For this I replicated the special tool that you are meant to make for your self =>  <= with a bit of pipe an open ended spanner, a stunt peg from #1 son's BMX and my hydraulic press!  I then fitted the toothed cog bit for the ABS sensor using the same collection of bits and bobs. Note in the picture above how you've got two thin washers that fit between the crush washer. Note also that you need to push the outer taper roller bearing in position when the shaft is fitted to the casing! To install the shaft I decided to yet again utilise BMX stunt pegs so that I could push the bearing into place with the hydraulic press rather than forcing the bearing and the thrust washer into position by tightening the nut on the shaft. Boy am I glad I did it this way => I used one BMX stunt peg to support the pinion shaft. I then put this in the hydraulic press and mounted the other BMX stunt peg over the end of the pinion shaft so I could push the outer bearing with the press.  In this configuration the casing can be rotated because the bottom of the pinion shaft is supported by a BMX stunt peg spacer - the casing sits on the inner roller bearing fitted to shaft and case and the upper part of the shaft is clamped by the pressing force of the hydraulic press pushing down onto the upper BMX stunt peg spacer pushing onto the outer bearing that is an interference fit on the pinion shaft... ...bloody hell is that clear? Anyway push the outer bearing onto the pinion shaft and you can see and feel the gap between the bearings gets smaller and smaller until you come up against that pesky crush washer. I've worked with these crush washers before - Mercedes seems to like them - they are a bugger to "get started". The amount of force necessary to start their deformation is un-be-'ucking-lievable => a W123 rear wheel bearing installation nearly broke me when one of those crush washers refused to budge. This one for the differential was not different. Gauge on the hydraulic press indicated 7 METRIC tons before it budged. I think the threads on the nut and the pinion shaft would have stripped before that would have gone.
__________________
1992 W201 190E 1.8 171,000 km - Daily driver 1981 W123 300D ~ 100,000 miles / 160,000 km - project car stripped to the bone 1965 Land Rover Series 2a Station Wagon CIS recovery therapy! 1961 Volvo PV544 Bare metal rat rod-ish thing I'm here to chat about cars and to help others - I'm not here "to always be right" like an internet warrior Don't leave that there - I'll take it to bits! Last edited by Stretch; 11-10-2013 at 11:21 AM. Reason: Clarified text
|
|
#44
11-10-2013, 10:11 AM
|
||||
|
||||
|
Anyway...
...I've now got the pinion shaft fitted with the outer bearing loosely fitted on the shaft - and that pesky crush washer will now deform when I tighten the nut on the pinion shaft
 Progress has stalled 'cos I can't find the new nut that I am sure I got from the dealer - typical! Anyway even though it has all been assembled there is a chance that the pinion shaft will have to come out again as the contact marks on the pinion and crown wheel need to be checked once assembled. Engineers' blue gets delivered tomorrow as do the last of the shims for the side cogs (next to the spider cogs)... ...this might get done before next weekend - might - all depends on how well the pinion and crown wheel gears mesh
__________________
1992 W201 190E 1.8 171,000 km - Daily driver 1981 W123 300D ~ 100,000 miles / 160,000 km - project car stripped to the bone 1965 Land Rover Series 2a Station Wagon CIS recovery therapy! 1961 Volvo PV544 Bare metal rat rod-ish thing I'm here to chat about cars and to help others - I'm not here "to always be right" like an internet warrior Don't leave that there - I'll take it to bits! Last edited by Stretch; 11-10-2013 at 11:23 AM. Reason: spelling
|
|
#45
11-11-2013, 01:19 PM
|
||||
|
||||
|
Fitting the side and spider cogs
I got the shims for the side cogs from the dealer today.
The 1.6mm thickness turned out to be 1.63mm The 1.65mm thickness turned out to be 1.69mm The 1.35mm thickness turned out to be 1.36mm No big deal really but it wasn't what I was expecting - hard to plan ahead when you get something you weren't expecting. So I fitted a 1.36mm shim on the "lower" cog and a 1.63mm shim on the "upper" side cog orientation as shown in this picture I fitted the spider cogs with the PTFE washers and had to tap the cogs round to get them into position with a bit of wood and a hammer. Very tight fit. Impossible to turn the gears by hand. I aligned the spider cogs and fitted the pin  Tomorrow I'm going to have to figure out a way of measuring the torque of this assembly.
__________________
1992 W201 190E 1.8 171,000 km - Daily driver 1981 W123 300D ~ 100,000 miles / 160,000 km - project car stripped to the bone 1965 Land Rover Series 2a Station Wagon CIS recovery therapy! 1961 Volvo PV544 Bare metal rat rod-ish thing I'm here to chat about cars and to help others - I'm not here "to always be right" like an internet warrior Don't leave that there - I'll take it to bits!
|
 |
| Bookmarks |
|
|


 Linear Mode


