

|
|
|
|
|
|
#46
 11-20-2013, 11:41 AM
|
||||
|
||||
|
I think I've got a solution of sorts for measuring side and spider cog...
...assembled torque (would have been included in the title but no! there's a character limit!)
I figured I'd use the flange for the axles as it fits nicely in the splines... 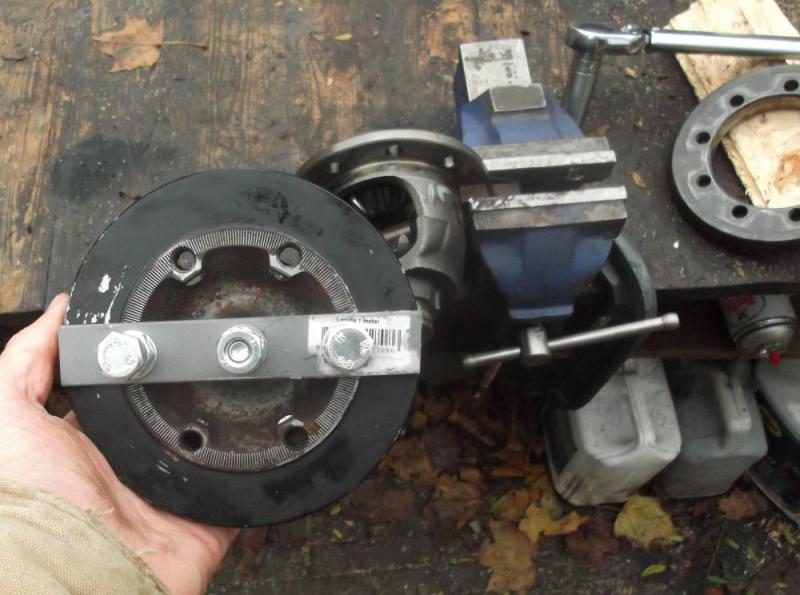 As you can see I've utilised a 2mm thick bit of galvanised goo from the local DIY shop and a few M10 nuts bolts and washers. You need to drill holes in the 2mm steel strip. I don't expect any of you will manage to get the centre hole slightly off centre just like me. That takes years and years of careful practice!!!!  Slot the axle flange into the side cog part of the differential and clamp the differential part in a vice at the bolt holes for the ring gear. USE SOME PADDING!  You can then use a standard torque wrench to measure the friction in the system. It should be between 40 and 90 Nm. My first attempt is too tight - more shims ordered at the dealer. 1.5mm and 1.55mm cost 50 euro cents a piece...
__________________
1992 W201 190E 1.8 171,000 km - Daily driver 1981 W123 300D ~ 100,000 miles / 160,000 km - project car stripped to the bone 1965 Land Rover Series 2a Station Wagon CIS recovery therapy! 1961 Volvo PV544 Bare metal rat rod-ish thing I'm here to chat about cars and to help others - I'm not here "to always be right" like an internet warrior  Don't leave that there - I'll take it to bits! 
|
|
#47
12-30-2013, 12:52 PM
|
||||
|
||||
|
Shims...
...shims...
...shims... ...not exactly the end of the world but as you can see from the results above they are not exactly what they say they are on the tin. No big deal if you have a micrometer but if you don't - well you'll be guessing. The 1.55mm shim was probably fished out of the wrong bin as it is the next size up! I'm trying to avoid a flat bit of glass and grinding paste situation - I really want to give the TV my full attention rather than trying to multi-task with shims...
__________________
1992 W201 190E 1.8 171,000 km - Daily driver 1981 W123 300D ~ 100,000 miles / 160,000 km - project car stripped to the bone 1965 Land Rover Series 2a Station Wagon CIS recovery therapy! 1961 Volvo PV544 Bare metal rat rod-ish thing I'm here to chat about cars and to help others - I'm not here "to always be right" like an internet warrior Don't leave that there - I'll take it to bits!
|
|
#48
12-31-2013, 04:33 PM
|
||||
|
||||
|
Pain in the arse!
Today I've mostly been playing about trying to get those shims fitted for that correct torque value. What a pain in the arse. I've been upping the shim thicknesses to make the differential assembly tighter and tighter. I ended up with the thickest shim I've got which when fitted last time meant the cogs in the differential wouldn't turn...
...so after a bit of flat glass some coarse grinding paste and a sanding disc I got the shim a little bit thinner and so I tried it fitted... ...the coating on the shim was worn away... ...and now the tightness / torque of the differential is lower than it was for the next size down! I can't work out if it was 1) the coating on the shim 2) an assembly problem 3) something else The assembly is tight unlike it was when I first took it to pieces - a bit clunky - I have a feeling I'm just going to give this a try even though it isn't anywhere near to the specifications in the FSM
__________________
1992 W201 190E 1.8 171,000 km - Daily driver 1981 W123 300D ~ 100,000 miles / 160,000 km - project car stripped to the bone 1965 Land Rover Series 2a Station Wagon CIS recovery therapy! 1961 Volvo PV544 Bare metal rat rod-ish thing I'm here to chat about cars and to help others - I'm not here "to always be right" like an internet warrior Don't leave that there - I'll take it to bits!
|
|
#49
01-08-2014, 12:39 PM
|
||||
|
||||
|
Had a bit of a Homer Simpson "doh" moment today. The problem with the torque of the differential gear assembly turned out to be =>
Quote:
With a bit of adjustment I got the stiffness torque to be within the range specified in the FSM. I checked the running of the gears with engineers blue. I had a bit of a rookie mistake - nipped the lid off of the tin and got an engineers blue explosion - sodding stuff went everywhere...  ...oh well... The contact of these differential cogs is on the ridge in the middle of the cogs - seems good to me.
__________________
1992 W201 190E 1.8 171,000 km - Daily driver 1981 W123 300D ~ 100,000 miles / 160,000 km - project car stripped to the bone 1965 Land Rover Series 2a Station Wagon CIS recovery therapy! 1961 Volvo PV544 Bare metal rat rod-ish thing I'm here to chat about cars and to help others - I'm not here "to always be right" like an internet warrior Don't leave that there - I'll take it to bits!
|
|
#50
01-08-2014, 12:47 PM
|
||||
|
||||
|
Fitting crown wheel
I had previously marked the crown wheel so that I could put it back on in its old position (it probably isn't a big deal but it had to be done!).
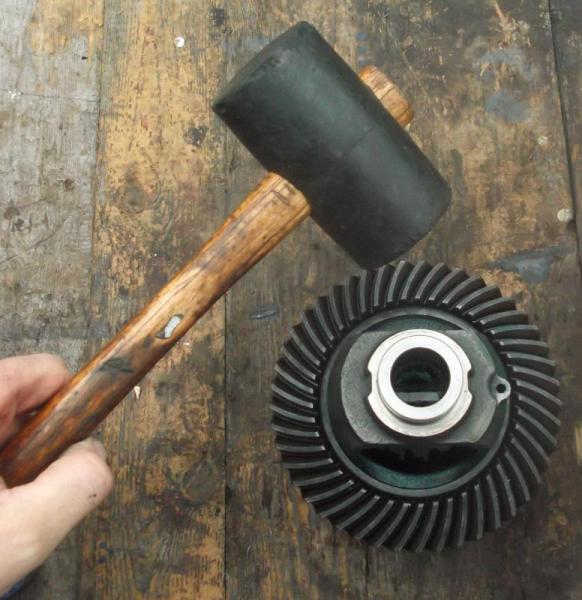 You are meant to put in new bolts (note 10.9 strength). I've been naughty because I'm not sure if this refresh will result in a whine free differential. I'm refitting the crown wheel bolts with loctite - because if I need to replace the pinion and the crown wheel (matched pair) I don't want to waste these rather expensive bolts (from dealer).  Make sure you clamp the diff in fixed position before you torque these bolts  Sorry guys I forgot to mention you are meant to heat the crown wheel before fitting - see FSM (Not that I did this of course it went on just fine with gentle sympathetic taps with a rubber hammer)
__________________
1992 W201 190E 1.8 171,000 km - Daily driver 1981 W123 300D ~ 100,000 miles / 160,000 km - project car stripped to the bone 1965 Land Rover Series 2a Station Wagon CIS recovery therapy! 1961 Volvo PV544 Bare metal rat rod-ish thing I'm here to chat about cars and to help others - I'm not here "to always be right" like an internet warrior Don't leave that there - I'll take it to bits! Last edited by Stretch; 01-09-2014 at 08:42 AM.
|
|
#51
01-08-2014, 12:54 PM
|
||||
|
||||
|
Fitting axial bearings
Even though I have a hydraulic press I actually quite like tapping bearings into position with a hammer and punch - you stand a better chance of not accidentally putting it on askew...
...it is nice to take your time  Whether you are hammering and punching or hydraulic pressing make sure you support the underside on a suitable lump and not on the newly fitted bearing on the other side... 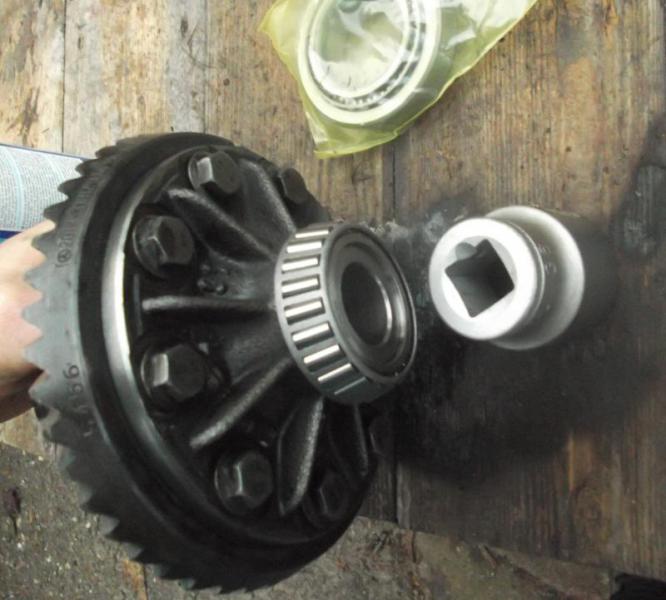 
__________________
1992 W201 190E 1.8 171,000 km - Daily driver 1981 W123 300D ~ 100,000 miles / 160,000 km - project car stripped to the bone 1965 Land Rover Series 2a Station Wagon CIS recovery therapy! 1961 Volvo PV544 Bare metal rat rod-ish thing I'm here to chat about cars and to help others - I'm not here "to always be right" like an internet warrior Don't leave that there - I'll take it to bits!
|
|
#52
01-09-2014, 08:55 AM
|
||||
|
||||
|
Pinion position assessment
Because I don't have (and will never buy) the special tools for this job I'm using a different method of making sure that the crown wheel and pinion wheel are in correct alignment.
As I've already fitted the shim for the pinion shaft behind the inner tapered roller bearing cup I wanted to have a quick check of the pinion position on the crown wheel. To do this I installed the crown wheel and the axial roller bearing cups and just held them in position and span the crown wheel round a few times after coating it in engineers blue. Here's a (really bad) picture of what it looked like  Using the information that diesel911 put in this thread for his astro differential rebuild => Need Help Finding Cause Of Wear in 92 Astro Van Differential There's this gucci little diagram showing what it all means 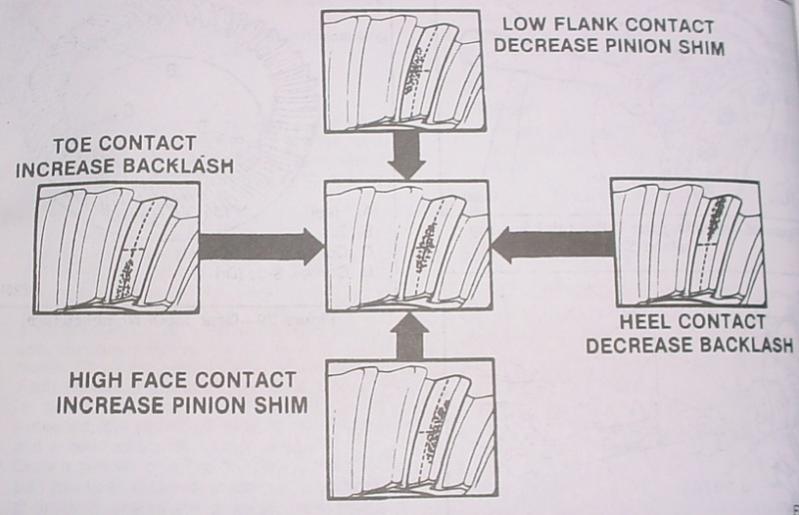 From this diagram I can see that because my pinion shaft is still a little loose the contact position suggests that pinion shim needs to be decreased. I'm guessing that with a little tightening to the correct torque it will all come back into the correct alignment. So I'm lucky that the old shim is more or less good for the pinion position - I don't think I need to knock that pesky inner bearing cup back out and adjust. YES RESULT! So in went the pinion seal 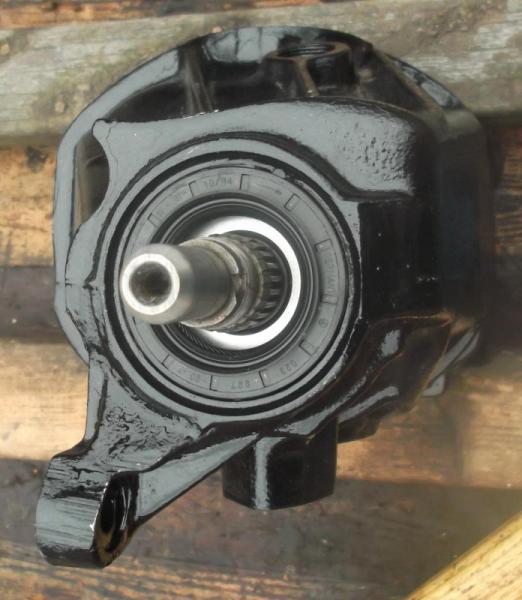 And after a bit of output shaft nut tightening on went the balance bar to measure the friction  The method of measuring the friction of a shaft that I use is given here in this steering box refresh thread => What a feeling it will be! A properly adjusted W123 / W116 / W126 power steering box Starts at post #8 Please note the pinion shaft friction should be measured with out the crown wheel and the rest of the guts fitted.
__________________
1992 W201 190E 1.8 171,000 km - Daily driver 1981 W123 300D ~ 100,000 miles / 160,000 km - project car stripped to the bone 1965 Land Rover Series 2a Station Wagon CIS recovery therapy! 1961 Volvo PV544 Bare metal rat rod-ish thing I'm here to chat about cars and to help others - I'm not here "to always be right" like an internet warrior Don't leave that there - I'll take it to bits!
|
|
#53
01-09-2014, 11:16 AM
|
||||
|
||||
|
Bollocks! I (think) I had some luck with the pinion shaft shim...
...but the C clip shims that were fitted to this differential exceed the possible limits in the FSM and on EPC!
 How can it be? IT IS NOT ALLOWED! The maximum shim size is 4.1mm I one shim which is 4.6mm AND ANOTHER that is 4.75mm How can it be? My world is turned upside down...   So that's probably another 20 euros going to the dealer (at least they still seem to be available) Just a case of measure eight times and buy once...
__________________
1992 W201 190E 1.8 171,000 km - Daily driver 1981 W123 300D ~ 100,000 miles / 160,000 km - project car stripped to the bone 1965 Land Rover Series 2a Station Wagon CIS recovery therapy! 1961 Volvo PV544 Bare metal rat rod-ish thing I'm here to chat about cars and to help others - I'm not here "to always be right" like an internet warrior Don't leave that there - I'll take it to bits!
|
|
#54
01-10-2014, 05:27 PM
|
||||
|
||||
|
Last pictures of fixing the output shaft nut
Not much progress today - I forgot to post these pictures
To apply the correct tightening torque to the output shaft nut you really need to hold the whole casing in place. 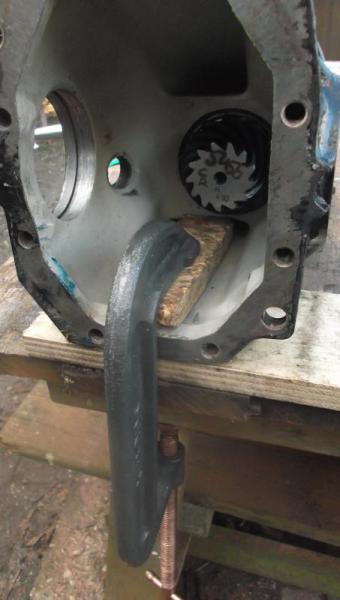 I used a wood and a ratchet strap to stop the pinion shaft from spinning 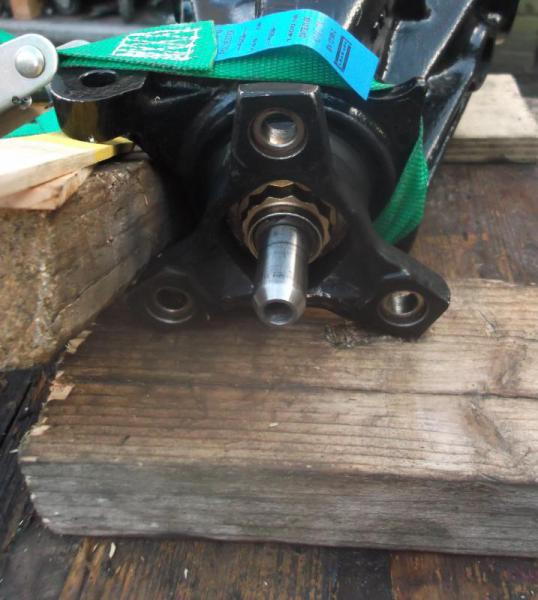 You really need to apply a whole heck of a lot of force to get the correct turning friction - you need to get to the stage where you think "I'm going to break this in a minute"!
__________________
1992 W201 190E 1.8 171,000 km - Daily driver 1981 W123 300D ~ 100,000 miles / 160,000 km - project car stripped to the bone 1965 Land Rover Series 2a Station Wagon CIS recovery therapy! 1961 Volvo PV544 Bare metal rat rod-ish thing I'm here to chat about cars and to help others - I'm not here "to always be right" like an internet warrior Don't leave that there - I'll take it to bits!
|
|
#55
01-19-2014, 04:22 PM
|
||||
|
||||
|
Why it is important to get the pinion shaft friction correct...
...Today I've been doing a bit of research that I think is worthwhile adding to the thread.
The faces of the teeth on the pinion and crown wheel are given the following names; dive and coast. The "drive" side is the side that is used the most - the forward "driven" side and the other side of the tooth is called the coast (although it is the driven side in reverse). For the crown wheel...  ...the curved arrow shows the direction of rotation during normal forwards direction travel of the car. Arrow "A" points to the drive side of the tooth. Arrow "B" points to the coast side of the tooth. On the pinion... 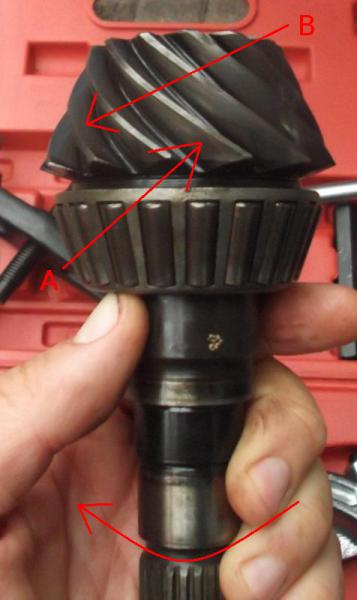 ...again the curved arrow shows the direction of rotation during normal forwards direction of travel of the car. As before arrow "A" points to the drive side and arrow "B" points to the coast side. Because these teeth need to roll over each other there needs to be a gap between them - if they were too tight they couldn't turn they would be solid / rigid. As you need this gap or clearance you get "backlash" between the contact of the teeth of these cogs. The pressure of this contact makes the pinion want to slide either towards or away from the crown wheel. For normal forwards driven direction of the car, the pinion gets dragged towards the larger tapered roller bearing - towards the crown wheel. In the other direction (in reverse) the pinion gets dragged towards the small tapered roller bearing - away from the crown wheel. So if you haven't tightened the nut on the end of the pinion / output shaft correctly the pinion shaft is going to shuttle back and forth whenever you press down or lift off the accelerator pedal knackering those two tapered roller bearings. These bearings need to have a correct pre-load to stop this from happening. If you over tighten the nut you add too great a pre-load and you shorten the life expectancy of the bearings. If you leave the nut too loose then you are likely to encourage the chance of allowing the pinion shaft to shuttle backwards and forwards which will cause impact damage and a knackered bearings.
__________________
1992 W201 190E 1.8 171,000 km - Daily driver 1981 W123 300D ~ 100,000 miles / 160,000 km - project car stripped to the bone 1965 Land Rover Series 2a Station Wagon CIS recovery therapy! 1961 Volvo PV544 Bare metal rat rod-ish thing I'm here to chat about cars and to help others - I'm not here "to always be right" like an internet warrior Don't leave that there - I'll take it to bits! Last edited by Stretch; 01-20-2014 at 02:29 AM. Reason: Tried to make it clearer
|
|
#56
01-19-2014, 04:37 PM
|
||||
|
||||
|
Guessing the shim thicknesses for the axial bearings
Again as I'm not using the special tools I need to improvise.
The first problem is to make sure that the axial bearings are positioned correctly. The bearing cups for these bearings slide in and out of the casing. Luckily mine are quite stiff to move in the casing so I can just... ...improvise a press... 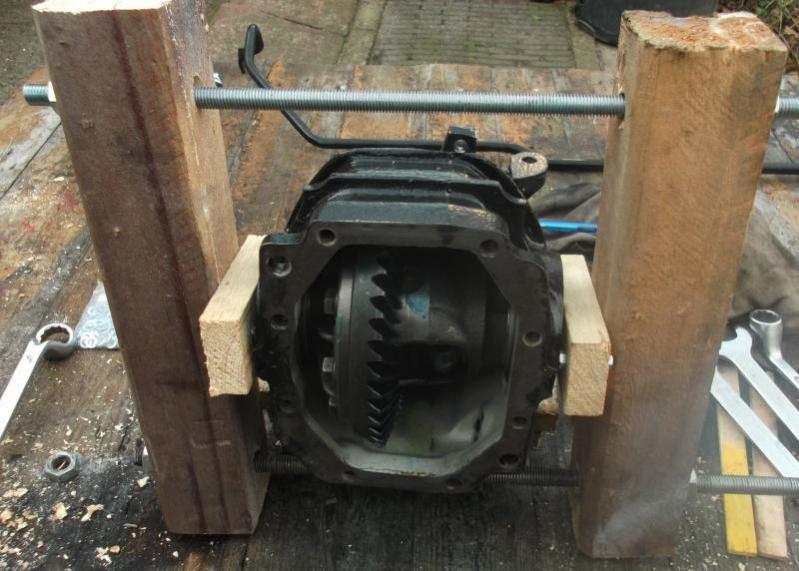  ...so that with a little careful jiggery pokery I can measure the position of the bearing cups after I've made sure the crown wheel is pressing and running nicely against the pinion wheel...  Please note - this is a measured guess that gives me an idea of the shims (circlips) I need to order so that I have a starting point for the proper adjustments that I'll be doing once I get these parts from the dealer.
__________________
1992 W201 190E 1.8 171,000 km - Daily driver 1981 W123 300D ~ 100,000 miles / 160,000 km - project car stripped to the bone 1965 Land Rover Series 2a Station Wagon CIS recovery therapy! 1961 Volvo PV544 Bare metal rat rod-ish thing I'm here to chat about cars and to help others - I'm not here "to always be right" like an internet warrior Don't leave that there - I'll take it to bits!
|
|
#57
01-22-2014, 02:37 PM
|
||||
|
||||
|
Grrrr
It's not easy when the bloody shims from the dealer keep on coming in sizes that they bloody well should NOT be...
1249940141 is meant to be 3.3mm mine is 3.2mm 1249940941 is meant to be 3.7mm mine is 3.66mm These might seem like small differences but when the pre-load of the axial bearings is applied by stretching the casing by 0.1mm to 0.15mm... ...flipping heck...
__________________
1992 W201 190E 1.8 171,000 km - Daily driver 1981 W123 300D ~ 100,000 miles / 160,000 km - project car stripped to the bone 1965 Land Rover Series 2a Station Wagon CIS recovery therapy! 1961 Volvo PV544 Bare metal rat rod-ish thing I'm here to chat about cars and to help others - I'm not here "to always be right" like an internet warrior Don't leave that there - I'll take it to bits!
|
|
#58
01-23-2014, 10:08 AM
|
||||
|
||||
|
Right more fiddling about...
...today I've found time to fit the circlip shims that came in surprising sizes from the dealer yesterday. I fitted the circlip shim for the axial bearing on the side furthest away from the crown wheel and then tipped the whole differential case in its side and measured how much space there was from the tapered roller bearing cup to the edge of the casing and then calculated the gap for the shim to see if I needed to bother stretching the casing =>
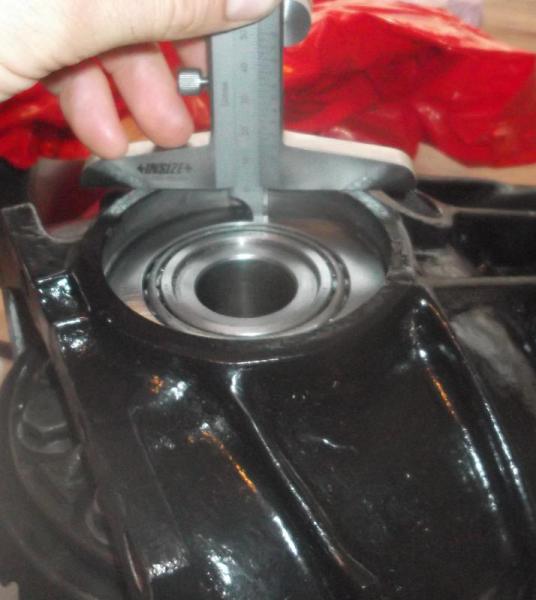 (sorry for the poor quality picture but I think it demonstrates what I'm up to more or less) ...as expected I didn't need to stretch the case - as the shims from the dealer aren't as thick as they say on the tin (packet). This is a bit of a pisser but on the other hand it shows that my dodgy no special tools measurements are turning out to be pretty accurate. I expected the circlips to just slide on in there and they do. There's no noticeable axial play - but I know there's no pre-load so this isn't good enough. It did, however, allow me to measure the backlash on the gear set. This is the clearance gap between the pinion and the crown wheel. The FSM specifies 0.08 to 0.14mm. I've measured an average of 0.31mm so it is way out. The only way to decrease the backlash is to move the crown wheel closer to the pinion. Because the dealer shims are obviously going to be the greatest expense in this no special tools adjustment (with the special tools I could shove, adjust and measure you see?) I'm making another gamble by buying a shim that will not only move the crown wheel closer to the pinion but also contain the thickness required for the axial bearing pre-load. The thinnest shim will be junked - well perhaps offered to someone else here who wants it. At about 10 euros a pop these shims are expensive but I am hoping after a little bit more arsing about the total cost of doing this job will still be a fraction of one of the special tools needed to do the job the FSM way. As ever - to be continued...
__________________
1992 W201 190E 1.8 171,000 km - Daily driver 1981 W123 300D ~ 100,000 miles / 160,000 km - project car stripped to the bone 1965 Land Rover Series 2a Station Wagon CIS recovery therapy! 1961 Volvo PV544 Bare metal rat rod-ish thing I'm here to chat about cars and to help others - I'm not here "to always be right" like an internet warrior Don't leave that there - I'll take it to bits!
|
|
#59
03-19-2014, 11:05 AM
|
||||
|
||||
|
Can you tell what it is yet?
I'm not sure just yet if this will work
   I do hope it does! High time this sodding differential was back on the subframe
__________________
1992 W201 190E 1.8 171,000 km - Daily driver 1981 W123 300D ~ 100,000 miles / 160,000 km - project car stripped to the bone 1965 Land Rover Series 2a Station Wagon CIS recovery therapy! 1961 Volvo PV544 Bare metal rat rod-ish thing I'm here to chat about cars and to help others - I'm not here "to always be right" like an internet warrior Don't leave that there - I'll take it to bits!
|
|
#60
03-19-2014, 01:40 PM
|
||||
|
||||
|
Completely off topic, but your tape measure creeps me out. The numbers are too close together.
__________________
$60 OM617 Blank Exhaust Flanges $110 OM606 Blank Exhaust Flanges No merc at the moment
|
 |
| Bookmarks |
|
|


 Linear Mode


