

|
|
|
|
|
|
|||||||
 |
|
|
LinkBack | Thread Tools | Display Modes |
|
#46
 12-25-2020, 06:24 PM
|
||||
|
||||
|
All my W123's have palomino interiors .
I really dislike the tobacco brown , unless it's pristine it looks dirty no matter what you do with/to it . Both my early coupes had it and I hated it .
__________________
-Nate 1982 240D 408,XXX miles Ignorance is the mother of suspicion and fear is the father I did then what I knew how to do ~ now that I know better I do better 
|
|
#47
12-27-2020, 01:44 PM
|
||||
|
||||
|
I just replaced a panel on my SD’s bolster. I had originally replaced the bolster three years ago with some cheap vinyl. Big mistake because it wore out. You can see in the first photo it isn’t mbtex. I decided to redo it with better vinyl. Here are some photos of the repair. I got some marine grade vinyl that kind of matched. I marked where the panel mated up with its neighboring panels and then cut the stitching around it to remove it.
Then I cut a fresh panel and sewed it to the seat cover. The construction is kind of complex with all the J hook and piping. I got a few of my stitches wonky and it doesn’t fit perfectly. But it beats having a hole. If I did it again I bet I could do it better. The bolsters seem to go out first. This trick will fix a lot of the seats I see on Craigslist cars. Then there’s the collapsed springs and crumbling horse hair. Anyhow enjoy the pix.          This was taken right after fitting. It looks a lot better now after I sat in it a month. Wrinkles relaxed a lot in the sun. I’ll take a more current photo and put it up. It really looks a lot better after settling in. 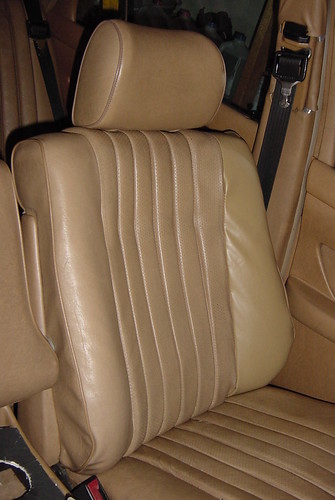
__________________
79 300TD Old Smokey AKA The Mistake (SOLD) 82 240D stick shift 335k miles (SOLD) 82 300SD 300k miles 85 300D Turbodiesel 170k miles 97 C280 147k miles
|
|
#48
12-27-2020, 03:56 PM
|
||||
|
||||
|
This is solid work.
A uniform coat of paint and I doubt anyone would notice. Recovering pleats is something I’d like to do. Not sure my sewing machine is up to the challenge, however. Also not sure a.) how to keep the new backing taut while stitching, b.) what effect adding a new line of stitch holes over the old unused would have on durability.
__________________
1981 240D 4sp manual. Ivory White.
|
|
#49
12-28-2020, 10:36 AM
|
||||
|
||||
|
The mbtex seems to be able to take a lot of restitching. Ive sewn my bolster twice now. I keep my stitch length long (5mm) so I dont punch too many holes. Im sure theres a limit to the number of times I can open it up and close it up but it still seems strong after 2x. My tex is also in pretty good shape - still supple and not brittle.
I use a really heavy duty machine. It has a lot of torque (see giant flywheel) and a walking foot. Its a sailmakers machine. My other hobby is restoring vintage sewing machines. There are some household machines like the 1970s and 1980s Husqvarna 6440 or 1030 that can do heavy materials. These have a two speed gear box that helps punch heavy stuff. Adjustable foot pressure, Teflon foot and a leather needle also help the home machine tackle an industrial job like this. My advice is get some upholstery scraps and try sewing a few layers. Youll find youll probably need a leather needle, Thicker thread (I use v69) at a minimum. If your machine is rigid, you can compensate for a weak motor by hand cranking slowly. I went through this process over the years to get to what Im doing. Ill do pleats next. The good news is you dont keep the backing taught while stitching. If you pleat with foam you compress the foam with the sewing foot and just sew the sandwich of tex, foam and vinyl together. For most or our repairs we just need to replace the fabric backing and sew new thread. This is done by removing the felt sausages first then sewing the tex and backing together flat with even spacings in the original stitch lines. Then the felt sausages are put back using a thin walled plastic tube inserted inside the channel to hold it open temporarily- like catheterization or stenting. Then slip the tube out leaving the sausage in the channel. Bottom line, you dont have to sew around the poofy pleats. Its actually easy. The hard part is the panel needs to be removed from the side boxing to get access with the machine. Then the side boxing is stitched back on at the end. Its a lot of work but still easier than starting from scratch. I have some collapsed pleats on my blue 300d that I intend to repair. Ill document the fix and post it up when I do it. I need to find the right thin walled tube. I think the tubes that Home Depot sells for fluorescent lamp shields will work. I guess I can measure it out on the seat pleats. There are other ways to do it too like dragging the sausages through with a string. Huh. Something to do during lockdown today. Hey heres a completely different thought. The pleat problem is caused by the backing rotting and the felt sausages wandering around when the thread no longer holds them in the channels. I wonder if you can just hand stitch on a new backing with the felt sausages in place using a double needle saddle stitch? It would take time by hand but if you just stitch through the original holes up top it may not be too long for one seat...like an hour? This tool would make a nice stitch. And you wouldnt have to deconstruct the boxing. 
__________________
79 300TD Old Smokey AKA The Mistake (SOLD) 82 240D stick shift 335k miles (SOLD) 82 300SD 300k miles 85 300D Turbodiesel 170k miles 97 C280 147k miles
|
|
#50
12-28-2020, 12:24 PM
|
||||
|
||||
|
Quote:
I have considered restoring them using hand stitches but what kept me from doing so was methodology. Putting the pads (sausages) in afterwards makes far more sense and is something I had failed to consider... I'll be very curious to see how your restoration goes. The six pleat pattern is a little different. The pleat channels seem to run much deeper so that even if they lose their stitching they're able to retain their shape. The latter of the two 5 pleat patterns (what I'm working with) appears to take shape through tension alone. Tricky, but doable.
__________________
1981 240D 4sp manual. Ivory White.
|
|
#51
12-28-2020, 01:32 PM
|
||||
|
||||
|
Nice insights ykobayshi !
__________________
1979 300D 220 K miles 1995 C280 109 K miles 1992 Cadillac Eldorado Touring Coupe 57K miles SOLD ******************** 1979 240D 140Kmiles (bought for parents)  *SOLD. *SOLD.SAN FRANCISCO/(*San Diego) 1989 300SE 148 K miles *SOLD
|
|
#52
01-06-2021, 09:06 PM
|
||||
|
||||
|
Here is an updated photo of my seat repair. The wrinkles have smoothed out and the panel has conformed to the seat the more I've sat in it.

__________________
79 300TD Old Smokey AKA The Mistake (SOLD) 82 240D stick shift 335k miles (SOLD) 82 300SD 300k miles 85 300D Turbodiesel 170k miles 97 C280 147k miles
|
|
#53
01-06-2021, 09:22 PM
|
|||
|
|||
|
Looks excellent. Well done.
- Peter.
__________________
2021 Chevrolet Spark Formerly... 2000 GMC Sonoma 1981 240D 4spd stick. 347000 miles. Deceased Feb 14 2021  2002 Kia Rio. Worst crap on four wheels 1981 240D 4spd stick. 389000 miles. 1984 123 200 1979 116 280S 1972 Cadillac Sedan DeVille 1971 108 280S
|
|
#54
01-08-2021, 07:54 PM
|
|||
|
|||
|
Ykobayashi, what is that hand-machine called, that you suggested for doing pleats? Any particular needle specified for that? Also, is any particular fabric recommended for the backing? Would an old cotton sheet work - or something else?
Thanks.
|
|
#55
01-15-2021, 10:02 AM
|
||||
|
||||
|
The sewing awl is a Tandy leather sewing awl. Available on Amazon among other places. You can get a Chinese replica at harbor freight too for cheaper. The Tandy comes with a nice slim needle that works. Or, you can use the Harbor Freight which takes standard sewing machine needles (singer) that can be bought at the dime store. The idea is you want to use a slim needle and poke through the original stitch holes MB made when they sewed the pleats. If you do this and cinch up the stitches uniformly they will just disappear like the originals.
A cotton sheet would work but after putting in all the work why not use real upohlstery muslin backing? Just get a few yards at Joannes or Walmart. Its widely available and used for indoor furniture rebuilding.
__________________
79 300TD Old Smokey AKA The Mistake (SOLD) 82 240D stick shift 335k miles (SOLD) 82 300SD 300k miles 85 300D Turbodiesel 170k miles 97 C280 147k miles
|
|
#56
01-16-2021, 10:47 PM
|
||||
|
||||
|
@ ykobayashi :
THANK YOU ~now I know where to get it....
__________________
-Nate 1982 240D 408,XXX miles Ignorance is the mother of suspicion and fear is the father I did then what I knew how to do ~ now that I know better I do better
|
|
#57
01-21-2021, 06:47 PM
|
||||
|
||||
|
Okay...
Well, I've done it, though at the moment it feels like a pyrrhic victory. Many intrepid DIYers have set out over the years to "restore their pleats -will be documenting the process" only to never be heard from again. Thanks to Ykobayashi I decided to give this a crack. Picked up a yard of muslin and a sewing awl and got to work. Warning, this is not for the faint of heart. Undertaking this repair may provoke an unmitigated stream of existentialism. If you've removed a seat skin, you'll be familiar with this:  Rotted fabric, etc, etc, etc.  Started with a seam ripper, removing as much of the old stitching as possible.  The awl, the muslin and some heavy duty polyester thread. :  A cubic yard is about three times the amount you'll need, but if you've any experience with sewing, you'll know it's better to err on the side of caution.  The needles that came with the awl were a little too bit. They completely obliterated the muslin and I didn't want to needlessly stretch the vinyl. In the end, I used a standard sewing machine needle The sewing awl is quite a delightful device. Very proto-sewing machine. It takes a while to find your technique however. On the skin in question, there are 8 rows of thread to replace. the first row took me around 80 mins. After the first 10 mins, I decided this was a horrible idea, a complete waste of time and a picture of masochism. After completing the first row, efficiencies began to materialize.  The second row took 40 minutes. The third 28 mins. I finally settled on 21 minutes a piece for the five remaining rows. Again, this is a complete and utter waste of time. After finishing the first two rows, I decided to test things. Not to make sure it was worthwhile (it wasn't) but to see whether the tension in the new muslin would be enough to overcome the tension of the vinyl. I used a ruler to insert the felt "sausages":  Lo and behold...  Here's what the back looks like, with two bits of felt now inserted:  The outer most columns I was able to finish with a sewing machine as these stitches are not visible. You're basically stitching into vertical seam so you have to sandwich the lot. It's a little awkward. You can then seal the entire thing off and trim it up.  And after... 5 hours maybe? :  The original backing covers the foam on the wings, but as that foam is glued to the vinyl, covering seemed superfluous. Also, that would have required more time with the awl and I could not abide that.  And finally:  Again, this is total waste of time. If you're into repetitive tasks and dopamine feedback loops, give it a shot. I've never knitted, but this process was spiritually akin. You put some headphones on, or some bad Tv, or make a phone call you've been avoiding, etc, and stitch away. You get there eventually. The thing is, these skins are so old and faded that even if you paid someone to restore the stitching -and they'd be making new holes, which I think would affect the integrity of the seat- color them with some palomino spray... you'd be pretty close to paying for new skins. That said, I did nail it.  -
__________________
1981 240D 4sp manual. Ivory White. Last edited by Shern; 01-21-2021 at 07:05 PM.
|
|
#58
01-21-2021, 06:59 PM
|
||||
|
||||
|
Bravo !
Top man !
__________________
1979 300D 220 K miles 1995 C280 109 K miles 1992 Cadillac Eldorado Touring Coupe 57K miles SOLD ******************** 1979 240D 140Kmiles (bought for parents) *SOLD.SAN FRANCISCO/(*San Diego) 1989 300SE 148 K miles *SOLD
|
|
#59
01-21-2021, 09:06 PM
|
||||
|
||||
|
I am impressed. Job well done!!!
__________________
 All Diesel Fleet 1985 R107 300SLD TURBODIESEL 2005 E320 CDI (daily) LOTS of parts for sale! EGR block kit http://www.peachparts.com/shopforum/diesel-discussion/355250-sale-egr-delete-block-off-plate-kit.html 1985 CA emissions 617 owners- You Need This! Sanden style A/C Compressor Mounting Kit for your 616/ 617 For Sale + Install Inst. Sanden Instalation Guide (post 11): http://www.peachparts.com/shopforum/diesel-discussion/367883-sanden-retrofit-installation-guide.html
|
|
#60
01-21-2021, 10:49 PM
|
|||
|
|||
|
Quote:
__________________
1984 & 1985 CA 300D's 1964 & 65 Mopar's - Valiant, Dart, Newport 1996 & 2002 Chrysler minivans
|
|
| Bookmarks |
| Thread Tools | |
| Display Modes | |
|
|


 Linear Mode


