

|
|
|
|
|
|
|||||||
 |
|
|
LinkBack | Thread Tools | Display Modes |
|
#1
 01-27-2014, 12:45 PM
|
||||
|
||||
|
W123 seats -- disassembly, skin removal padding refurbish, misc. notes
Hello All!
So I've noticed that in the car community a lot of people are not afraid of taking on projects such as floor welding, transmission replacement, or engine work, but somehow seem to shy away from simple upholstery work such as skin swapping and pleat restoration. Since I am going to be doing some seat work in the next few days, I figured I’d write up what I’m doing so that you don’t have to spend $$$ at an upholstery shop for what you can easily do at home. First, we’ll take two seats apart – a 1984 or 1985 driver’s seat in Blue (code 152) and a 1983 driver's seat in some sort of tan (Palomino? I don't know) and take them apart. The idea with this project is to end up with two blue seats for my 'SD (I'm swapping to manual seats to save weight & reduce complexity), and to that end I have a third seat with destroyed tracks and rotten springs/padding but a half-decent skin in blue. I will also restore the pleats in the seat and perhaps add some padding in general. Part of this DIY was completed with cat as my sidekick.  Here are the two patients:  We will tackle the Palomino (?) one first. A good place to start in stripping the seat is the bottom. The first step will be to stand on the seat like this and then reach in and push & pull the skin out. It is tucked into a crevice in the seat frame that you need to push it out of, and crouching on the seat creates slack in the padding that allows you to pull it out. The closer you stand towards the front, the more the front will be compressed. Try to find a position that just allows you to get your fingers in there and still creates slack in the skin.  It finally came out when I used the handle of a pair of scissors to push up on the padding. You can see a strip of some sort of cardboard material that gives the edge of the skin the stiffness required to stay in the groove.  On this seat, the skin was quite easy to slip out once I got it started. 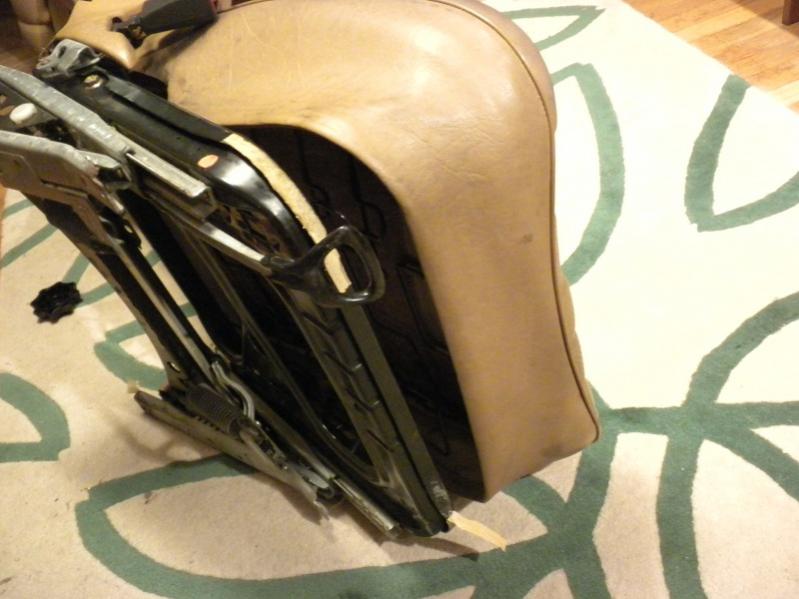 Here you can see both what creates those pleats and why they go so flat. There are insert -- the gray strips -- that are sewn into "pockets" and create the pleats. In this seat, you can see that the cloth backing that forms those "pockets" is totally disintegrated.  So the skin is completely removed in the front and on the sides, but not on the back. To remove it on the back, you need to create slack there. I have found that the best way of doing this is to completely recline the seat and then stuff the upholstery backwards through the crevice between the seat bottom and back while tilting the seatback back up.  I ended up getting the back end off by slipping my finger in and pulling down as such:   I then pulled the skin off by pulling from the front away from the seat (if the seat were mounted in the car, towards the dash). Some of the skin got caught in the rear corners of the cushion and I had to work it off by hand; but this was not too hard.  Next, the seatback.
__________________
"Senior Luna, your sense of humor is still loco... but we love it, anyway." -rickymay ____ "Your sense of humor is still loco...  " -MBeige ____ "Señor Luna, your sense of humor is quite järjetön" -Delibes " -MBeige ____ "Señor Luna, your sense of humor is quite järjetön" -Delibes1982 300SD -- 211k, Texas car, tranny issues ____ 1979 240D 4-speed 234k -- turbo and tuned IP, third world taxi hot rod 2 Samuel 12:13: "David said to Nathan, I have sinned against the Lord. And Nathan said to David, The Lord also has put away your sin; you shall not die." 
|
|
#2
01-27-2014, 12:51 PM
|
||||
|
||||
|
On to the seatback. For starters, you will need to remove the seatback backing. It is held on by a phillips-head screw on the bottom.
 When you have undone the screw, just pull down on the back and it should come right out. It may take a bit of a tug. To get the headrest out, just pull it out while pressing this button in. The button may take some force, but if I can do it, you can do it.  On this seat, the bottom of the seatback skin came out very easily. I just pulled it towards me and it came right out  ! I'm guessing that you will probably have a harder time with -- this was just too easy -- but I may be wrong. ! I'm guessing that you will probably have a harder time with -- this was just too easy -- but I may be wrong.  In getting the skin off the sides, I first gave the top half of the seat the man-hug of death to create slack at the top to start working out the skin. Once it's out on the top, just work your way down. Repeat on the other side.  Next you will need to free the skin from the seatback adjustment mechanism, and to do this, you will need to remove the piece of plastic trim that resides there (I'll get a picture of it up later). It basically sits there and covers the hinge point. If you see the seat, you'll know right away what I'm talking about. That piece of trim is fixed on with four clips in a circular formation as shown (it's the thing in the center of the picture). 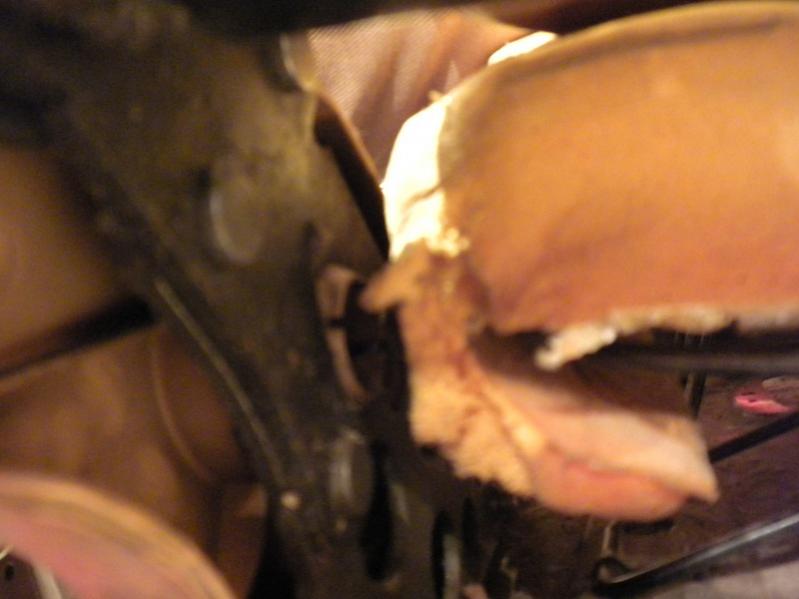 I ended up getting it off by using two flathead screwdrivers to press on two clips simultaneously and I GOT IT OUT WITHOUT BREAKING ANY CLIPS CHECK IT OUT BABY YO!!!!!! THIS IS VICTORY!!  Getting the skin off at the top will be different. All you need to do is slip it out some clips, which is a whole lot easier that the rest of the stuff. Here is a view looking upside-down at the clips.  The last step will be to undo a plastic runner that secures the skin to the seat and helps the skin maintain its proper shape. Here it is on the back.  Here you can see how it holds the skin on. There is a thin strip of cloth that slips into little hooks in the plastic runner. Just slip those out -- I used a screwdriver.  OK, we're done!  Here is everything we took off:  I will be updating this thread later today with stuff that was different on the blue seat and then on how I'm refurbishing the upholstery and padding. I will also be making observations on differences between the two seats.
__________________
"Senior Luna, your sense of humor is still loco... but we love it, anyway." -rickymay ____ "Your sense of humor is still loco... " -MBeige ____ "Señor Luna, your sense of humor is quite järjetön" -Delibes1982 300SD -- 211k, Texas car, tranny issues ____ 1979 240D 4-speed 234k -- turbo and tuned IP, third world taxi hot rod 2 Samuel 12:13: "David said to Nathan, I have sinned against the Lord. And Nathan said to David, The Lord also has put away your sin; you shall not die." Last edited by Mölyapina; 01-27-2014 at 01:27 PM.
|
|
#3
01-27-2014, 04:01 PM
|
||||
|
||||
|
I never have the heart to tell them...
Thanks for the thorough writeup, looking forward to more...I need to do some seat work myself someday. I'll be referring to this.
Beautiful cat. Somehow, whenever my cats appoint themselves to be my sidekicks during a project, I wind up getting less done, not more. Much less.
|
|
#4
01-27-2014, 05:35 PM
|
|||
|
|||
|
Excellent thread.
|
|
#5
01-27-2014, 10:11 PM
|
|||
|
|||
|
Excellent writeup so far, Jooseppi.
I'm currently rebuilding the 1979 bamboo seats (I may have shown them to you when you were here to buy parts) for use in my '83 240D. I'm having to deal with a lot of rusty fasteners and whatnot, as the parts car's floor had been rotted out for years. It's certainly not too bad a job. My horsehair pads were completely disintegrating, so I'm replacing them with memory foam. I also did a bunch of spring repair and reinforcement and had to stitch up some tears in the MB Tex. Here's a couple of shots of my "new" driver's seat, completed.  
|
|
#6
01-27-2014, 10:29 PM
|
||||
|
||||
|
So the blue seat was more troublesome than the tan one. I think that this is because the tan seat had its seat bottom replaced before funola bouhgt it (the seat came from funola's old car which JB3 bought and then parted out...
 ). The front edge was hard to get out, and when I finally got it out, I had to use the aforementioned pair of scissors to work it out. ). The front edge was hard to get out, and when I finally got it out, I had to use the aforementioned pair of scissors to work it out. When I finally got the silly thing out, I found that the seat had an inner fabric lining separate from the vinyl that was stapled on to the cushion. Grr.   I ended up cutting it off. Here we again see why the pleats are flat.  I then tried several methods of getting the back off.    That last one finally worked.  I don't know how difficult the seatback would be as opposed to the Palomino (?) seat, but it might not be too different because I'm not sure if the seatBACK was ever replaced.
__________________
"Senior Luna, your sense of humor is still loco... but we love it, anyway." -rickymay ____ "Your sense of humor is still loco... " -MBeige ____ "Señor Luna, your sense of humor is quite järjetön" -Delibes1982 300SD -- 211k, Texas car, tranny issues ____ 1979 240D 4-speed 234k -- turbo and tuned IP, third world taxi hot rod 2 Samuel 12:13: "David said to Nathan, I have sinned against the Lord. And Nathan said to David, The Lord also has put away your sin; you shall not die."
|
|
#7
01-27-2014, 10:46 PM
|
|||
|
|||
|
Looks like you are going through a lot of effort to take the seat apart.
Why don`t you remove the back from the base? remove the plastic side covers then the 2 13mm bolts on each side, and the seat back lifts off. The hog Rings hold the cloth down tight to the foam pad. just snip off the Hog Rings, (remove them so they don`t rip your hand) and then lift off the seat cover. If you are going to install a new-er cover, then you have to remove them anyway. Charlie
__________________
there were three HP ratings on the OM616... 1) Not much power 2) Even less power 3) Not nearly enough power!! 240D w/auto Anyone that thinks a 240D is slow drives too fast. 80 240D Naturally Exasperated, 4-Spd 388k DD 150mph spedo 3:58 Diff We are advised to NOT judge ALL Muslims by the actions of a few lunatics, but we are encouraged to judge ALL gun owners by the actions of a few lunatics. Funny how that works
|
|
#8
01-27-2014, 11:09 PM
|
||||
|
||||
|
Quote:
.Quote:
. We both cracked up .How did you repair your broken springs? DieselGiant method? Memory foam sounds like a really good idea! I'm afraid the most I'll be able to afford will be some normal foam  . .Quote:
1) I didn't know how to take the seat apart, but it didn't seem necessary... of course, if it comes off that easily, I could see that it would make the job a bit easier. 2) Since the Palomino (?) seat had been riding for a while without the hog rings, I am going to make a guess that they are not totally necessary and will not be reinstalling them. Because of this, it was easier just to cut the fabric right above the rings.
__________________
"Senior Luna, your sense of humor is still loco... but we love it, anyway." -rickymay ____ "Your sense of humor is still loco... " -MBeige ____ "Señor Luna, your sense of humor is quite järjetön" -Delibes1982 300SD -- 211k, Texas car, tranny issues ____ 1979 240D 4-speed 234k -- turbo and tuned IP, third world taxi hot rod 2 Samuel 12:13: "David said to Nathan, I have sinned against the Lord. And Nathan said to David, The Lord also has put away your sin; you shall not die." Last edited by Mölyapina; 01-27-2014 at 11:20 PM.
|
|
#9
01-27-2014, 11:28 PM
|
||||
|
||||
|
So here's the differences I've noticed between the two seats.
1) (This one is obvious) The Palomino (?) has a five-pleat pattern and the blue seat has a six-pleat pattern; before 1984, only leather seats came with six pleats. 2) This one is less obvious but interesting. The Palomino (?) five-pleat pattern only has springs on the sides:  The blue six-pleat had two coils in the front along with the side springs:  Are these front coils something that came in in 1984 in general? Are the front coils something that went with the six-pleat style? Is the seat bottom from the Palomino (?) seat really from an older car and are the front coils something that came with the mid-generational refresh? Does anyone have any thoughts?
__________________
"Senior Luna, your sense of humor is still loco... but we love it, anyway." -rickymay ____ "Your sense of humor is still loco... " -MBeige ____ "Señor Luna, your sense of humor is quite järjetön" -Delibes1982 300SD -- 211k, Texas car, tranny issues ____ 1979 240D 4-speed 234k -- turbo and tuned IP, third world taxi hot rod 2 Samuel 12:13: "David said to Nathan, I have sinned against the Lord. And Nathan said to David, The Lord also has put away your sin; you shall not die."
|
|
#10
01-28-2014, 12:25 AM
|
||||
|
||||
|
Seat skin differences
The main difference I see (and look for) is that the earlier seats had double stitching, and the later had single. I have seen single stitch as early as '82 in the coupes, but not till '84 in the sedans. Yes Charlie is correct about separating the top from the bottom= much easier! I have pulled numerous seat skins from cars, and have always separated the seat halves. Another tip is to remove the foam and all with the skin. If the foam and/or horse hair padding is good on the skin you are using, it is very easy to remove them together (they can stay together), and install them on the replacement spring box or seat back. When I find a good passenger side skin at a wrecking yard, I just buy the skin and foam/horse hair pad (cheaper and easier to carry!). The passenger side can then be used on the driver side (they are interchangeable).
__________________
 All Diesel Fleet 1985 R107 300SLD TURBODIESEL 2005 E320 CDI (daily) LOTS of parts for sale! EGR block kit http://www.peachparts.com/shopforum/diesel-discussion/355250-sale-egr-delete-block-off-plate-kit.html 1985 CA emissions 617 owners- You Need This! Sanden style A/C Compressor Mounting Kit for your 616/ 617 For Sale + Install Inst. Sanden Instalation Guide (post 11): http://www.peachparts.com/shopforum/diesel-discussion/367883-sanden-retrofit-installation-guide.html
|
|
#11
01-28-2014, 12:41 AM
|
||||
|
||||
|
Nice workshop you have there... just like home
.Did the cat take the pictures? Congrats on the excellent writeup.
__________________
 Mac 2002 e320 4matic estate│1985 300d│1980 300td Previous: 1979 & 1982 & 1983 300sd │ 1982 240d Let's take a drive into the middle of nowhere with a packet of Marlboro lights and talk about our lives. ― Joseph Heller, Catch-22
|
|
#12
01-28-2014, 02:28 AM
|
|||
|
|||
|
Don`t waste your time fixing broken springs. Replace the Spring Box (usually the drivers side that has the broken springs) from the Passenger side. then the left side that doesn`t get pushed down and used much, becomes the side the driver uses more, and will have a bit more firmness to it.
It would be best to use a Spring Box form a second Gen W126 (86 - 90) they seem to have a nicer Spring Box with an added spring and the Foam round pieces in the corner front coils. You will have to remove the electric seat tracks for the W123 manual one`s. To remove the back rest, (you already have one plastic cover off) is to remove the 2 plastic side covers. trick is to remove w/o breaking one or more of the now brittle plastic tabs out of the circle in the metal frame. Then remove the 4 13mm bolts (2 ea side) and lift the back off. The w123 drivers side has the forward and back adjustment, and the elevation adjustment. The early w123 pass side has the forward back adjustment only. The height is set at a fixed position as seen from the rear, it sits on 2 pedestal. there is one bolt that screws into the Rocker at the right rear. I swapped my 240D Pass side to the tracks with the elevation. Now this would be a good how to do it DIY frustrating pictorial. There are 6 screws that hold the track to the Spring Box. It`s a real Chinese Jig Saw puzzle to remove them, and then realign back together. You have a good write up, you will fine tune it as you do more seats. Charlie
__________________
there were three HP ratings on the OM616... 1) Not much power 2) Even less power 3) Not nearly enough power!! 240D w/auto Anyone that thinks a 240D is slow drives too fast. 80 240D Naturally Exasperated, 4-Spd 388k DD 150mph spedo 3:58 Diff We are advised to NOT judge ALL Muslims by the actions of a few lunatics, but we are encouraged to judge ALL gun owners by the actions of a few lunatics. Funny how that works
|
|
#13
01-28-2014, 09:18 AM
|
|||
|
|||
|
Quote:
Look how the springs attach to the box, it's pretty easy to bend that sheet metal and slide them right out. Then find the appropriate unbroken spring and put it in the old slot, bend the metal back and Bob's your uncle.
__________________
Onus probandi incumbit ei qui dicit, non ei qui negat I recondition w123/w126/w124/w140/r107/r129/ steering boxes! 1984 300D "Elsa" odo reset 6/2011 147k 1983 300TD "Mitzi" ~268k OM603 powered 1995 E300 "Adelheid" 262k [Sold]
|
|
#14
01-28-2014, 09:37 AM
|
||||
|
||||
|
Quote:
As for the hog rings, mine were so rusted that a quick flick of a screwdriver broke them free. Quote:
As for the seat springs, I used a method similar to what Kent Bergsma does. Actually, my father (an antique furniture upholsterer) came up with the same method around 15 years ago to repair springs in my '82 240D at the time. Basically:
I put the repaired seat on the floor to try it out, and it's even more comfortable than I'd hoped for. Time will tell how it is when I install it in a car. Quote:
Quote:
|
|
#15
01-28-2014, 01:29 PM
|
|||
|
|||
|
Quote:
__________________
|
|
| Bookmarks |
|
|


 Linear Mode


