

|
|
|
|
|
|
#31
 03-15-2004, 10:43 AM
|
||||
|
||||
|
Quote:
Brian, that's an OE dealer "genuine Mercedes" pad. I got mine from Rusty, but you can also get it from FastLane (I think), or your local stealer. Price was pretty reasonable, IIRC. I'm finding that for certain items, the OE part is worth the extra money compared to the OEM/aftermarket item (example - speedometer cables, hood pads, OM603 intake gaskets). For other things, the OE part price can be DOUBLE with little, if ANY, difference! For example - wheel bearings, ball joints, most suspension/steering links & bushings, etc... in those cases it ain't worth the cost for the little "star", IMO. Sometimes it's a trial & error process, though. I bought the aftermarket speedo cable for ~$35 and after receiving it, and comparing to the original, I was sorry I didn't pay the ~$80 for the OE dealer cable.  BTW, a dealer price sheet from approximately May-2005 is at this URL. It's a text file in Zip format, about 2MB: http://www.w124performance.com/docs/mb/other/MB_Pricelist_May-2005.zip 
Last edited by gsxr; 01-05-2007 at 02:57 PM. Reason: Updated URL 
|
|
#32
03-15-2004, 10:47 AM
|
||||
|
||||
|
Quote:
 It did, though. It did, though.
|
|
#33
03-15-2004, 10:58 AM
|
|||
|
|||
|
The very nature of the contact cements is that they can not be moved around after contact ( thus the " CONTACT" ).
So on large cumbersome items you may need to have a helper and or some devices... For instance, when wanting to glue large pieces of leather together which must be aligned contact cement can be applied and then a large piece of waxed paper placed between the pieces... then you start at one edge and push down on the leather as the waxed paper is withdrawn from between them.. this keeps air pockets from happening... For hood pads something like thin plywood could be used to place the pad on and two people raise it into alignment . For some things extra hands are almost necessary for enjoying a project....
|
|
#34
03-15-2004, 11:51 AM
|
||||
|
||||
|
Quote:
__________________
1994 C280, dark green metallic 105k miles 1991 190E 2.6, Black 191,500 miles (sold to another forum member) 2003 Chevy Tahoe LT, Redfire Metallic 105k miles 1989 Mustang GT Cobra Convertible 43k miles
|
|
#36
03-15-2004, 01:06 PM
|
||||
|
||||
|
has anyone had any success with using snaps,buttons or some other simple mechanical device for holding the hood pad on.i tried a good quality construction adhesive first.but that didnt last long
|
|
#37
03-15-2004, 01:33 PM
|
|||
|
|||
|
"SO, would I be advised to use Liquid Nails or the 3M 8090?"
I think the 3M 8090 is what is made for this kind of stuff.... I used liquid nails out of a gallon can day before yesterday for putting melanine to plywood.... which is what it is made for.... but was worried the next day when it would still move around some... it does look to have dried..... but.... Maybe it is time you take the next step up in your DIY training... tackling something which needs some planning to be applied in the proper place... as compared to using a less suitable glue .... Overspray ..... this is not a problem because most of these cans have an adjustable nozzle... which can be adjusted to different widths....
|
|
#38
01-04-2007, 09:53 PM
|
|||
|
|||
|
Bump...
|
|
#39
08-14-2007, 01:03 PM
|
||||
|
||||
|
hood pad installation with 3m super trim adhesive (8090)
I had to go to a NAPA parts store to find it...initially I couldn't find it at Kragen or Pep Boys so I picked up Loctite Headliner Adhesive at an AutoZone but the next day found the recommended 3M 8090. They might have it at Lowe's as 3M 90...
I raised the hood straight up and prepped the engine bay by laying a thick u-haul moving box atop the crossover manifold to kneel on (I weigh 175lbs) and then spread a large blue plastic drop cloth/tarp from Harbor Freight from the top of the windsheild to the ground in front of the car. It also covered the fenders to the ground. Taped everything in place with duct tape. I fitted the pad dry one time to check for any irregular fit areas but found none. I laid the pad on the tarp over my engine with the foil side facing down and the front pointing forward as if it were already in place. I put on some nitrile gloves and got busy. I sprayed the first pass over the rear third of the pad as a test run (next time I would spray the entire surface of the pad.) Then sprayed the entire hood. After about 5 minutes I applied the second pass in a diagonal pattern to the first and ultimately the third pass perpendicular to the first. I just made the three passes before emptying the can. I think the secret to using this stuff is to apply as directed on the can...just let it dry completely between passes. One immediate benefit is you can clearly see your spray pattern when it drys and fill in any missed areas on the next pass. The can states you have up to an hour after application to bond the items so I gave it plenty of time to dry after the last pass...15 minutes or so. I had zero problem placing the pad from the bottom center first and then up through the middle to the nose of the hood. I then went out from the center to each side using my hands first and then a small plastic box about 6"x6" and two inches wide to smooth out firmly. [forgot to mention that clean up was a breeze - I slipped off my gloves over the head of the can, set it on the $3 blue tarp and rolled the whole enchilada up and tossed it in the dumpster. Zero overspray on anything but the tarp and very little of that.] This morning it looked as factory firm a fit over the contours on the sides as it did last night. If my camera wasn't drying out after taking an accidental bath hiking this weekend I would have taken pics along the way....
__________________
 1991 300SL 71K miles young Last edited by iceman805; 08-14-2007 at 04:04 PM. Reason: Add the clean up phase
|
|
#40
08-14-2007, 02:35 PM
|
||||
|
||||
|
I have amassed the material to do this.
But I cant find the 3m adhesive remover anywhere, and the old adhesive laughs off any other remover I have tried. Anyone know where to get it? UPDATE: With renewed searching vigor I used 3M's website to located a dealer. Theres one on my way to work that carries the heavy duty stuff that comes in a can that folks talk about here. Hopefully this is helpful to someone in the future.
__________________
------------------------------- '85 300D, 'Lance',250k, ... winter beater (100k on franken-Frybrid 3 Valve Kit) '82 300D, 'Tex', 228k body / 170k engine ... summer car '83 300TD Cali Wagon 210k, wife's car Last edited by dieseldan44; 08-14-2007 at 02:53 PM.
|
|
#41
08-14-2007, 03:48 PM
|
||||
|
||||
|
I just did my hood pad and used the 3M 8090 SUPER Trim Adhesive. When it tacked, I folded it in half to line it up under the hood, carefully placed it and rolled it on with a paint roller to burnish it. I also ended up using 1 and a half cans. Overspray was very minimal but I sprayed the pad on my gravel driveway not on the engine bay.
 Prepped and ready to spray 3 coats on pad and 3 coats on hood. 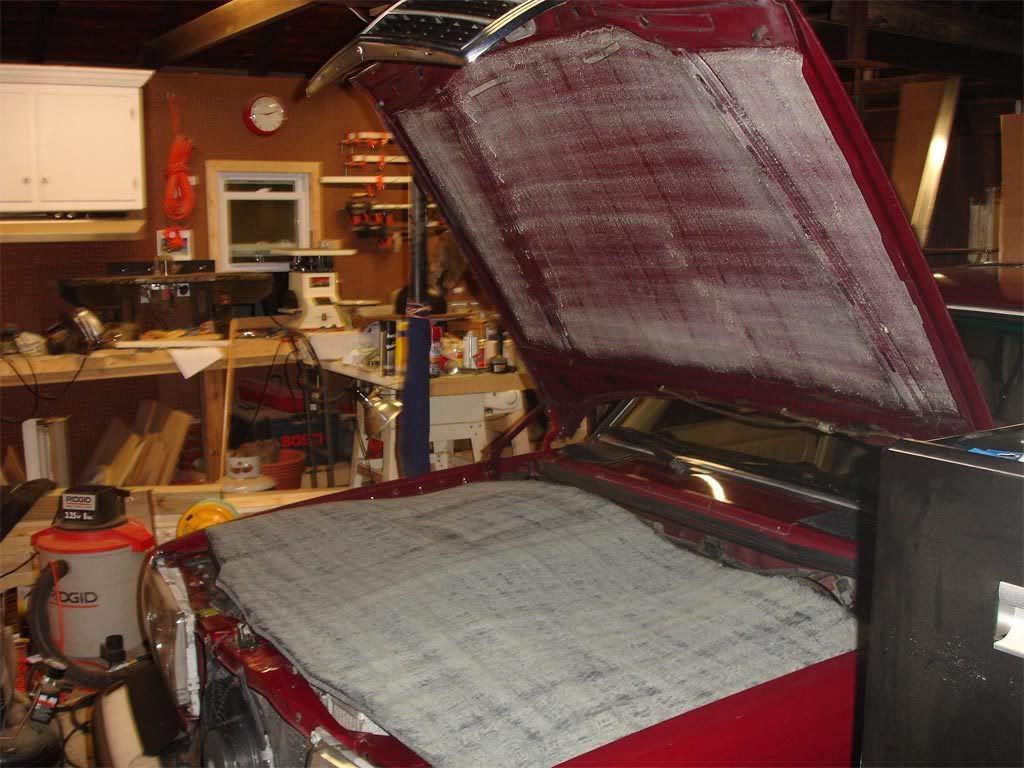 Sprayed and tacking for 15 minutes. 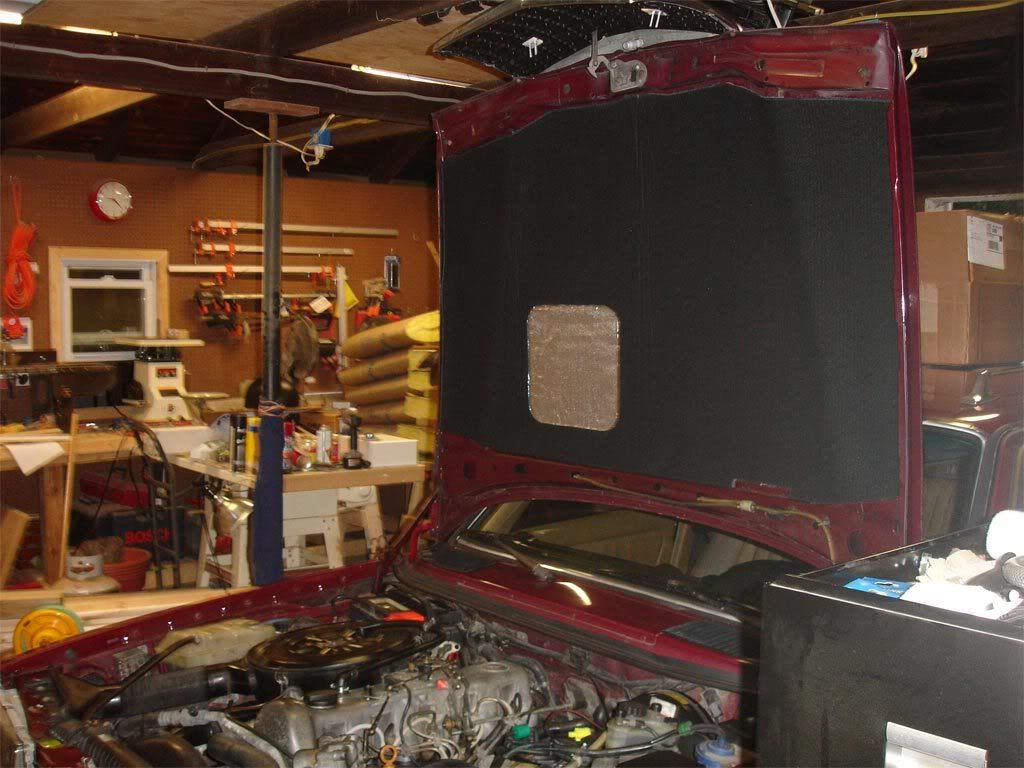 In place and curing while upright overnight.
__________________
Chad 2013 Jeep Unlimited Rubicon OBK#44 "Pleasure in the job puts perfection in the work." - Aristotle (384-322 B.C.) SOLD 1985 300TD - Red Dragon 1986 300SDL - Coda 1991 - 300TE 1995 - E320 1985 300CD - Gladys 2006 Nissan Pathfinder LE 1998 Acura 3.0 CL
|
|
#42
08-14-2007, 04:22 PM
|
|||
|
|||
|
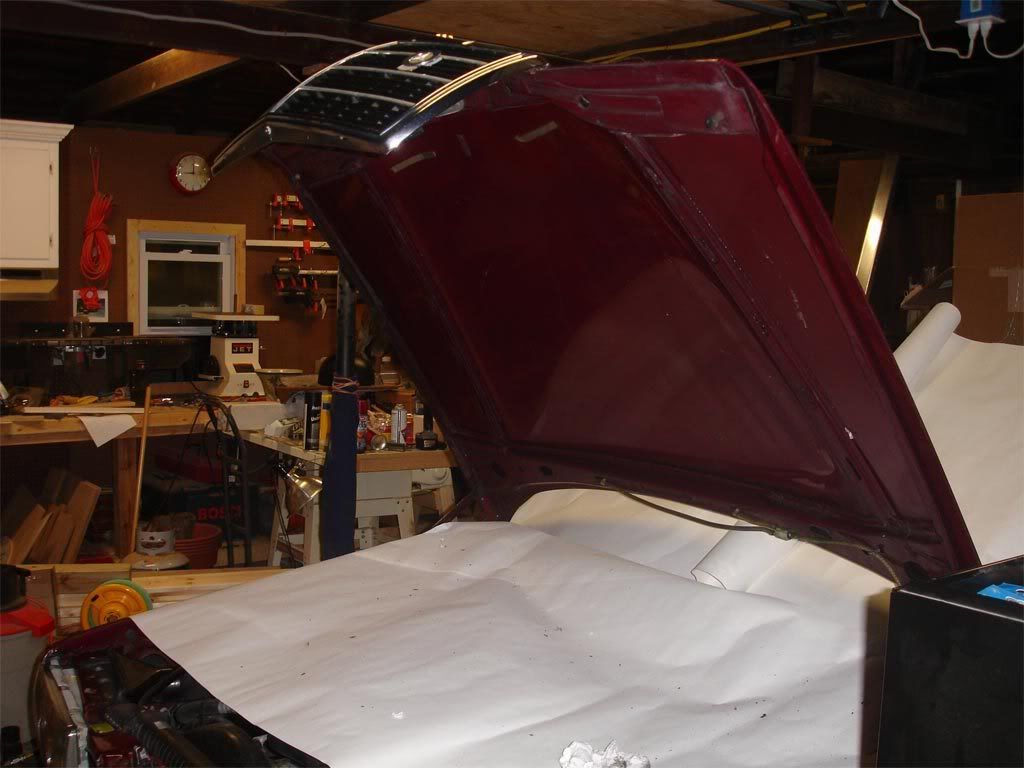
Pics and write up of my hood pad install
I used 8090 - so far so good (14 months later in texas heat and counting) - here is the original posts of the install:
Hood Pad Replacement (pics)
__________________
~shell As of 2/2010: 2001 CLK55 0o\=*=/o0 13.6 @ 106mph 10K mi 1984 300SD 260K mi and going and going... 97 S600 46K miles 1991 Sentra SE-R (extremely dorked with) www.se-r.net
|
|
#43
08-14-2007, 04:33 PM
|
||||
|
||||
|
Chad,
Thanks for the pics! Did you cut out the indentation for the windshield washer lines/splitter, or does the pad come with it? dd
__________________
------------------------------- '85 300D, 'Lance',250k, ... winter beater (100k on franken-Frybrid 3 Valve Kit) '82 300D, 'Tex', 228k body / 170k engine ... summer car '83 300TD Cali Wagon 210k, wife's car
|
|
#44
08-14-2007, 05:04 PM
|
||||
|
||||
|
Bodyart27, your pad turned out very nice. I love your lift, I don't have the headroom for one myself. I just stood on the strut towers to put mine on.
Dieseldan44, the pad came precut - all I had to do was glue it in. Also the paint roller I used was 6" i think. Not a regular width one. The regular ones did bend as Bodyart27 stated in his linked post but the smaller one could take the pressure and the length of the handle helped me spread the pad into place. I also didn't tape off anything. Just the paper to proect the engine bay and the windshield. Keep in mind that you can turn the tip of the spray nozzle to make the spray pattern vertical or horizontal. I sprayed the pad first to get a feel for the spray pattern before I did the hood.
__________________
Chad 2013 Jeep Unlimited Rubicon OBK#44 "Pleasure in the job puts perfection in the work." - Aristotle (384-322 B.C.) SOLD 1985 300TD - Red Dragon 1986 300SDL - Coda 1991 - 300TE 1995 - E320 1985 300CD - Gladys 2006 Nissan Pathfinder LE 1998 Acura 3.0 CL
|
|
#45
08-14-2007, 06:27 PM
|
|||
|
|||
|
I'm glad the lack of hood pad doesn't bother me. That looks like a real PITA.
__________________
1984 300TD
|
 |
| Bookmarks |
|
|


 Linear Mode


