

|
|
|
|
|
|
|
|
#1
 12-03-2015, 01:42 AM
|
|||
|
|||
|
Here are some pics of the process
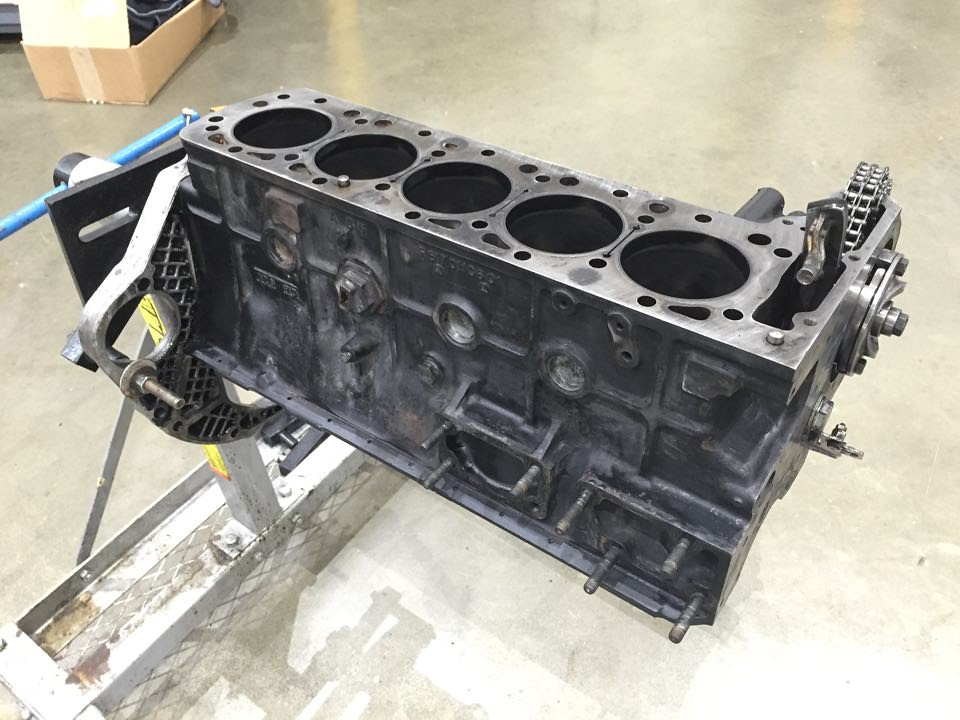 12336403_1064119076973024_1243694379_n by David S, on Flickr 12336403_1064119076973024_1243694379_n by David S, on Flickr 12348186_1064119240306341_2093677746_n by David S, on Flickr 12348186_1064119240306341_2093677746_n by David S, on Flickr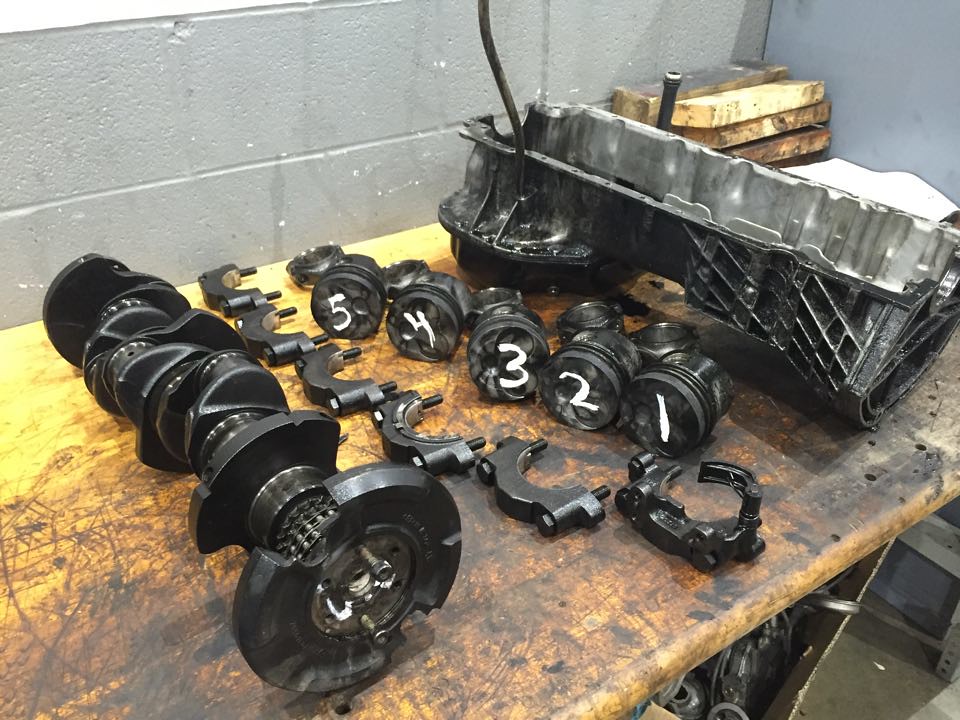 12277270_1064119046973027_1440536306_n by David S, on Flickr 12277270_1064119046973027_1440536306_n by David S, on Flickr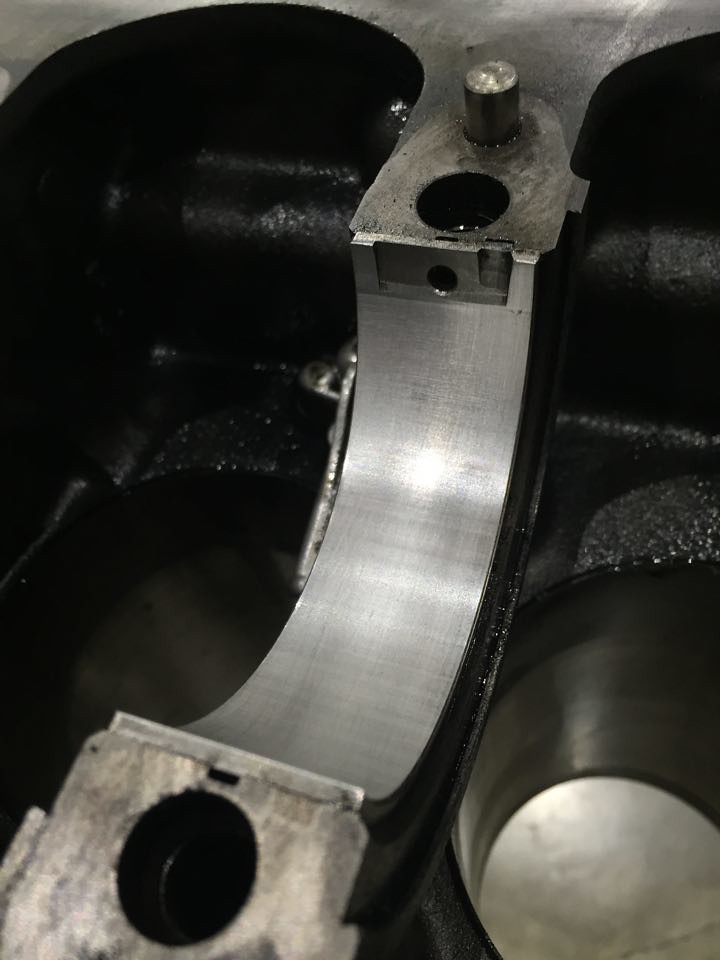 12335877_1064119203639678_1391378973_n by David S, on Flickr 12335877_1064119203639678_1391378973_n by David S, on Flickr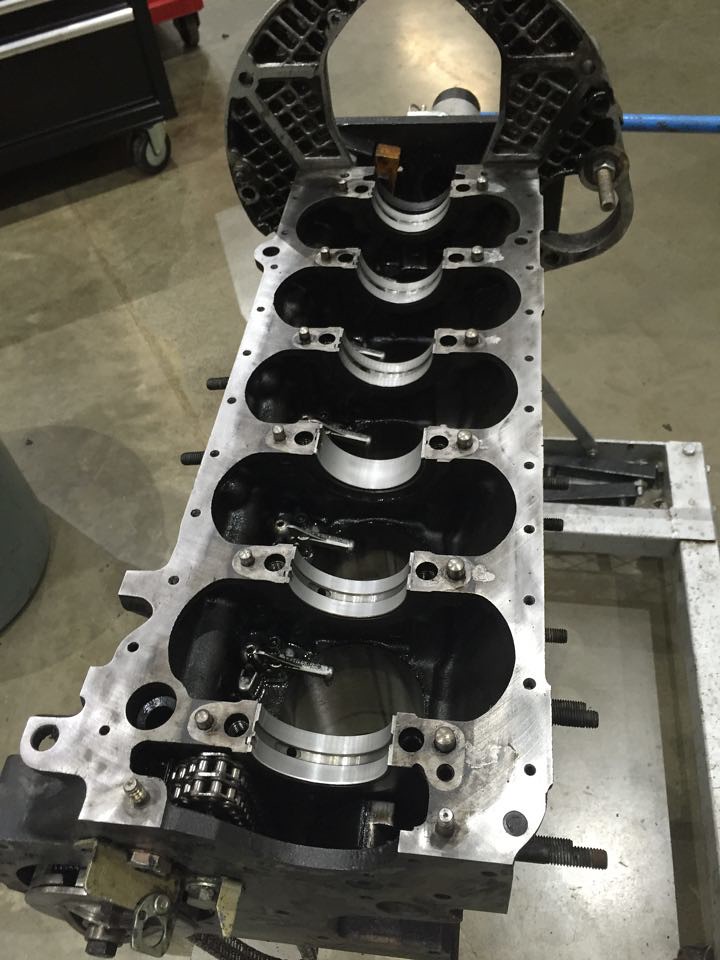 12348408_1064119103639688_1894317406_n by David S, on Flickr 12348408_1064119103639688_1894317406_n by David S, on Flickr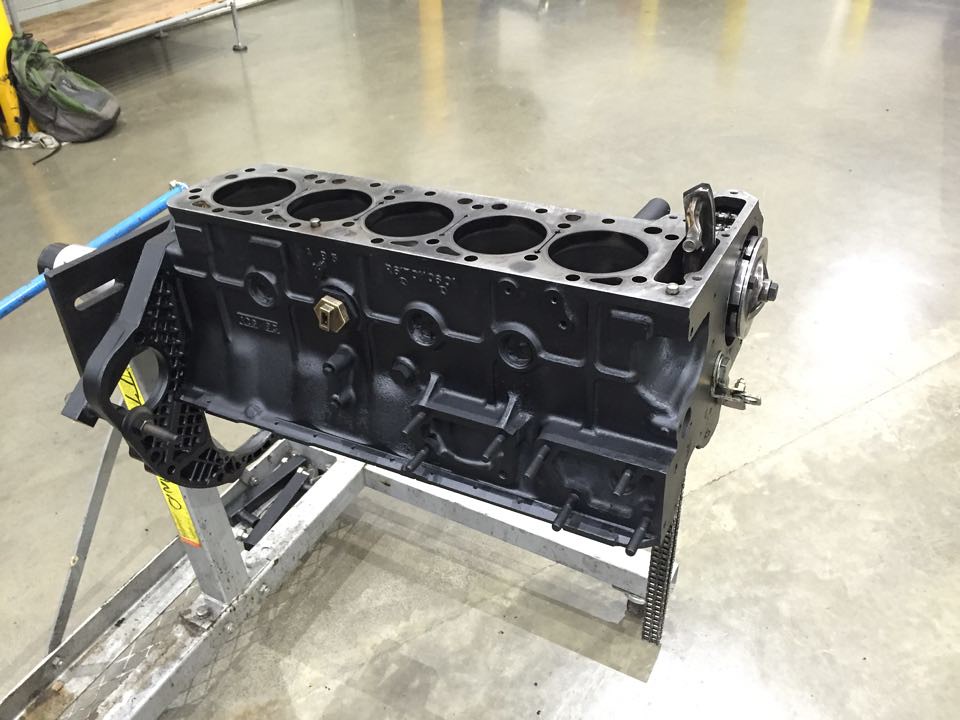 12319428_1064119260306339_849820930_n by David S, on Flickr 12319428_1064119260306339_849820930_n by David S, on Flickr

|
|
#2
12-03-2015, 01:42 AM
|
|||
|
|||
|
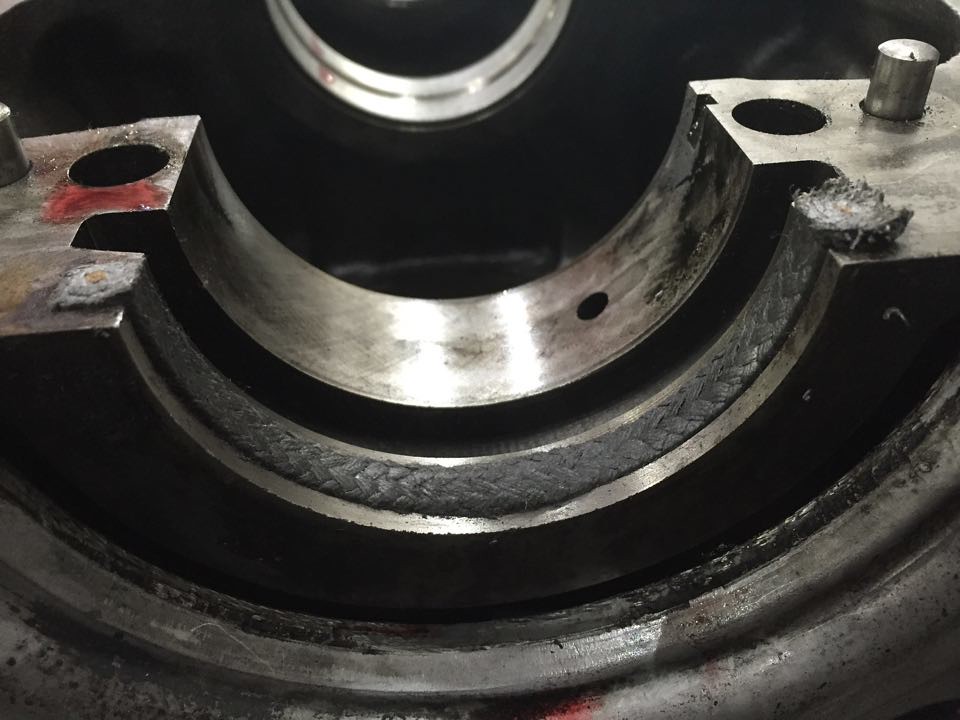
I got the whole block apart and gave it a nice spray of fresh black paint today. Before installing the crank and pistons, i need to put in the new rear main seal. I am a little confused on how it works and havent found much info on what to do. The block has half of the seal and the oil pan has the other half in it, but the new one is one piece. Am I supposed to cut it in half so that there are two "half moons"? The FSM says to leave about 1mm out past the edge but I am a little confused as to if it is supposed to be cut in half? If it is, why wouldnt they just make the new seal in two pieces?
|
|
#3
12-03-2015, 05:41 AM
|
||||
|
||||
|
Quote:
Get yourself a brand new Stanley knife blade / new knife blade and cut onto a soft surface like a bit of scrap wood. Do your best to make sure the cut is clean and straight - practice for the next cuts! Lubricate the seal before fitting Ideally some form of engine assembly lube is best Whilst holding the rope seal in the middle - position the rope seal in middle of the casting at the locating pin. Push the seal onto the pin as best you can. Next with clean hammer handle covered in more lube (engine assembly lube is best! If not engine oil) push the seal more firmly onto the pin. With the hammer handle you now need to roll from the pin position to one of the outer edges Then repeat for the other edge. Rolling action is necessary - do not drag When you have it fitted so that the seal just sticks out of the recess you then need to cut off the ends as described in the FSM. Take your time with this so you get clean sharp square ends. I hope this helps.
__________________
1992 W201 190E 1.8 171,000 km - Daily driver 1981 W123 300D ~ 100,000 miles / 160,000 km - project car stripped to the bone 1965 Land Rover Series 2a Station Wagon CIS recovery therapy! 1961 Volvo PV544 Bare metal rat rod-ish thing I'm here to chat about cars and to help others - I'm not here "to always be right" like an internet warrior  Don't leave that there - I'll take it to bits!
|
|
#4
12-03-2015, 03:26 AM
|
||||
|
||||
|
I thought the rear main is a rope seal.
I don't have any experience to help, sorry.  Does this thread give you any clues? http://www.peachparts.com/shopforum/diesel-discussion/298852-rear-crankshaft-rope-seal-replacement-without-removing-crank.html
__________________
'84 190D 2.2 5MT (Red/Palomino) Current car. Love it! '85 190D 2.2 Auto *Cali* (Blue/Blue) *sold* http://badges.fuelly.com/images/sig-us/302601.png http://i959.photobucket.com/albums/a...0/sideview.png
|
|
#5
12-03-2015, 11:03 AM
|
||||
|
||||
|
^^What he said
Also, just spend the money on new pins and bolts for the harmonic balancer, and use locktite. They tend to fail when reused. The big bolt can be reused with no trouble if I remember correctly.
__________________
$60 OM617 Blank Exhaust Flanges $110 OM606 Blank Exhaust Flanges No merc at the moment
|
|
#6
12-03-2015, 09:28 PM
|
|||
|
|||
|
Quote:
Though he doesn't want to spend he money on the parts that shouldn't be reused....So not sure if that would matter... Also one should note, that the connection point of the starter and alternator bracket shouldn't be painted as both items ground to the block.....
__________________
|
|
#7
12-03-2015, 04:03 PM
|
|||
|
|||
|
Is the seal a rope seal, like we have seen before? If rubber, that is something new. U.S. 60's gas engines had the rope seal, but rebuild kits have a 2 piece rubber seal (better). But, nobody has reported that for an OM617 engine.
Rollguy posted a thread w/ photos about replacing the rear seal w/ crank in the block. Unlike U.S. engines, you can't just push the seal around since a pin secures it. Rollguy had to loosen the crank enough to get it out and the new one in. You can do it better and easier since your crank is out. As mentioned, roll the rope seal in until well seated. You can use a large socket or piece of pipe. I expect you must cut it and work on each side separately. I have never done a rope seal, just the 2-piece rubber replacements (U.S. engines). I assume you noted that the connecting rods and caps have dash marks "/", "//", "///", ... to label which cylinder they were installed in and to (probably) orient the cap correctly. I don't know how much keeping them in the same location matters in a rebuild. More important is to keep the caps matched to the rods. Note in the 3rd photo of post 46 how the oil chain tensioner attaches to the #1 bearing cap. That plastic tension rail tends to break. I found mine such. Haynes (and I recall the FSM) said you must remove the upper oil pan to replace it, which would be very involved. Nope, you just unbolt the bearing cap. Harder is removing the oil pump, but that is possible w/ just the lower oil pan off (search for my post). I suggest the OP replace that plastic tension rail since many have found them cracked at the pivot, about to fail. It costs <$10.
__________________
1984 & 1985 CA 300D's 1964 & 65 Mopar's - Valiant, Dart, Newport 1996 & 2002 Chrysler minivans
|
|
#8
12-03-2015, 10:55 PM
|
|||
|
|||
|
It was a rope seal, I just wasnt sure what it was called. Today I installed the new seal and put the crank back in. Also, I'll be sure to clean off those surfaces, thanks for the tip!
 12336227_1064546656930266_990729166_n by David S, on Flickr 12336227_1064546656930266_990729166_n by David S, on Flickr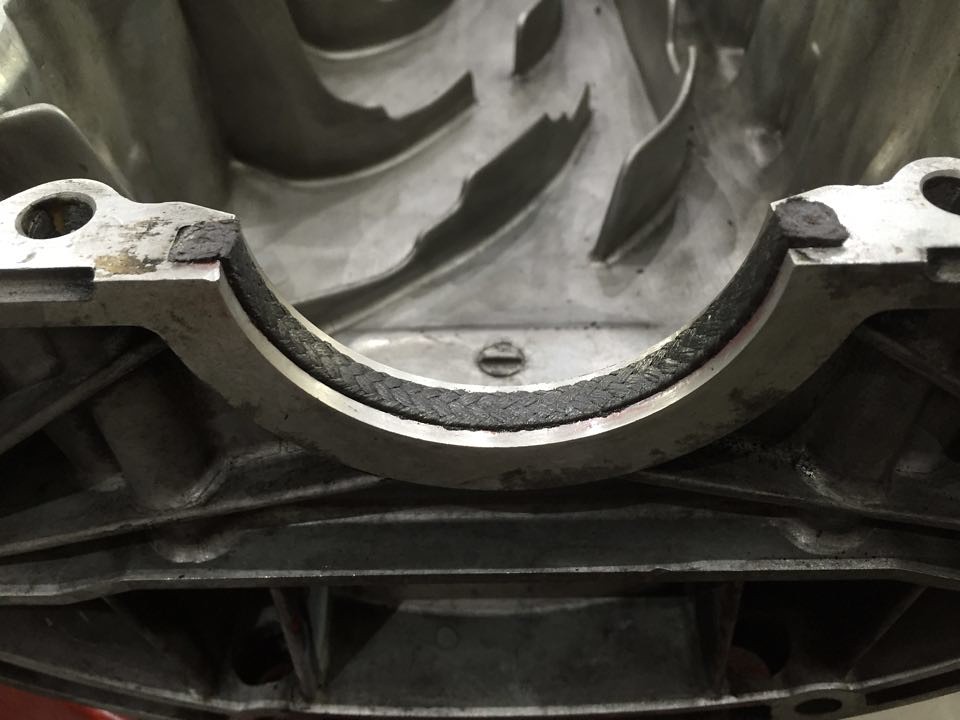 12325137_1064546676930264_525477258_n by David S, on Flickr 12325137_1064546676930264_525477258_n by David S, on Flickr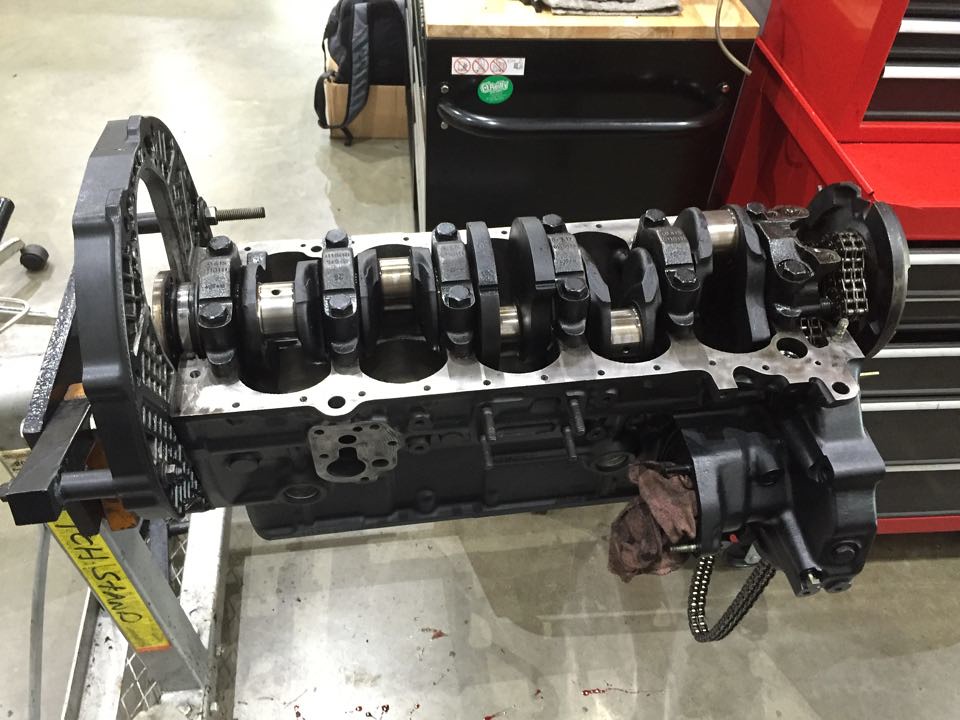 12348765_1064546693596929_1653075346_n by David S, on Flickr 12348765_1064546693596929_1653075346_n by David S, on Flickr
|
|
#9
12-04-2015, 01:07 AM
|
||||
|
||||
|
Looks good.
Definitely be careful with the harmonic balancer when you reinstall it. If the keys fail and the balancer runs them over, the entire crankshaft is ruined. Locktite everything and follow FSM torque values. When you clean gasket mating surfaces, the best to use is a coffee filter and solvent. I use any solvent I can find at the moment like acetone, brake cleaner, denatured alcohol, etc. Clean the mating surface until the coffee filter stays totally clean, no material transfer at all. Reference the FSM when installing gaskets since you may need a dab of RTV in some places like corners.
__________________
'84 190D 2.2 5MT (Red/Palomino) Current car. Love it! '85 190D 2.2 Auto *Cali* (Blue/Blue) *sold* http://badges.fuelly.com/images/sig-us/302601.png http://i959.photobucket.com/albums/a...0/sideview.png
|
|
#10
12-04-2015, 01:18 AM
|
|||
|
|||
|
Quote:
__________________
|
|
#11
12-04-2015, 07:25 AM
|
||||
|
||||
|
Quote:
__________________
'84 190D 2.2 5MT (Red/Palomino) Current car. Love it! '85 190D 2.2 Auto *Cali* (Blue/Blue) *sold* http://badges.fuelly.com/images/sig-us/302601.png http://i959.photobucket.com/albums/a...0/sideview.png
|
|
#12
12-04-2015, 08:28 AM
|
||||
|
||||
|
I'm curious about using coffee filters to clean? I'm assuming because it won't leave particles behind. Any recommendation on which brand? Can you get coffee filter paper in large sheets?
__________________
Jim
|
|
#13
12-04-2015, 10:18 AM
|
||||
|
||||
|
Looking good!! Thanks so much for keeping us updated.
What parts are you going to end up replacing/keeping?
__________________
"Senior Luna, your sense of humor is still loco... but we love it, anyway." -rickymay ____ "Your sense of humor is still loco...  " -MBeige ____ "Señor Luna, your sense of humor is quite järjetön" -Delibes " -MBeige ____ "Señor Luna, your sense of humor is quite järjetön" -Delibes1982 300SD -- 211k, Texas car, tranny issues ____ 1979 240D 4-speed 234k -- turbo and tuned IP, third world taxi hot rod 2 Samuel 12:13: "David said to Nathan, I have sinned against the Lord. And Nathan said to David, The Lord also has put away your sin; you shall not die."
|
|
#14
12-04-2015, 10:21 AM
|
||||
|
||||
|
Quote:
__________________
$60 OM617 Blank Exhaust Flanges $110 OM606 Blank Exhaust Flanges No merc at the moment
|
|
#15
12-04-2015, 04:24 PM
|
||||
|
||||
|
Quote:
I've never looked for coffee filter paper in large sheets, but your best bet on that would be to get sheets of laboratory grade filter paper. It's very similar, and it must be clean to avoid contaminating the filtered product.
__________________
'84 190D 2.2 5MT (Red/Palomino) Current car. Love it! '85 190D 2.2 Auto *Cali* (Blue/Blue) *sold* http://badges.fuelly.com/images/sig-us/302601.png http://i959.photobucket.com/albums/a...0/sideview.png
|
 |
| Bookmarks |
|
|


 Hybrid Mode


