

|
|
|
|
|
|
#16
 10-06-2013, 04:20 PM
|
|||
|
|||
|
In preparation for welding in the trunk pan and other items, what is the best way to remove the undercoat and/or seam sealer around the old spot welds ?

|
|
#18
10-07-2013, 03:23 AM
|
||||
|
||||
|
Quote:
Go for something that heats a large area rather than something like a welding brazing torch that heats much smaller areas. Wear a mask - the fumes are grim. If you find rust underneath the coating peels off easier than the skin on a ripe peach. Great work so far. But before you start to weld in any part of the side of the car pay particular attention to the rear structure and how the boot lid will fit (or not).
__________________
1992 W201 190E 1.8 171,000 km - Daily driver 1981 W123 300D ~ 100,000 miles / 160,000 km - project car stripped to the bone 1965 Land Rover Series 2a Station Wagon CIS recovery therapy! 1961 Volvo PV544 Bare metal rat rod-ish thing I'm here to chat about cars and to help others - I'm not here "to always be right" like an internet warrior  Don't leave that there - I'll take it to bits!
|
|
#19
10-07-2013, 03:30 AM
|
||||
|
||||
|
You might need to do more work here =>
The little crease right next to the door designer crease might cause you trouble
  As will the lip on the inner wheel arch. Bridging gaps like that will need a lot of heat and filler rod which might cause you trouble in a bit. If you can get these bits closer to stock then you'll have an easier time of it. Shaping hard wood plywood to the shape you want can help for one time use / not many times used reaction surfaces. I'm no expert but the guys on this site are => MetalMeet - for Metalshaping Enthusiasts & Professional Metalshapers
__________________
1992 W201 190E 1.8 171,000 km - Daily driver 1981 W123 300D ~ 100,000 miles / 160,000 km - project car stripped to the bone 1965 Land Rover Series 2a Station Wagon CIS recovery therapy! 1961 Volvo PV544 Bare metal rat rod-ish thing I'm here to chat about cars and to help others - I'm not here "to always be right" like an internet warrior Don't leave that there - I'll take it to bits!
|
|
#20
10-08-2013, 11:03 PM
|
|||
|
|||
|
Yes Stretch, that is a concern. That is the gap between the quarter panel around the wheel arch and outer wheel arch itself. I believe I've come up with a plan to deal with this which will dealt with after the panel has been mounted to the car.
|
|
#21
10-08-2013, 11:17 PM
|
|||
|
|||
|
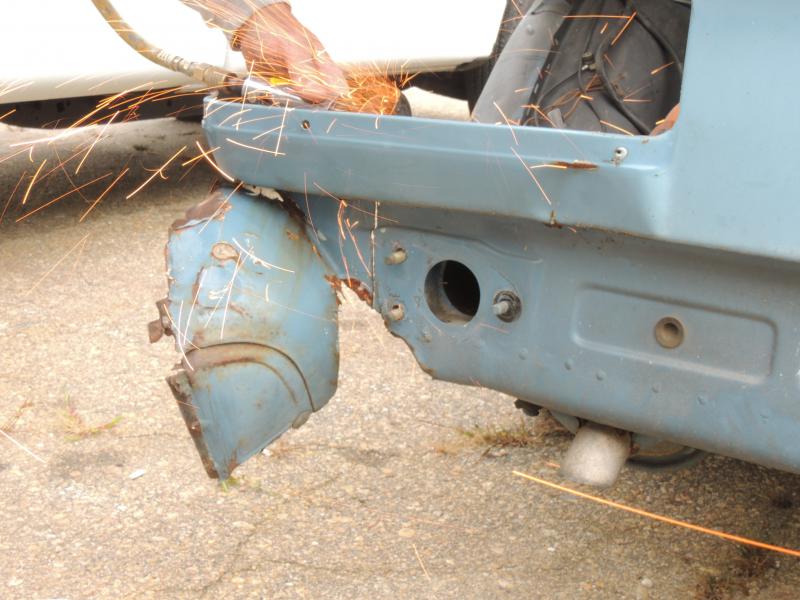
Got some more work done today for welding the quarter panel to the car. Since welding will need to be done to the back of the car, the bumper needed to be removed. Looks interesting without it
 After this was to grind off loose metal around the trunk. In cutting the metal around where the lights go, you never know what bugs will make your MB there home 
Last edited by steeleygreg; 10-08-2013 at 11:40 PM.
|
|
#22
10-08-2013, 11:55 PM
|
|||
|
|||
|
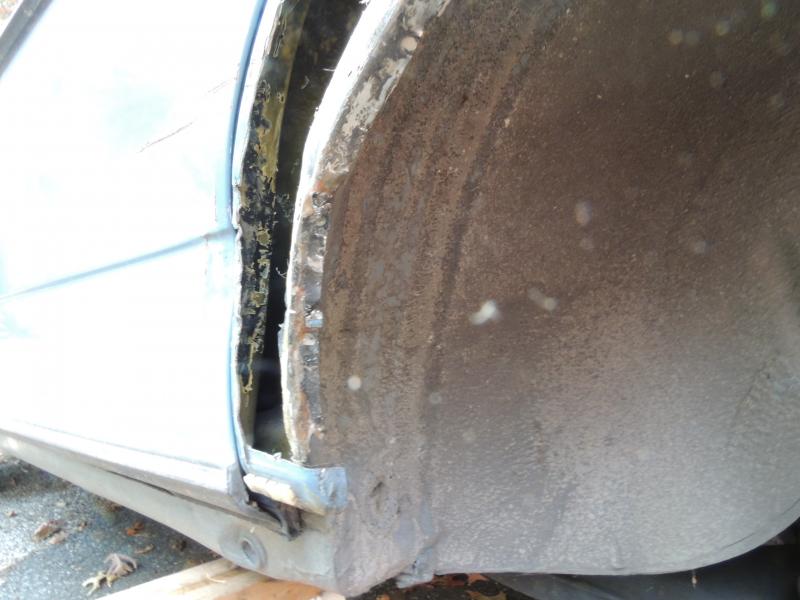
The decision to use the donor panel was made with using the dog-log section from the aftermarket panel. The reason was that the rear end of the car was damaged and the rounded section below the bumper is not obtainable in aftermarket. Well maybe it is but I couldn't find one.
The first pic is the modified donor panel and the finished product. Notice the the outer wheel arch has been trimmed back to mate with the original. The third pic shows the area which needs to be trimmed out of the donor panel so as to fit the wheel arch correctly. Last edited by steeleygreg; 10-09-2013 at 12:06 AM.
|
|
#23
10-09-2013, 02:54 AM
|
||||
|
||||
|
Great pictures - these all deserve to be BIG but here are two that are particularly good
  Foam sound insulation - I never knew!
__________________
1992 W201 190E 1.8 171,000 km - Daily driver 1981 W123 300D ~ 100,000 miles / 160,000 km - project car stripped to the bone 1965 Land Rover Series 2a Station Wagon CIS recovery therapy! 1961 Volvo PV544 Bare metal rat rod-ish thing I'm here to chat about cars and to help others - I'm not here "to always be right" like an internet warrior Don't leave that there - I'll take it to bits!
|
|
#24
10-11-2013, 10:47 AM
|
||||
|
||||
|
Hmm
Greg, I will call you today..
.
__________________
ASE Master Mechanic https://whunter.carrd.co/ Prototype R&D/testing: Thermal & Aerodynamic System Engineering (TASE) Senior vehicle instrumentation technician. Noise Vibration and Harshness (NVH). Dynamometer. Heat exchanger durability. HV-A/C Climate Control. Vehicle build. Fleet Durability Technical Quality Auditor. Automotive Technical Writer 1985 300SD 1983 300D 2003 Volvo V70 https://www.boldegoist.com/
|
|
#25
10-11-2013, 01:35 PM
|
||||
|
||||
|
OK
you have e-mail.
.
__________________
ASE Master Mechanic https://whunter.carrd.co/ Prototype R&D/testing: Thermal & Aerodynamic System Engineering (TASE) Senior vehicle instrumentation technician. Noise Vibration and Harshness (NVH). Dynamometer. Heat exchanger durability. HV-A/C Climate Control. Vehicle build. Fleet Durability Technical Quality Auditor. Automotive Technical Writer 1985 300SD 1983 300D 2003 Volvo V70 https://www.boldegoist.com/
|
|
#26
10-15-2013, 07:44 PM
|
|||
|
|||
|
Ok. Got some work done and ready for welding. First was to cut the outer wheel arch on the car so that the donor fender would mate up. Although I didn't get a pic of the process, the inner wheel arch flanges where ground and straightened where it mated with the outer wheel arch. In the second pic, it doesn't look it but the seam where ground to bare metal. The third pic is inside the truck with vice grip clamps holding the two fender seams together. The horizontal seam between the two parts of the outer wheel arch were expected. This will be sealed after the fender is tacked in place.
Last edited by steeleygreg; 10-15-2013 at 11:23 PM.
|
|
#27
10-15-2013, 07:58 PM
|
|||
|
|||
|
Now for the outside of the fender. The plan is to weld the rear critical rounded corner found in the third pic. The rear light assembly has to fit in the groove of the body panel so that the rubber trim will make it water tight. The alignment reference point is the trim hole as shown. I used welding butt clamps to hold the donor fender section to the car in the correct plane.
Also as shown the donor fender has been ground down to metal where the weld will be. I haven't done the same to the car section yet. The forth pic shows a closer pic of where the light assembly goes. I wanted to make a note to those who might be a little picky, that in pic 2 is the hole for the light assembly. On the bottom of the opening, where the donor cream color section joins the car blue color, there is a slight mis-match in alignment between the panels. This has been left intentionally because the bottom blue section was damaged when the car was in the accident. The donor section is true in alignment and once tact welds are put into place, I'll adjust the blue section to match. Next on to welding
Last edited by steeleygreg; 10-16-2013 at 01:58 AM.
|
|
#28
10-16-2013, 12:18 AM
|
||||
|
||||
|
Looking good
I am very happy with your progress.
Hope the welding is done soon. .
__________________
ASE Master Mechanic https://whunter.carrd.co/ Prototype R&D/testing: Thermal & Aerodynamic System Engineering (TASE) Senior vehicle instrumentation technician. Noise Vibration and Harshness (NVH). Dynamometer. Heat exchanger durability. HV-A/C Climate Control. Vehicle build. Fleet Durability Technical Quality Auditor. Automotive Technical Writer 1985 300SD 1983 300D 2003 Volvo V70 https://www.boldegoist.com/
|
|
#29
10-16-2013, 01:54 PM
|
||||
|
||||
|
Make sure the lights fit before you weld
 And mark out with masking tape the position of the trim on that rear panel before you weld => do you get a long straight line along the car?
__________________
1992 W201 190E 1.8 171,000 km - Daily driver 1981 W123 300D ~ 100,000 miles / 160,000 km - project car stripped to the bone 1965 Land Rover Series 2a Station Wagon CIS recovery therapy! 1961 Volvo PV544 Bare metal rat rod-ish thing I'm here to chat about cars and to help others - I'm not here "to always be right" like an internet warrior Don't leave that there - I'll take it to bits!
|
|
#30
10-16-2013, 02:07 PM
|
||||
|
||||
|
ROFL
Quote:
Even the person I predicted. Greg forgot to note that the lights HAVE been test fitted. Thanks 'Stretch', that is good advice. .
__________________
ASE Master Mechanic https://whunter.carrd.co/ Prototype R&D/testing: Thermal & Aerodynamic System Engineering (TASE) Senior vehicle instrumentation technician. Noise Vibration and Harshness (NVH). Dynamometer. Heat exchanger durability. HV-A/C Climate Control. Vehicle build. Fleet Durability Technical Quality Auditor. Automotive Technical Writer 1985 300SD 1983 300D 2003 Volvo V70 https://www.boldegoist.com/
|
 |
| Bookmarks |
|
|


 Linear Mode


