

|
|
|
|
|
|
|||||||
 |
|
|
LinkBack | Thread Tools | Display Modes |
|
#46
 07-05-2013, 03:03 PM
|
|||
|
|||
|
Quote:

|
|
#47
07-05-2013, 05:01 PM
|
||||
|
||||
|
Valves will have a degree of runout, if only a thousandth or two. As you rotate the valve, you will feel a tight spot where you lose some clearance. This is where you want to adjust the clearances; at the tightest point. Otherwise, as the valve rotates, it will reduce clearance in the area that has the most runout.
All I have ever done on a 617 is point the lobe at the spray tube and adjust...
__________________
 Did you just pass my 740 at 200 kmh in a 300SD????? Did you just pass my 740 at 200 kmh in a 300SD?????1978 300SD 'Phil' - 1,315,853 Miles And Counting - 1, 317,885 as of 12/27/2012 - 1,333,000 as of 05/10/2013, 1,337,850 as of July 15, 2013, 1,339,000 as of August 13, 2013 100,000 miles since June 2005 Overhaul - Sold January 25th, 2014 After 1,344,246 Miles & 20 Years of Ownership 
|
|
#48
07-05-2013, 05:09 PM
|
|||
|
|||
|
I forgot to try this method, though I want to and will soon.
-Unless anybody has discovered any negatives. No stripped valve stems, or anything to report?
__________________
1982 300CD Petrol/Black Leather
|
|
#50
07-07-2013, 01:57 AM
|
||||
|
||||
|
I am too scared to try it this way, and I have valve adjusting down to about 30 minutes total anyway. I would also need to get the big wrench if I was to try it. I have never needed more than 2- 14mm wrenches (one custom bent, and one straight) to do this job. After doing a few, you get to be faster at it. I do one cyl at a time in the firing order. I only need to turn the crank 36 degrees each time, then adjust the next one in the firing order.
__________________
 All Diesel Fleet 1985 R107 300SLD TURBODIESEL 2005 E320 CDI (daily) LOTS of parts for sale! EGR block kit http://www.peachparts.com/shopforum/diesel-discussion/355250-sale-egr-delete-block-off-plate-kit.html 1985 CA emissions 617 owners- You Need This! Sanden style A/C Compressor Mounting Kit for your 616/ 617 For Sale + Install Inst. Sanden Instalation Guide (post 11): http://www.peachparts.com/shopforum/diesel-discussion/367883-sanden-retrofit-installation-guide.html
|
|
#51
07-07-2013, 11:56 AM
|
||||
|
||||
|
My first time adjusting valves. 2.5hrs taking my time to adjust and recheck. Used the regular way due to the fact I didn't have a wrench to hold the large nut. All 8 valves were tight. I did have a issue re-installing the valve cover. then found out the cam was in the wrong position not allowing the cover to slide by. once i rotated the motor it went right on.
Seems to start and run smoother.
__________________
 2006 Jetta TDI DSG 320k miles 1997 Ford F150 325k miles 4.2L V6 "Work Truck" 2008 Tundra 225k miles 5.7L 1982 240D.....sold 1984 300D...Totaled OUCH! 1985 300D Turbo 222k miles "Dos" sold to 79Mercy 1986 300SDL 98K miles "The Beater"....sold 1987 190E 2.3 16v Euro spec 115K miles....sold
|
|
#52
07-07-2013, 02:32 PM
|
||||
|
||||
|
Quote:
__________________
All Diesel Fleet 1985 R107 300SLD TURBODIESEL 2005 E320 CDI (daily) LOTS of parts for sale! EGR block kit http://www.peachparts.com/shopforum/diesel-discussion/355250-sale-egr-delete-block-off-plate-kit.html 1985 CA emissions 617 owners- You Need This! Sanden style A/C Compressor Mounting Kit for your 616/ 617 For Sale + Install Inst. Sanden Instalation Guide (post 11): http://www.peachparts.com/shopforum/diesel-discussion/367883-sanden-retrofit-installation-guide.html
|
|
#53
07-07-2013, 08:16 PM
|
||||
|
||||
|
I dunno about this. It would seem to me that jam nuts are designed to be tightened to prevent movement. And then loosened to allow movement. It's not that big of a deal really. Just adjust each valve as the lobe points to the oil rail and move on. Keep it simple. That's why the valve adjusting wrenches come in a set of 3. Use them

__________________
'70 F100 shortbed '82 Diesel Westy '83 Euro 300TD Curtlo Viper Yeti ARC Surly long haul trucker
|
|
#55
08-25-2016, 06:01 PM
|
|||
|
|||
|
This is complete nonsense. It's been a few years, so hopefully you found another mechanic... Let's simplify:
Look at the design of the valve. Effectively, you have a threaded rod (valve stem) going through a hole in a cap that can spin (the part over the spring with the hex flats). You can rotate the cap infinitely, which rotates the entire valve as well. The only way to affect the position of the valve stem relative to the cap and the rocker is to turn the lower nut, which requires loosening of the upper one. If you rotate the locked valve nuts relative to the cap, spinning the entire valve, you are doing nothing. At best you are grinding the valve against the valve seat, which might knock some debris loose. Take a look at the design drawing.
|
|
#56
11-01-2016, 08:11 AM
|
|||
|
|||
|
Worked for me. The large spring retaining "cap" as you call it prevents the valve from rotating while you adjust the nuts. What else would the function of that third wrench be? Or am I misreading your protest?
__________________
1982 300CD Petrol/Black Leather
|
|
#57
11-01-2016, 10:48 AM
|
||||
|
||||
|
Quote:
Here are some pics and diagrams to help visualize. There is a key in the valve spring retainer and a key way in the valve stem and the two parts are locked together. 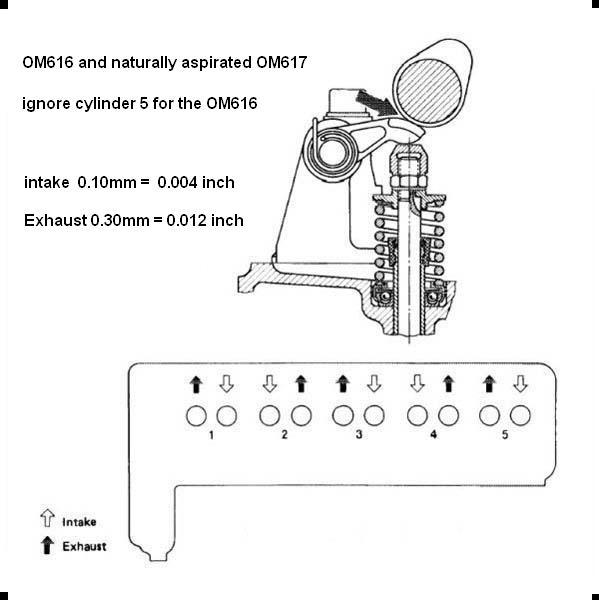 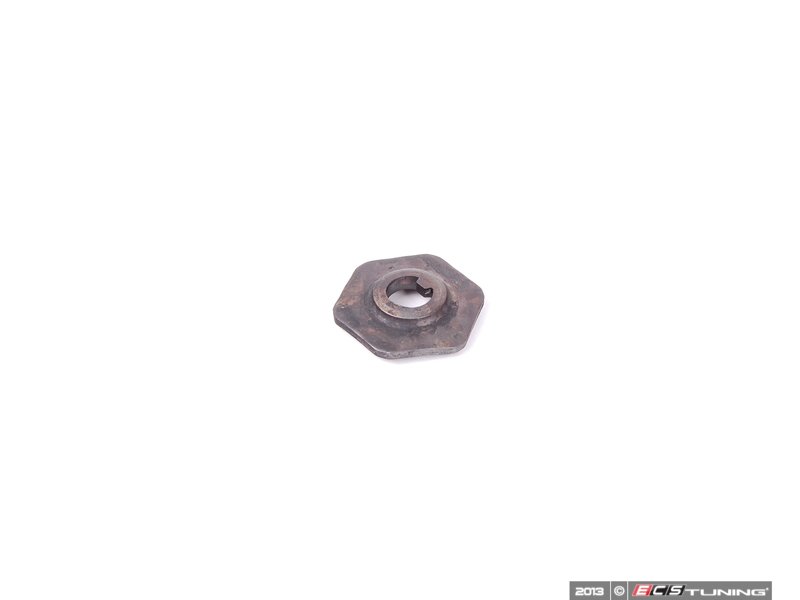
__________________
85 300D turbo pristine w 157k when purchased 167,870 July 2025 83 300 D turbo 297K runs great. SOLD! 83 240D 4 spd manual- parted out then junked
|
|
#58
11-01-2016, 11:34 AM
|
|||
|
|||
|
Quote:
__________________
1980 240d , chain elongation, cam marks reference: http://www.peachparts.com/shopforum/diesel-discussion/10414-help-i-need-check-stretch.html http://www.peachparts.com/shopforum/diesel-discussion/305365-9-degrees-chain-stretch.html evap fin cleaning: http://www.peachparts.com/shopforum/diesel-discussion/156207-photo-step-step-post-showing-w123-evaporator-removal-1983-240d-1982-300td.html?highlight=evaporator A/C thread http://www.peachparts.com/shopforum/diesel-discussion/297462-c-recommendations-mb-vehicles.html
|
|
#59
11-02-2016, 03:16 PM
|
|||
|
|||
|
I kind of follow that approach, but only at the final tightening. If the gap is on the tight side, I swing the top wrench more (moves top nut down), or if slightly loose I swing the wrench on the lower jam nut more. I check the gap when done and sometimes loosen and repeat. The way the OP describes it sounds like the jam nut isn't tight when starting the process. Probably takes 20 min to adjust all valves, after the valve cover is off. I have done it ~5 times.
I wonder why so much fuss in many posts about special bent wrenches and such. I have always used regular open-ended wrenches, though the lower one is short enough to swing between the injector tubes as I recall. It is from a cheap HF kit of all open w/ say 15 mm & 16 mm on one wrench. On the few occasions when I had the injector tubes off, that is a great time to adjust valves, but I sure wouldn't remove them for that task.
__________________
1984 & 1985 CA 300D's 1964 & 65 Mopar's - Valiant, Dart, Newport 1996 & 2002 Chrysler minivans
|
|
#60
11-02-2016, 03:32 PM
|
|||
|
|||
|
Quote:
A quick wipe on the oiler tube with a clean rag after setting each valve lash is a good, quick way to keep up with where you've been.
__________________
84 300SD 85 380SE 83 528e 95 318ic
|
|
| Bookmarks |
|
|


 came on. I could not believe how easy it was using his method.


 Linear Mode


