

|
|
|
|
|
|
|
|
#1
 07-16-2013, 01:24 PM
|
||||
|
||||
|
Quote:
I don't really want to stake / peen them in place because the casing is a bit limp wristed... ...and as for vibration - that won't be a problem 'cos I'm a very good driver!!!!
__________________
1992 W201 190E 1.8 171,000 km - Daily driver 1981 W123 300D ~ 100,000 miles / 160,000 km - project car stripped to the bone 1965 Land Rover Series 2a Station Wagon CIS recovery therapy! 1961 Volvo PV544 Bare metal rat rod-ish thing I'm here to chat about cars and to help others - I'm not here "to always be right" like an internet warrior  Don't leave that there - I'll take it to bits! 
|
|
#2
07-17-2013, 01:56 AM
|
||||
|
||||
|
Thanks Mike that's what I was thinking.
Weird mixture of bearings though - I see no further evidence of previous tampering on the gearbox though. Perhaps this is why Getrag aren't as good as ZF?
__________________
1992 W201 190E 1.8 171,000 km - Daily driver 1981 W123 300D ~ 100,000 miles / 160,000 km - project car stripped to the bone 1965 Land Rover Series 2a Station Wagon CIS recovery therapy! 1961 Volvo PV544 Bare metal rat rod-ish thing I'm here to chat about cars and to help others - I'm not here "to always be right" like an internet warrior Don't leave that there - I'll take it to bits!
|
|
#3
07-17-2013, 10:12 AM
|
||||
|
||||
|
Mike, if the green stuff has worked for you that sounds like the most practical route
I have a solution that involves a milling machine, because a mill can fix everything if you have time on your hands  
__________________
$60 OM617 Blank Exhaust Flanges $110 OM606 Blank Exhaust Flanges No merc at the moment
|
|
#4
07-18-2013, 07:28 PM
|
||||
|
||||
|
I've just ordered a whole set of seals for this gear box made by Elring (Elring part number is 597.899). The set costs just under 27 euros (cheapest I could find) - I hope it has a bit more than just the front and rear seals! At present I don't know what the kit contains - bit of a gamble but it might come good.
__________________
1992 W201 190E 1.8 171,000 km - Daily driver 1981 W123 300D ~ 100,000 miles / 160,000 km - project car stripped to the bone 1965 Land Rover Series 2a Station Wagon CIS recovery therapy! 1961 Volvo PV544 Bare metal rat rod-ish thing I'm here to chat about cars and to help others - I'm not here "to always be right" like an internet warrior Don't leave that there - I'll take it to bits!
|
|
#5
07-19-2013, 12:26 AM
|
|||
|
|||
|
Quote:
The second time I took apart my 411 to fix a synchro spring (which reminds me, those fit specifically into the synchro a certain way even though its a simple steel wire component, if you don't put them back right the spring will be chewed to bits in a couple shifts and you'll have trouble shifting for that gear) , I just used rtv gray instead of gaskets, and o rings from the local parts store, which worked well also The spring I goofed up was I belive for 4th gear synchro, right where the input and output shaft join. The spring is pretty basic, but I think it has a little hook on one end, and that hooks around a boss on the brass synchro, I wish I had a pic, but it should be self explanatory as you look at it. Anyway, if its not held in place by this feature and can rotate, it gets chewed up pretty fast
__________________
This post brought to you by Carl's Jr.
|
|
#6
07-29-2013, 04:09 PM
|
||||
|
||||
|
Well it seems like for ever...
...since I ordered the sealing kit for the gearbox. It arrived today - about a week later than promised.
It looks quite good - may be a bit strange with paper gaskets instead of the plastic ones that were there originally but they are marked with a thickness... The plan is to start the rebuild in about two weeks or so.
__________________
1992 W201 190E 1.8 171,000 km - Daily driver 1981 W123 300D ~ 100,000 miles / 160,000 km - project car stripped to the bone 1965 Land Rover Series 2a Station Wagon CIS recovery therapy! 1961 Volvo PV544 Bare metal rat rod-ish thing I'm here to chat about cars and to help others - I'm not here "to always be right" like an internet warrior Don't leave that there - I'll take it to bits!
|
|
#7
07-31-2013, 12:06 PM
|
|||
|
|||
|
Quote:
first pic shows the 4th synchro brass clutch, and the light torsion spring in front of it. 2nd pic shows how the assembly is supposed to go together. Hook in the torsion spring points up into provision in the brass clutch. If this piece is not hooked in the clutch piece (which is the mistake I made), what will happen is the torsion spring will be destroyed in the gearing pretty much immediately. From a drivability standpoint, this issue will present itself as a from 5th to 4th gear downshift grind, unless very slowly engaged or double clutched. Shifting up from 3rd to 4th will be fine, but the downshift is the part that becomes a problem. the torsion spring in my .411 was reduced to about 30 tiny pieces, but I did drive it almost 12k before i took it apart. The issue is not really destructive unless you try and force the downshift, its more really really annoying, as it slows down the shift a lot. The pics are from a .412 gearbox.
__________________
This post brought to you by Carl's Jr.
|
|
#8
08-14-2013, 03:45 PM
|
||||
|
||||
|
Thanks for the pictures - I'm just back from a nice holiday in England (only rained on one day!). I'm going to finish off this project next week...
__________________
1992 W201 190E 1.8 171,000 km - Daily driver 1981 W123 300D ~ 100,000 miles / 160,000 km - project car stripped to the bone 1965 Land Rover Series 2a Station Wagon CIS recovery therapy! 1961 Volvo PV544 Bare metal rat rod-ish thing I'm here to chat about cars and to help others - I'm not here "to always be right" like an internet warrior Don't leave that there - I'll take it to bits!
|
|
#9
09-01-2013, 08:30 AM
|
||||
|
||||
|
Hmmm 2 weeks later he's back to the grind stone...
...better late than never.
I think I've got all the stuff I need to start checking the gearbox. The only damage I can find is on the reverse cog => You can see the edges have gone (a bit) on the large cog that's just above the tapered roller bearing in the picture above. [Trying to provoke the only a stick shift will do crew] To replace this cog it would not only cost money (!) but I'd have to pull the bearing off of the end of the main shaft. I can't be bothered. It is not as though this is a real gear box => it isn't an automatic transmission where this would matter <= !!!! => manual gearboxes are disposable! [/Trying to provoke the only a stick shift will do crew] Despite my anti-manual gearbox-ism the tolerances on these gearboxes are quite impressive. Here's what you are meant to set the parts at Please note - there are no deep groove ball bearings in my gearbox. This is red herring - ignore this specification if you only have tapered roller bearings. I have amassed a pretty impressive amount of information regarding how you are meant to strip and rebuild these gearboxes, and I must say that a lot of it is pretty confusing. I find that the Mercedes based literature for the W123 era is much easier to follow - I think this post 1985 documentation is pretty confusing. I've gotten hold of 717.41X WIS information - not very detailed 717.43X FSM info - slightly different gearboxes to the 717.41X-es 717.44X FSM info - slightly different gearboxes to the 717.41X-es 717.412 information in the W124 Haynes manual I had a lot of reading to do - but thanks goes to those who helped me find all of this reading material. It all boils down to the following points 1) The input shaft is only connected to the main shaft via the lay shaft Here's a picture of the input shaft in the bottom of the gear box 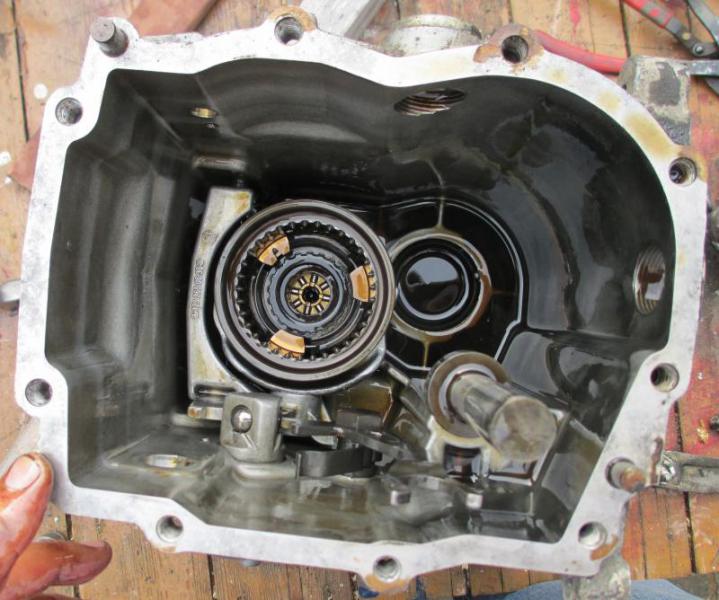 And here's a picture of the main shaft being removed  2) The clearance or end float of the combined input shaft and main shaft and the lay shaft needs to be correct 3) These two clearances are made between the front of the gearbox casing and the intermediate plate => middle casting bit that doesn't exist on the 4 speed gearbox  4) The distance between the 3/4 synchro gear and the intermediate plate is important 5) You are meant to measure this with lots of special tools! Here's what you are meant to do => You dismantle the gearbox and then knock the bearing cups on the front of the gearbox outwards of the casing. You then Install a special tool that allows you turn the shafts and tighten the clearance / end float until there isn't any; you then measure the distance of the bearing cups from the casing with a depth gauge. By measuring the distance of the shim material in the front cover to the cover mating surface you can then work out the clearance - or what the clearance should be. I don't have this special tool. I'm not going to buy this special tool - so I had to come up with another plan.
__________________
1992 W201 190E 1.8 171,000 km - Daily driver 1981 W123 300D ~ 100,000 miles / 160,000 km - project car stripped to the bone 1965 Land Rover Series 2a Station Wagon CIS recovery therapy! 1961 Volvo PV544 Bare metal rat rod-ish thing I'm here to chat about cars and to help others - I'm not here "to always be right" like an internet warrior Don't leave that there - I'll take it to bits!
|
|
#10
09-01-2013, 08:48 AM
|
||||
|
||||
|
Certain things you might want to check (1)
=> Please note <= I'm not taking those pesky shafts down to component parts. There are checks to be done on the synchro parts - there are wear limits that should be checked. Like I said I'm not bothering - I'm taking a gamble - I reckon I got a diamond here. It'll be alright - it'll do a trip!
{This could bite me on the arse of course} So assuming you've checked and re-assembled the lay shaft and the main shaft and it is all good... ...it is worthwhile making a few measurements to make sure that the bearing clearances are good. The first thing that can be done is to check that the main shaft is at the correct height with respect to the intermediate plate. Looking back at the specifications listed above it should be 138.4 mm Spin the main shaft around on its taper roller bearing whilst it sits in the intermediate plate cup. Try making measurements at several points on the casting. Ideally you need a bigger foot on a depth gauge than the one I have. This dimension is adjusted by changing the shims under the bearing cup in the intermediate plate.  Note that the bearing cup for the lay shaft has NO shims!
__________________
1992 W201 190E 1.8 171,000 km - Daily driver 1981 W123 300D ~ 100,000 miles / 160,000 km - project car stripped to the bone 1965 Land Rover Series 2a Station Wagon CIS recovery therapy! 1961 Volvo PV544 Bare metal rat rod-ish thing I'm here to chat about cars and to help others - I'm not here "to always be right" like an internet warrior Don't leave that there - I'll take it to bits!
|
|
#11
09-01-2013, 09:02 AM
|
||||
|
||||
|
Certain things you might want to check (2)
When you've measured the main shaft height from the intermediate plate you might as well have a quick check for the clearance between the main shaft and the input shaft.
Now this is a dimension that isn't "seen" when the shafts are assembled correctly. This might sound a bit strange but it is a measurement made when there's an important part missing. In this gearbox I have a spring that is compressed between the input shaft and the main shaft. This not only spring makes it difficult to measure the combined main shaft and input shaft clearance but it needs to be removed for this measurement too. You can find it within the input shaft Remove the spring and reassemble the input shaft - include the little roller bearings - one shown in the picture above but don't forget the lateral one too. Fit the input shaft on top of the main shaft. If you lift up the springy shifter bit you can see daylight! Measure this distance Use feeler gauges to see if the gap is 1.5 mm Adjustment is made by the shims that would normally go on top of the spring you've removed!
__________________
1992 W201 190E 1.8 171,000 km - Daily driver 1981 W123 300D ~ 100,000 miles / 160,000 km - project car stripped to the bone 1965 Land Rover Series 2a Station Wagon CIS recovery therapy! 1961 Volvo PV544 Bare metal rat rod-ish thing I'm here to chat about cars and to help others - I'm not here "to always be right" like an internet warrior Don't leave that there - I'll take it to bits!
|
|
#12
09-01-2013, 09:10 AM
|
||||
|
||||
|
An aside - that little spring
This little spring seems to make sure that the tapered roller bearings on the main shaft and the adjoining input shaft are always in contact with the bearing cups. This is different from the lay shaft that is only constrained by the casing.
Previously I've posted a bit information about estimating coil spring stiffness => http://www.peachparts.com/shopforum/3158425-post12.html Using the information in that post I reckon that the spring has these properties So for every 1mm of compression it is like an equivalent weight of about 17kg resting on the shafts / bearings. This demonstrates that if you happen to have the special tool to measure the combined main shaft and input shaft bearing clearance you really need to tighten that bugger down. It also shows how important it is to keep the intermediate plate firmly screwed in place!
__________________
1992 W201 190E 1.8 171,000 km - Daily driver 1981 W123 300D ~ 100,000 miles / 160,000 km - project car stripped to the bone 1965 Land Rover Series 2a Station Wagon CIS recovery therapy! 1961 Volvo PV544 Bare metal rat rod-ish thing I'm here to chat about cars and to help others - I'm not here "to always be right" like an internet warrior Don't leave that there - I'll take it to bits!
|
|
#13
09-08-2013, 04:14 AM
|
||||
|
||||
|
Update.
Progress is slow. I was informed by the dealer that the shims for gearboxes are pretty expensive (I need one for the lay shaft) so I went off on a tangent taking the 4 speed gearbox that was originally fitted to the 190E to bits. I was hoping to find some shims that would do. Unfortunately the 4 speed gearbox has deep groove ball bearings and no shims on the lay shaft... ...so back to the dealer to ask for the shim I went. Scrunched up eyes and half closed ears - waiting for the kick in the dangly bits - one euro eighty plus tax! Spares man at the dealer has updated the MB VIN records for the car saying that a 717.412 is now fitted though. Part gets here on Tuesday. With good weather and a stress free week I hope to have time to finish off this project. {Got to get the car back together soon - I'm getting fed up with car parts all over the place}
__________________
1992 W201 190E 1.8 171,000 km - Daily driver 1981 W123 300D ~ 100,000 miles / 160,000 km - project car stripped to the bone 1965 Land Rover Series 2a Station Wagon CIS recovery therapy! 1961 Volvo PV544 Bare metal rat rod-ish thing I'm here to chat about cars and to help others - I'm not here "to always be right" like an internet warrior Don't leave that there - I'll take it to bits!
|
|
#14
09-12-2013, 12:12 PM
|
||||
|
||||
|
From small acorns...
...I got the new shim from the dealer - part 202 263 04 52 => 0.9mm shim which replaced the other ones for the lay shaft in the front cap to give a clearance that is back to the 0.05mm spec (see previous posts for data).
You can no longer feel any shaft movement between the bearing cups with the intermediate plate fitted but the bearings spin freely! Because of the evidence of bearing cups spinning in the casing I'm using a glue to hold them in place. I knocked out the bearing cups again - well lifted them most of the way out with my fingers - and then set to work sealing the front cover. You are meant to use a jointing compound (that I don't have) to make the screw threads leak proof. For the sake of all things German I decided to use Permatex Black RTV and just get on with my life (and stop this incessant shopping). Wipe off the excess on both sides of the cover (whether you use the correct stuff or the RTV or what ever you choose) EDIT - guess who forgot a bit? Put this on as well! Don't forget the shims. They can be installed when the cover has been fitted... If you are doing this by the book the bearing cups and shims would already be in place. What I'm showing here is potentially a little dodgy but I think I'm making a suitable compromise between leaving the cups as they are and doing a proper job. If anyone revisits these bearing cups after me they might need to use a hydraulic press to get the cups out but other than that hopefully my choice of using glue now won't cause too much trouble... ...this is not advisable - once these cups are glued in place the distance between the cups is fixed - you can no longer adjust with shims (unless you strip the cups out again of course) After applying a continuous thin bead of glue around the bearing cup I made sure the bearing cups were seated in the correct position on top of the shims <= you don't want to mess that up! I'm leaving them over night to set before I start oiling up the inside of the gearbox and start putting the shafts back in.
__________________
1992 W201 190E 1.8 171,000 km - Daily driver 1981 W123 300D ~ 100,000 miles / 160,000 km - project car stripped to the bone 1965 Land Rover Series 2a Station Wagon CIS recovery therapy! 1961 Volvo PV544 Bare metal rat rod-ish thing I'm here to chat about cars and to help others - I'm not here "to always be right" like an internet warrior Don't leave that there - I'll take it to bits! Last edited by Stretch; 09-14-2013 at 12:36 PM. Reason: I forgot to fit a bit so...
|
|
#15
09-14-2013, 08:45 AM
|
||||
|
||||
|
Speedometer concerns
Well I tried to think ahead. I took some of my old 4 speed gearbox to bits to see if I could swap over the speedometer drive parts so when I fit the 5 speed to the 190E with the differential for the 4 speed box all will be good on the gauge.
The tail cone sections / end sections are very different => You can see on the 716.217 tail cone - that's the one on the left - that the cog on the output shaft is bigger and the drive for the speedo cable is about 1mm smaller in diameter than the 717.412 tail cone - which is on the right. So if you hear of a "swap the tail cone" suggestion - jump all over the bugger who said that! Next step - was to think OK fit the cogs from one casing in the other => ...as you can see they are of different thicknesses... ...so I had visions of making spacers to fit the difference in width. Luckily I didn't go off on that tangent for too long. The biggest problem is the diameter of the larger 716.216 shaft cog - it doesn't fit in the 717.412 casing => So that's that. I'll have to have an external adjustment thingumyjig to correct for the 4 speed diff on my W201. 
__________________
1992 W201 190E 1.8 171,000 km - Daily driver 1981 W123 300D ~ 100,000 miles / 160,000 km - project car stripped to the bone 1965 Land Rover Series 2a Station Wagon CIS recovery therapy! 1961 Volvo PV544 Bare metal rat rod-ish thing I'm here to chat about cars and to help others - I'm not here "to always be right" like an internet warrior Don't leave that there - I'll take it to bits! Last edited by Stretch; 09-14-2013 at 12:33 PM. Reason: Added an extra picture for previous post
|
 |
| Bookmarks |
|
|


 Hybrid Mode


