

|
|
|
|
|
|
#46
 07-06-2012, 11:40 AM
|
||||
|
||||
|
Quote:
__________________
 All Diesel Fleet 1985 R107 300SLD TURBODIESEL 2005 E320 CDI (daily) LOTS of parts for sale! EGR block kit http://www.peachparts.com/shopforum/diesel-discussion/355250-sale-egr-delete-block-off-plate-kit.html 1985 CA emissions 617 owners- You Need This! Sanden style A/C Compressor Mounting Kit for your 616/ 617 For Sale + Install Inst. Sanden Instalation Guide (post 11): http://www.peachparts.com/shopforum/diesel-discussion/367883-sanden-retrofit-installation-guide.html 
|
|
#47
07-06-2012, 11:53 AM
|
||||
|
||||
|
I'm still wondering about the possibility of drilling and tapping the holes in the front of the block that the NA blocks use. I'd have to believe that the casting in that location hasn't changed. This would provide the opportunity to fully support the critical front of the bracket where the belt pressure and vibration are the greatest. Holes shown in yellow and red area represents welded on front support.
It would emulate the aluminum one posted earlier where the front casting takes all the load and the rear casting is just support for the rear of the compressor.  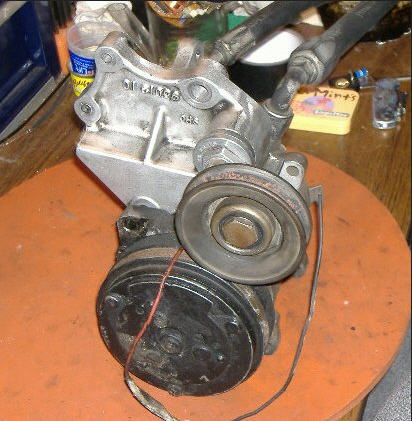 This also puts the mounting bolts in shear rather than in tension. I understand that this strategy would take the project out of the realm of "bolt on", but hey, it's not our fault MB eliminated a good set of mounting points on the front of the engine when they added a turbo!
__________________
Current Stable
|
|
#48
07-06-2012, 12:06 PM
|
|||
|
|||
|
Quote:
__________________
'85 300D Cal 280,000 miles '14 GLK 350 60000 miles
|
|
#49
07-06-2012, 02:14 PM
|
|||
|
|||
|
You've done a nice job with your fabrication, but I hope those end tabs are not 1/8" strap. In my experience, 1/8" will not be heavy enough. They need to be 1/4" or better.
I remember seeing some light mounts in aftermarket a/c systems in the fifties that would break quickly. I was only a little kid then, but my Dad put in and serviced lots of aftermarket a/c systems in those days and I remember seeing stuff break and him insisting on heavy mount kits and telling his customers that the more expensive pieces were worth the extra money.
__________________
2001 SLK 320 six speed manual 2014 Porsche Cayenne six speed manual Annoy a Liberal, Read the Constitution
|
|
#50
07-06-2012, 02:48 PM
|
||||
|
||||
|
Quote:
__________________
All Diesel Fleet 1985 R107 300SLD TURBODIESEL 2005 E320 CDI (daily) LOTS of parts for sale! EGR block kit http://www.peachparts.com/shopforum/diesel-discussion/355250-sale-egr-delete-block-off-plate-kit.html 1985 CA emissions 617 owners- You Need This! Sanden style A/C Compressor Mounting Kit for your 616/ 617 For Sale + Install Inst. Sanden Instalation Guide (post 11): http://www.peachparts.com/shopforum/diesel-discussion/367883-sanden-retrofit-installation-guide.html
|
|
#51
07-06-2012, 02:57 PM
|
||||
|
||||
|
Quote:
I still believe that using 3 pan bolts will work. Most of the load is supported by the large plate and it's mounting. The bottom would only need to provide enough support so the plate does not vibrate.
__________________
All Diesel Fleet 1985 R107 300SLD TURBODIESEL 2005 E320 CDI (daily) LOTS of parts for sale! EGR block kit http://www.peachparts.com/shopforum/diesel-discussion/355250-sale-egr-delete-block-off-plate-kit.html 1985 CA emissions 617 owners- You Need This! Sanden style A/C Compressor Mounting Kit for your 616/ 617 For Sale + Install Inst. Sanden Instalation Guide (post 11): http://www.peachparts.com/shopforum/diesel-discussion/367883-sanden-retrofit-installation-guide.html
|
|
#52
07-06-2012, 03:17 PM
|
|||
|
|||
|
Quote:
|
|
#53
07-06-2012, 03:40 PM
|
||||
|
||||
|
Quote:
In your final design are you going with 1/4, 3/8 or 1/2 plate for the bracket?
__________________
Current Stable
|
|
#54
07-06-2012, 03:45 PM
|
|||
|
|||
|
Quote:
Very good!
__________________
2001 SLK 320 six speed manual 2014 Porsche Cayenne six speed manual Annoy a Liberal, Read the Constitution
|
|
#55
07-06-2012, 07:51 PM
|
||||
|
||||
|
This version appears more stout and has more mounting bolts than mine and I've tested it for about a year with a LOT of miles without any problems other than some belt tensioning hiccups not related to how the bracket was mounted.
I say throw some gussets on the rear of the plate or along the bottom for *****s and giggles and go with it. I had some issues a couple of weeks ago which caused a lot of clutch cycling at interstate speeds. It worried me at first but I figured what the he!! it's a good test and I just let it cycle. Nothing weird happened and all was well when I got home and still is... I'm also using a heavier sanden (709) than the more popular 508 so this rig looks golden! I had planned on drilling/tapping the front of the block if the first version didn't work but it really is fine without them.
__________________
My occupational hazard bein' my occupation's just not around... 1980 300SD 1980 300SD
|
|
#56
07-06-2012, 07:57 PM
|
||||
|
||||
|
Quote:
__________________
All Diesel Fleet 1985 R107 300SLD TURBODIESEL 2005 E320 CDI (daily) LOTS of parts for sale! EGR block kit http://www.peachparts.com/shopforum/diesel-discussion/355250-sale-egr-delete-block-off-plate-kit.html 1985 CA emissions 617 owners- You Need This! Sanden style A/C Compressor Mounting Kit for your 616/ 617 For Sale + Install Inst. Sanden Instalation Guide (post 11): http://www.peachparts.com/shopforum/diesel-discussion/367883-sanden-retrofit-installation-guide.html
|
|
#57
07-09-2012, 08:45 PM
|
||||
|
||||
|
I went today and picked up more steel to fabricate the brackets. I decided to use 5/16" thick plate. I got a piece of 5/16 X 8" plate, 10' long. I also got a stick of 3/4 .120 DOM tubing for the sleeves. I talked to an old friend of mine (have not talked to him in at least 3 years!) that has a fabrication shop. He is going to cut the plates for me with his plasma cutting table. He will need to make a sheet metal pattern for his machine (old school non computerized). After I get one plate made, I will weld another bracket together (more precise than the prototype), and test it. If I find that everything is good, I will consider that the first article and have him cut the rest of the material (will make about 16 pieces). I will then make a fixture from the first article and start welding! I am also considering having all the parts cad plated. They have a minimum charge, so I need to get as pieces made as feasibly possible to keep the cost down.
__________________
All Diesel Fleet 1985 R107 300SLD TURBODIESEL 2005 E320 CDI (daily) LOTS of parts for sale! EGR block kit http://www.peachparts.com/shopforum/diesel-discussion/355250-sale-egr-delete-block-off-plate-kit.html 1985 CA emissions 617 owners- You Need This! Sanden style A/C Compressor Mounting Kit for your 616/ 617 For Sale + Install Inst. Sanden Instalation Guide (post 11): http://www.peachparts.com/shopforum/diesel-discussion/367883-sanden-retrofit-installation-guide.html
|
|
#58
07-10-2012, 03:53 PM
|
||||
|
||||
|
Got the parts today!
I picked up the parts today from the fabricator. He made a sheet metal pattern for his machine for both pieces from my cardboard pattern. I will drill and weld all the parts, and make sure everything is good.
 The next update will be the finished part mounted on the car for testing....Rich
__________________
All Diesel Fleet 1985 R107 300SLD TURBODIESEL 2005 E320 CDI (daily) LOTS of parts for sale! EGR block kit http://www.peachparts.com/shopforum/diesel-discussion/355250-sale-egr-delete-block-off-plate-kit.html 1985 CA emissions 617 owners- You Need This! Sanden style A/C Compressor Mounting Kit for your 616/ 617 For Sale + Install Inst. Sanden Instalation Guide (post 11): http://www.peachparts.com/shopforum/diesel-discussion/367883-sanden-retrofit-installation-guide.html
|
|
#59
07-10-2012, 11:53 PM
|
||||
|
||||
|
First article and fixture made
I got the pieces welded together, and made the first article. I then made a fixture from it:
 The fixture:  The plate in the fixture:  The compressor and idler mounted on the plate:  I will mount the plate on the car, and add the oil cooler hose mount to it. I will also need to add something to the fixture for holding the oil cooler line bracket. After that, I will test it for a couple weeks while I get the rest of the pieces cut to make at least 10 plates....Rich
__________________
All Diesel Fleet 1985 R107 300SLD TURBODIESEL 2005 E320 CDI (daily) LOTS of parts for sale! EGR block kit http://www.peachparts.com/shopforum/diesel-discussion/355250-sale-egr-delete-block-off-plate-kit.html 1985 CA emissions 617 owners- You Need This! Sanden style A/C Compressor Mounting Kit for your 616/ 617 For Sale + Install Inst. Sanden Instalation Guide (post 11): http://www.peachparts.com/shopforum/diesel-discussion/367883-sanden-retrofit-installation-guide.html
|
 |
| Bookmarks |
|
|


 Linear Mode


