

|
|
|
|
|
|
#1
 01-23-2013, 12:24 PM
|
||||
|
||||
|
Ball joint replacement using HF kit and home made adapter
I needed to replace the ball joints on my 240 (as well as other suspension parts), and did not want to spend the big bucks required to purchase the special tool. I got a ball joint kit from Harbor Freight:
 After removing the old joint and cleaning and painting the parts, I had to make a special adapter for the press to work, as nothing provided in the kit would work. I took a piece of 2" black pipe and cut off a slice 7/8" long. I cut out about 1/4" from the circumference, making the diameter smaller. I then welded a large washer on the top, and ground it all smooth (just for looks).  The pieces needed to do the job:  I had to tighten the press as much as I could, and then hammer the clamp to force the ball joint in. The threads are too course to press this joint in by just turning the screw:  A little tightening, a little hammering, and repeating the process a couple times, and the joint is all the way in:  The finished product: 
__________________
 All Diesel Fleet 1985 R107 300SLD TURBODIESEL 2005 E320 CDI (daily) LOTS of parts for sale! EGR block kit http://www.peachparts.com/shopforum/diesel-discussion/355250-sale-egr-delete-block-off-plate-kit.html 1985 CA emissions 617 owners- You Need This! Sanden style A/C Compressor Mounting Kit for your 616/ 617 For Sale + Install Inst. Sanden Instalation Guide (post 11): http://www.peachparts.com/shopforum/diesel-discussion/367883-sanden-retrofit-installation-guide.html 
|
|
#2
01-23-2013, 12:48 PM
|
||||
|
||||
|
So no nicks or tears to the boot from the install? Very nice.
How did you get the old ball joint out? Were you able to hammer it out or do you have access to a press?
__________________
 Mac 2002 e320 4matic estate│1985 300d│1980 300td Previous: 1979 & 1982 & 1983 300sd │ 1982 240d Let's take a drive into the middle of nowhere with a packet of Marlboro lights and talk about our lives. ― Joseph Heller, Catch-22
|
|
#3
01-23-2013, 12:59 PM
|
|||
|
|||
|
a user called samiam said he made a similar thing for a W124 - and it worked very nicely.
__________________
2012 BMW X5 (Beef + Granite suspension model) 1995 E300D - The original humming machine (consumed by Flood 2017) 2000 E320 - The evolution (consumed by flood 2017)
|
|
#4
01-23-2013, 01:02 PM
|
||||
|
||||
|
OK,
you cut a SLIT in the 2" pipe, then hammered it back round, and welded the slit closed, and welded the washer onto one end of the piece... right? I'd also like to know what you did to remove the old joint. Quote:
__________________
John HAUL AWAY, OR CRUSHED CARS!!! HELP ME keep the cars out of the crusher! A/C Thread "as I ride with my a/c on... I have fond memories of sweaty oily saturdays and spewing R12 into the air. THANKS for all you do! My drivers: 1987 190D 2.5Turbo 1987 560SL convertible 1987 190D 2.5-5SPEED!!!  1987 300TD 2005 Dodge Sprinter 2500 158"WB 1994GMC 2500 6.5Turbo truck... I had to put the ladder somewhere!
|
|
#6
01-23-2013, 01:48 PM
|
||||
|
||||
|
Quote:
__________________
Mac 2002 e320 4matic estate│1985 300d│1980 300td Previous: 1979 & 1982 & 1983 300sd │ 1982 240d Let's take a drive into the middle of nowhere with a packet of Marlboro lights and talk about our lives. ― Joseph Heller, Catch-22
|
|
#7
01-23-2013, 01:59 PM
|
||||
|
||||
|
Quote:
__________________
John HAUL AWAY, OR CRUSHED CARS!!! HELP ME keep the cars out of the crusher! A/C Thread "as I ride with my a/c on... I have fond memories of sweaty oily saturdays and spewing R12 into the air. THANKS for all you do! My drivers: 1987 190D 2.5Turbo 1987 560SL convertible 1987 190D 2.5-5SPEED!!! 1987 300TD 2005 Dodge Sprinter 2500 158"WB 1994GMC 2500 6.5Turbo truck... I had to put the ladder somewhere!
|
|
#8
01-23-2013, 01:59 PM
|
|||
|
|||
|
To get that ball joint out a serious hammer (literally like Thor's Hammer) is required.
and another hammer made of brass with a 2 ft handle to act as a drift held by another person while the first person swings the 10 lb sledge like an axe. It would take one swing to knock it out, two for rusty ones. You can use a 4 lb sledge with more time (shoulder wear out)
__________________
2012 BMW X5 (Beef + Granite suspension model) 1995 E300D - The original humming machine (consumed by Flood 2017) 2000 E320 - The evolution (consumed by flood 2017)
|
|
#9
01-23-2013, 02:07 PM
|
||||
|
||||
|
Quote:
John Henry's hammer makes more sense to me as an example...
__________________
John HAUL AWAY, OR CRUSHED CARS!!! HELP ME keep the cars out of the crusher! A/C Thread "as I ride with my a/c on... I have fond memories of sweaty oily saturdays and spewing R12 into the air. THANKS for all you do! My drivers: 1987 190D 2.5Turbo 1987 560SL convertible 1987 190D 2.5-5SPEED!!! 1987 300TD 2005 Dodge Sprinter 2500 158"WB 1994GMC 2500 6.5Turbo truck... I had to put the ladder somewhere!
|
|
#10
01-23-2013, 02:44 PM
|
|||
|
|||
|
I just did them on a W201 which I think is the same design as the W124. I got them out with a sledge hammer along with the aid of heat. Removed the wheel, disconnected the hub/brakes and tied them out of the way. Car was in the shop on a concrete floor. Set the arm down on a large block of wood (arm still attached to car) such that 80% of the bottom of the BJ was hanging over the edge. Hit it several times with a 3' - 4' swing of the sledge and no budge. Heated things up (not cherry hot as it appears the end of the arm is tempered) and it still took several more whacks before they popped out. One side drove the ball of the BJ through the ball joint before I knocked the rest of the BJ housing out. Those guys were in there really tight!
Be care full that the wood under the arm won't move as if it jarred out of the way the spring could become free and hurt something. Made 2 little jigs from scrap pipe fittings for install. One fit the perimeter of the BJ on the bottom and the other was slightly larger than the hole for the top with enough length for the threaded part of the BJ to fit inside. 4 or 5 firm whacks with a 2 lb hammer set them in place...not too bad putting them back. As you do alot of MB work, I could see where the specialty tool could be cost efffective for you.
__________________
You can't always get what you want, but if you try sometime you just might find you get what you need.
|
|
#11
01-23-2013, 03:27 PM
|
||||
|
||||
|
attached
attached pictures for future need.
.
|
|
#12
01-23-2013, 03:33 PM
|
||||
|
||||
|
Quote:
__________________
All Diesel Fleet 1985 R107 300SLD TURBODIESEL 2005 E320 CDI (daily) LOTS of parts for sale! EGR block kit http://www.peachparts.com/shopforum/diesel-discussion/355250-sale-egr-delete-block-off-plate-kit.html 1985 CA emissions 617 owners- You Need This! Sanden style A/C Compressor Mounting Kit for your 616/ 617 For Sale + Install Inst. Sanden Instalation Guide (post 11): http://www.peachparts.com/shopforum/diesel-discussion/367883-sanden-retrofit-installation-guide.html
|
|
#13
01-23-2013, 03:37 PM
|
||||
|
||||
|
Quote:
__________________
All Diesel Fleet 1985 R107 300SLD TURBODIESEL 2005 E320 CDI (daily) LOTS of parts for sale! EGR block kit http://www.peachparts.com/shopforum/diesel-discussion/355250-sale-egr-delete-block-off-plate-kit.html 1985 CA emissions 617 owners- You Need This! Sanden style A/C Compressor Mounting Kit for your 616/ 617 For Sale + Install Inst. Sanden Instalation Guide (post 11): http://www.peachparts.com/shopforum/diesel-discussion/367883-sanden-retrofit-installation-guide.html
|
|
#14
01-23-2013, 04:50 PM
|
|||
|
|||
|
Rich that is thinking outside the box, good idea with the pipe. I have one of those Chicom BJ Presses.
Funola posted a thread Redneck lower Ball Joint removal. He dug a hole and buried the upper end of the knuckle in the ground to drive out the BJ with a Hammer. This does work, I did mine for the 85, and took about 7 - 10 whacks to drive it out. I placed a piece of 1/4" 4x4 steel in the bottom of the hole so I wasn`t driving the thing deeper into the ground. I used the flat end of the Socket (27MM) against the BJ and a smaller one (11/16) inverted inside. both impact sockets. Red neck lower ball joint removal 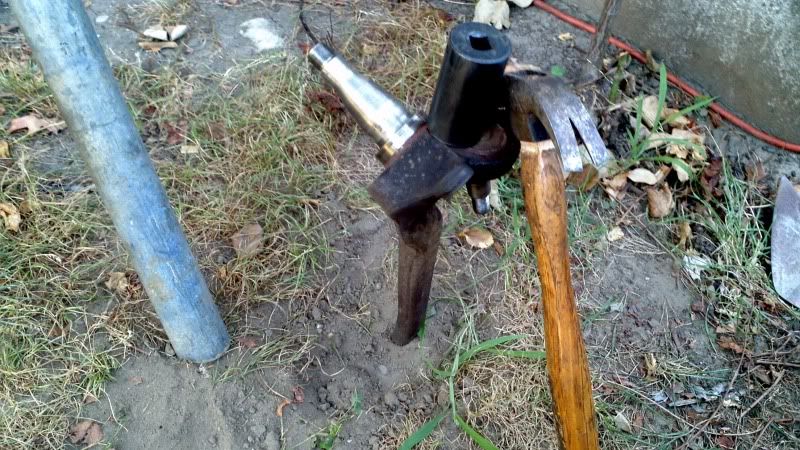 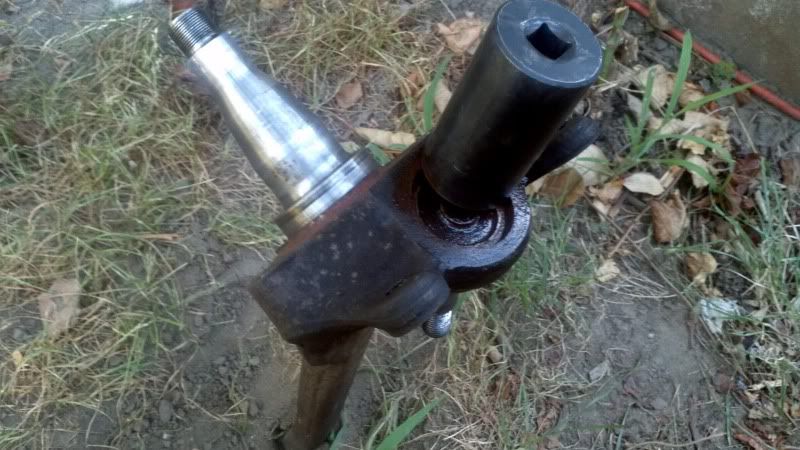 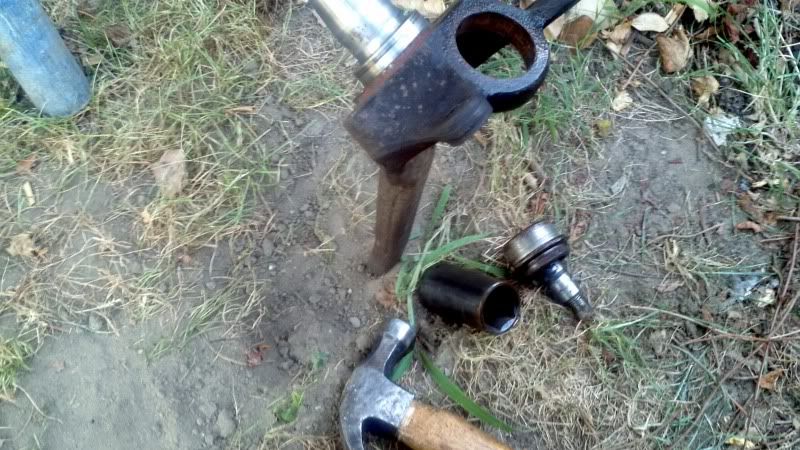 Thanks to Funola for the pictures. Charlie
__________________
there were three HP ratings on the OM616... 1) Not much power 2) Even less power 3) Not nearly enough power!! 240D w/auto Anyone that thinks a 240D is slow drives too fast. 80 240D Naturally Exasperated, 4-Spd 388k DD 150mph spedo 3:58 Diff We are advised to NOT judge ALL Muslims by the actions of a few lunatics, but we are encouraged to judge ALL gun owners by the actions of a few lunatics. Funny how that works
|
|
#15
01-23-2013, 04:53 PM
|
|||
|
|||
|
Hi Rich, making the adapter is a lot of work. Do you think a similar size 1/2" drive socket would work also?
__________________
Not MBZ nor A/C trained professional but a die-hard DIY and green engineer. Use the info at your own peril. Picked up 2 Infractions because of disagreements. NOW reversed.  W124 Keyless remote, PM for details. http://www.peachparts.com/shopforum/mercedes-used-parts-sale-wanted/334620-fs-w124-chasis-keyless-remote-%2450-shipped.html 1 X 2006 CDI 1 x 87 300SDL 1 x 87 300D 1 x 87 300TDT wagon 1 x 83 300D 1 x 84 190D ( 5 sp ) - All R134 converted + keyless entry.
|
 |
| Bookmarks |
|
|


 Linear Mode


