

|
|
|
|
|
|
|
|
#1
 01-05-2014, 06:17 PM
|
|||
|
|||
|
Steering Box R&R DIY
This is specifically applicable to anyone I sell a steering box to. If you buy a re-manufactured box for your w123/w123/r129/etc this will also apply.
This is a DIY guide for the removal and replacement of a steering box for w123/w126 chassis specifically. These directions are also applicable to W115, W116, R129 but have a few differences peculiar to each chassis. Section 46 in the FSM is where steering information can be found. This DIY is covered by 46-310, Removal and Replacement of Steering. Which can be found, along with the rest of the w123 manual at startekinfo.com --->Workshop Resources--->W123 manual--->[Specific model]--->Chassis and Body Manual--->Steering If you're interested in what goes into reconditioning these steering boxes the definitive guide can be found atWhat a feeling it will be! A properly adjusted W123 / W116 / W126 power steering box Before beginning I have to make it clear that this repair is to be done if you feel comfortable working on your car. Getting this repair wrong can negatively effect your ability to steer your vehicle, which may endanger yourself as well as other drivers. If you don't feel comfortable doing the brakes on your vehicle, stop here and have a professional work on your steering box. Also note that a replacement steering box will not solve all of your problems (unless of course your problem is a worn out or leaking steering gearbox). I or any other supplier would gladly sell you a steering box, but please be diligent and inspect/replace the rest of your steering linkages (tie rods/ drag link/ idler arm bushing) and front suspension components (upper and lower control arm bushings/ ball joints/ wheel bearings) BEFORE replacing a steering box. These boxes are pretty robust and while they can be the cause of play other items usually wear first. Last edited by martureo; 01-05-2014 at 07:44 PM. 
|
|
#2
01-05-2014, 06:22 PM
|
|||
|
|||
|
Specific tools needed:
-12mm socket or combination wrench -6mm Allen driver -tie rod removal specific tools -15mm socket -17mm combination wrench -19mm combination wrench -penetrating fluid (e.g. PB Blaster) -2 quarts Power Steering Fluid or Transmission Fluid -blue threadlocking fluid (e.g. Loctite) -patience You may choose to remove the driver's front wheel for ease of removal/installation during this procedure. Loosening the lug bolts before putting the car up on jack stands will make this easier. Start with the front two wheels off the ground, on jack stands. The wheels don't need to be very high, just enough so that they can move freely and you have room to work underneath the vehicle. Remove the drag link and driver's side tie rod from the pitman arm. (Steering linkage R&R DIY found here PeachPartsWiki: Steering Rebuild) If you cannot remove these items from the Pitman arm, stop and reconsider replacing the steering box at this point. Do not under any circumstances reinstall a drag link or tie rod which you have damaged by removing. Consider buying new steering linkage parts and then reattempt this job. If you have successfully removed the steering linkage, push them out of the way so you have room to work. 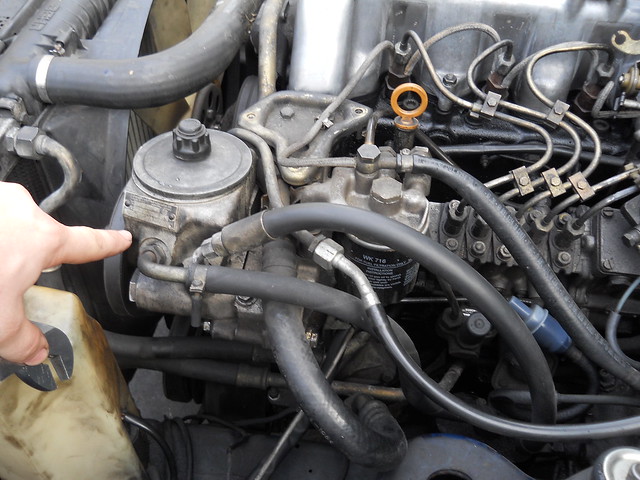 This is your power steering fluid reservoir. Unscrew the retainer, which may be a wingnut or a rubber-gripped fastener. Remove the cover and set aside. Now you have two options on draining the box. I'll explain both options. I like to use a small diameter nozzle turkey baster device to suck the power steering fluid from the reservoir. The tool I use fits inside the holes seen below in the power steering fluid filter and is able to remove 100% from the reservoir. I then remove the box and drain a minimal amount of fluid from it afterward. (The reservoir is where most of the fluid in the system is) This is what the reservoir looks like after you've drained it. 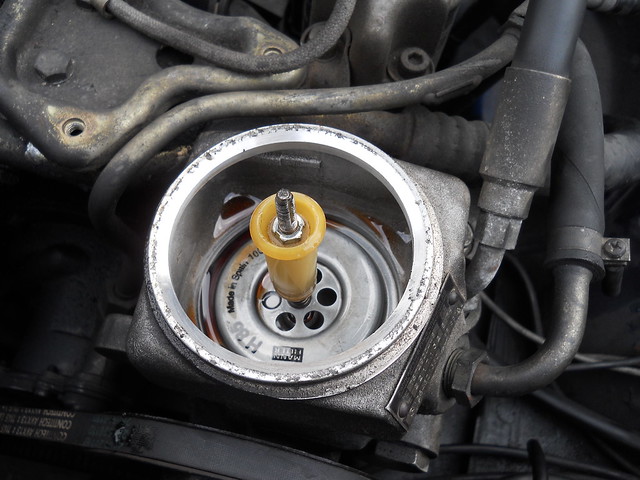 If you choose to drain the fluid from the steering box (and the reservoir at the same time), get a catch pan ready and remove the drain plug in the picture near the pitman arm shaft. The bolt is 12mm (yes, it's an odd size). You'll have to turn the steering wheel to one side or the other to get the box to drain. It will not drain in a centered position. (And don't worry if the wheel is off center at this point) 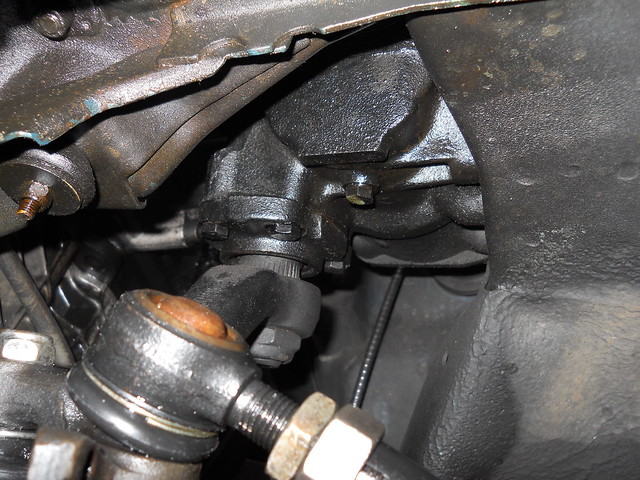
Last edited by martureo; 01-05-2014 at 07:45 PM.
|
|
#3
01-05-2014, 06:26 PM
|
|||
|
|||
|
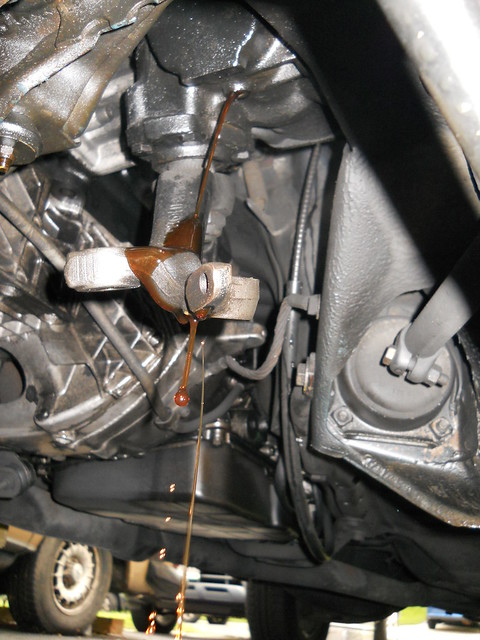
The below picture shows you about how much the fluid is going to drain. And from where.
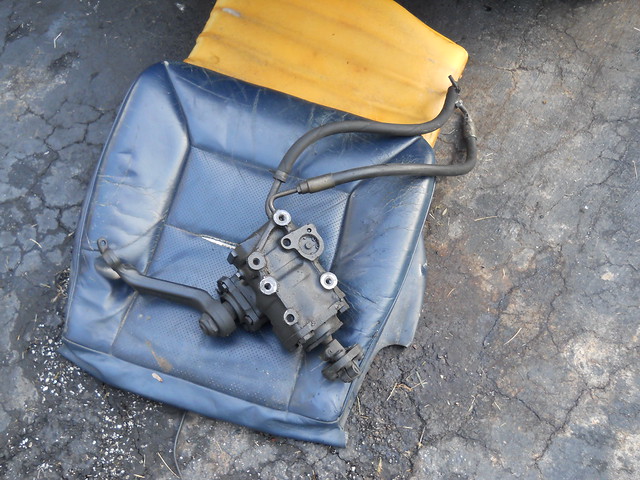
 On the input shaft bushing you need to remove the bolt closer to the firewall, don't bother with the box side bolt as you can mess with that when it's out of the car. Both bolts are usually stubborn and I've cut more than I've successfully unscrewed. Heat, penetrating oil and a few whacks to try to shock it usually work in combination. You may need to rotate the steering wheel to get a good angle on this bolt.  Disconnect the lines from the power steering pump. Move them around until they are untangled from any other line and loose above the steering box. When I unbolt the box I hold on to the lines, using them to lower the box to the ground. 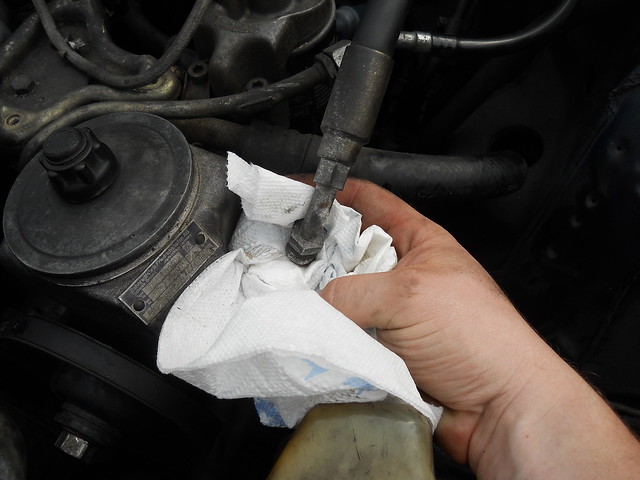 Get something for the box to land on. It's a heavy 30 lb monster and you don't want it hitting pavement, or you. I've used foam pads to catch pans. Just make sure there's something to protect the box and the ground. Last edited by martureo; 01-05-2014 at 07:45 PM.
|
|
#4
01-05-2014, 06:30 PM
|
|||
|
|||
|
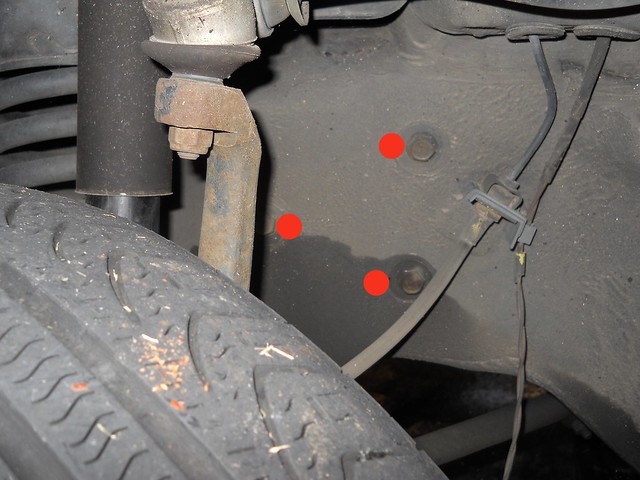
The next bit is all touch and feel. Slowly back out the three bolts (15mm IIRC) from the driver's wheel well. DO NOT FULLY REMOVE YET. You can do this without removing the wheel, don't worry about the hub flopping around either way. Once the bolts are relatively loose, hold the power*steering*lines with your left hand and back out the bolts with your right hand. (If you're arms aren't long enough, get a helper) Keep tension on the lines because when that last thread is backed out the*box*will drop. It's 30lbs, so be careful.
  Hooray, your box is out. If you didn't drain the fluid through the drain bolt, now is an excellent time to drain the remaining fluid in the box. Now if you bought a box from me, it will look somewhat like this (EDIT: I've since started painting the boxes and Pitman arms a semi-gloss black to prevent surface rust, so it will look a bit prettier) 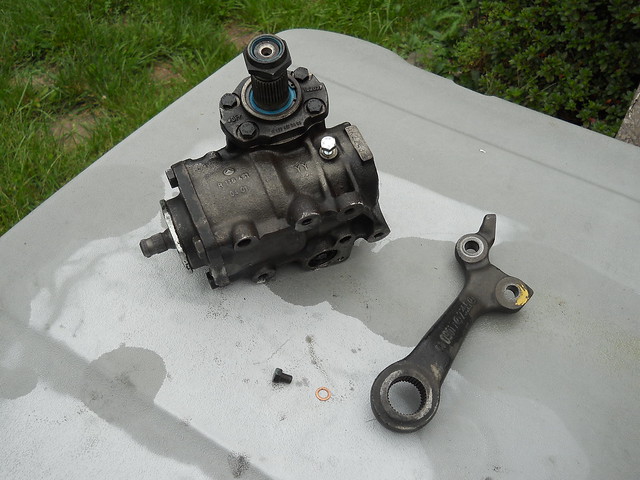 The box is locked in the center position with a locking tool (in reality it's a M8 1mm X 25mm bolt from Home Depot). It comes with the drain plug bolt and a new crush washer. The Pitman arm is disattached. [If you have sourced a box from other than me it is highly advised that you get a locking screw and use it. Install it by removing the drain plug and, using the input shaft (the smaller one) rotate the box until you can view a hole in the surface of the working piston. Center the hole and thread in the locking tool. Do not overtighten. Torque so that the bolt won't come out and the input shaft cannot move freely.] Look for the alignment mark on the end of the Pitman shaft (the bigger one). 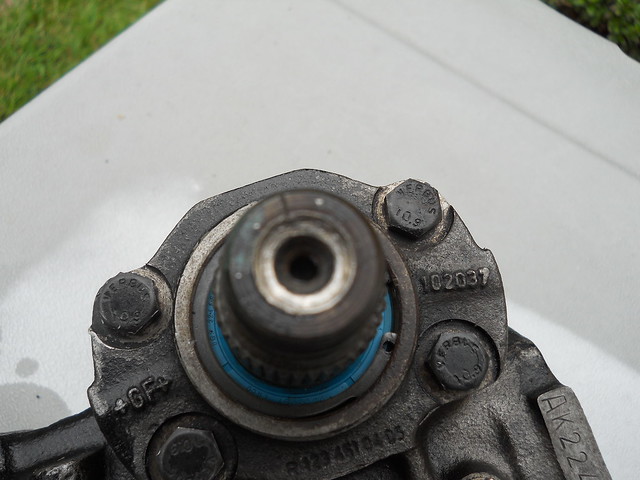 You want to install the Pitman arm so that the mark on the arm lines up with the one on the shaft. 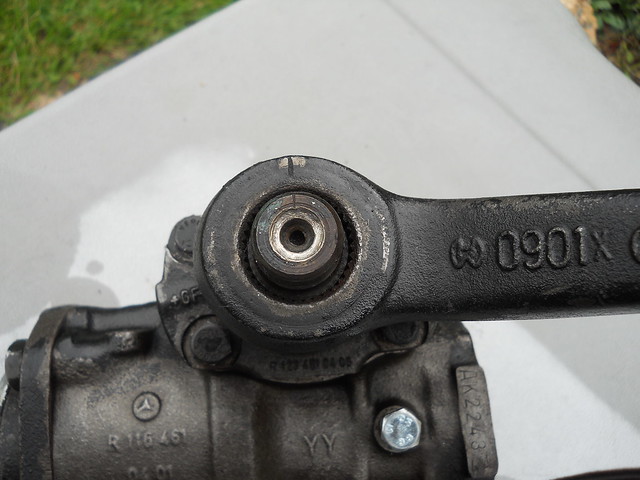 Install the nut onto the shaft. It will force the arm onto the shaft further. Don't kill yourself, but I like to try to get it to around ½ in to ¾ in from the face of the box. The spines on the arm are drafted and will grip more the further they are on the shaft, the nut is just a retaining nut. A word on the steering coupling. You can reuse the old one. These buggers are tough, I've cut through a few of them and it doesn't appear that they're going to be able to come apart while driving. So if you have an old cracked one, you can drive with it without fear. I would suggest that you go ahead and replace it now because of the pain of having to replace it later, but to each his own. DIY for replacement found here: PeachPartsWiki: Steering Coupling Replacement Last edited by martureo; 01-05-2014 at 07:45 PM.
|
|
#5
01-05-2014, 06:33 PM
|
|||
|
|||
|
Look a the box as it will be installed into the vehicle, like this.
 The Red arrow is the direction of the input shaft to the steering wheel. The Blue arrow is the direction you want to orient the firewall side input coupling screw. That way when you're installing that last bolt you'll be able to reach it without turning the steering wheel. (Refer back to steering coupling reference picture mentioned previously) Do not tighten down. Attach the lines to the new box, you'll use them to pull the box into position. (You can only install them one way) To keep the steering wheel centered put the key in the ignition to center it and then remove the key to engage the steering lock. You may have to play with this for a bit to keep it centered. Or if you have the luxury of a second person, they can steady it by hand. Get the three mounting bolts ready and put some threadlocking compound (e.g. Loctite) on the threads. [The FSM directs installing new bolts each time, I don't believe this is necessary. Especially since you're just paying for clean bolts with threadlocking compound on them] 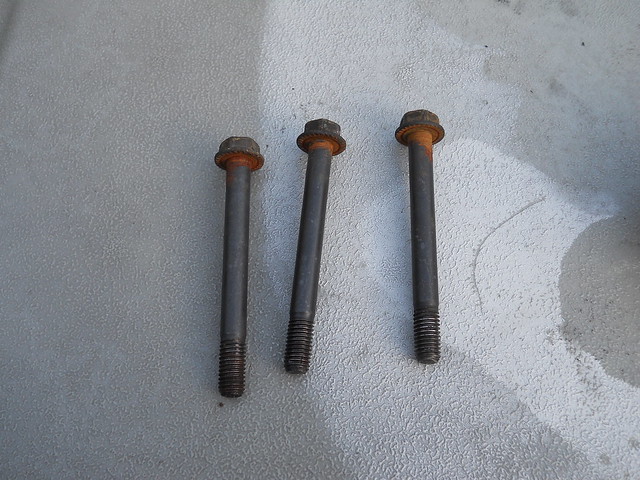 I'm not going to lie, this part sucks. You're going to get pretty intimate with your fender. Thread the lines up past the IP and then from the top of the car, pull the box up into position. The box is centered so you just need to match the splines up on the steering wheel shaft while it's centered. At this point you need to maintain the attachment of the coupling on the input shaft while trying to position the box so that at least one bolt can be threaded in from the wheel well. Once you get that first bolt in the rest are quite a bit easier. [If your steering is slightly off at this point due to the wheel shifting you can try again. Or if you're getting fed up there's another option. Finish installing the box and then remove the steering wheel and move it over one spline or two at a later date to align it with the box. A few splines won't hurt anyone.] Thread the remaining two bolts in and tighten all three.(70-80 NM/ ~50-60 ft -lb) Then move the input bushing enough up the shaft towards the firewall so you can thread the top bolt in. It sits into a groove on the shaft coming from the steering wheel, so you need to wiggle it until the bolt fits into that groove. Last edited by martureo; 01-05-2014 at 07:46 PM.
|
|
#6
01-05-2014, 06:42 PM
|
|||
|
|||
|
Then thread the power*steering*lines back under the other lines and thread them into the*steering*pump housing.
 Reinstall the the tie rods and retaining nuts. Then remove the centering tool from the box and*install*the drain plug with new washer. If you removed the driver's wheel, reinstall now and don't forget to retorque the lug bolts again once the wheel is on the ground. Go ahead and make sure all lines, bolts and most importantly, the drain plug are sufficiently torqued before filling the system with fluid. Fill the pump reservoir with fluid, almost to the brim (if your engine has the shakes don't or it will spill). I use both Power Steering Fluid and Transmission fluid (Dex/Merc). I've used both in the past on number of vehicles, and while I use Transmission fluid on my on vehicles I don't see any problem with either. This next part requires two people. You need someone to steer from opposite lock to opposite lock (all the way left to all the way right) at a medium, steady pace. Continue supply the pump with fluid until the bubbles stop, DO NOT LET IT RUN DRY. There is a Fill To line in the reservoir (you'll see it). Cap the reservoir and you're done. Depending where you sourced your box you may need to make a finite adjustment to the steering after you've taken a test drive. Steering Play Adjustment This can be done with the box installed. With a 17mm combination wrench, gently loosen the steering adjustment jam nut. Use a 6mm allen key to back out the adjustment screw a quarter of a turn at a time. Tighten the jam nut when at desired position. Repeat until desired "tightness" is attained. CAUTION. Over tightening the box can result in a dangerous condition where the steering box might not be able to turn. DO NOT OVER ADJUST THE BOX. Last edited by martureo; 01-05-2014 at 07:44 PM.
|
|
#7
01-07-2014, 10:25 AM
|
||||
|
||||
|
Nice one martureo!
I don't advocate your comment about steering box adjustment - but otherwise this is a nice addition to the general knowledge here. Do you know if the second generation W126 steering boxes are of the W201 / W124 ilk (W201 steering box refresh and adjust)? If so people might come across the aluminium alloy bodied casings - which I am sure should not be fixed to the chassis with the torque specified above or in the FSM.
__________________
1992 W201 190E 1.8 171,000 km - Daily driver 1981 W123 300D ~ 100,000 miles / 160,000 km - project car stripped to the bone 1965 Land Rover Series 2a Station Wagon CIS recovery therapy! 1961 Volvo PV544 Bare metal rat rod-ish thing I'm here to chat about cars and to help others - I'm not here "to always be right" like an internet warrior  Don't leave that there - I'll take it to bits!
|
|
#8
01-07-2014, 11:49 AM
|
|||
|
|||
|
Quote:
Quote:
According to 46-3400 (Installation of steering gear for w124) the torque values are the same 70-80 Nm, which I converted roughly to 50-60 ft lb. I don't have a FSM for the w201 and I don't have any information which would correspond to the installation for those boxes, but I think it might be safe to torque them to the same value as w123/w126 and w124 boxes. EDIT: I found it. 46-0001 (Survey of steering gears) shows that the w201 boxes are unique to that chassis. There is mention of an aluminum housing and an iron housing for that chassis, but as stated before I don't have any w201 specific manuals so I couldn't tell if the torque values are different.
__________________
Onus probandi incumbit ei qui dicit, non ei qui negat I recondition w123/w126/w124/w140/r107/r129/ steering boxes! 1984 300D "Elsa" odo reset 6/2011 147k 1983 300TD "Mitzi" ~268k OM603 powered 1995 E300 "Adelheid" 262k [Sold] Last edited by martureo; 01-07-2014 at 12:27 PM.
|
|
#9
01-07-2014, 05:23 PM
|
||||
|
||||
|
The W201 FSM is available on startek for free now
The steering chapter (46) is here => http://www.startekinfo.com/StarTek/outside/11832/Resources/201Create/PDF/10011.pdf No mention of the alloy casing though... ...I'm going to have to bend the ear of the head mechanic at the dealer - or perhaps get access to WIS... ...as for the adjustment. I found it tricky on both the W123 steering box and the W201 steering box to adjust. You tighten the screw in an anti-clockwise direction and check the torque as you turn the input shaft through its central position. If you over tighten it and then nudge it back a bit it seems to loose its place. It is weird - you would think oh sheet just turn it back and it will be back to where it was - but it isn't. It like there's some form of hysteresis in there (or summit like that). Strange. To get back to where you were I think it is necessary to back off all of the tension in the adjusting system and start again. So I advocate a policy of not messing with that little screw. I think nipping it up is likely to bugger it up...
__________________
1992 W201 190E 1.8 171,000 km - Daily driver 1981 W123 300D ~ 100,000 miles / 160,000 km - project car stripped to the bone 1965 Land Rover Series 2a Station Wagon CIS recovery therapy! 1961 Volvo PV544 Bare metal rat rod-ish thing I'm here to chat about cars and to help others - I'm not here "to always be right" like an internet warrior Don't leave that there - I'll take it to bits!
|
|
#10
01-07-2014, 05:37 PM
|
|||
|
|||
|
Quote:
Quote:
However, since the boxes I adjust already have that tension in them a note of "only back out, do not tighten screw" would remove the possibility of error. Or something of that sort.... (I'm not sure if there's a European term for backlash/lash Backlash (engineering) - Wikipedia, the free encyclopedia)
__________________
Onus probandi incumbit ei qui dicit, non ei qui negat I recondition w123/w126/w124/w140/r107/r129/ steering boxes! 1984 300D "Elsa" odo reset 6/2011 147k 1983 300TD "Mitzi" ~268k OM603 powered 1995 E300 "Adelheid" 262k [Sold]
|
|
#11
01-20-2014, 10:04 PM
|
||||
|
||||
|
question
Excuse me if this question is out of place in your thread.
But are diesel W123 steering boxes all the same part number ? i.e. 1978 to 1985 300D same as 240D ? All interchangeable? Your thread is most welcome and informative ! Great service you are providing also ! 
__________________
1979 300D 220 K miles 1995 C280 109 K miles 1992 Cadillac Eldorado Touring Coupe 57K miles SOLD ******************** 1979 240D 140Kmiles (bought for parents) *SOLD.SAN FRANCISCO/(*San Diego) 1989 300SE 148 K miles *SOLD
|
|
#12
01-21-2014, 02:49 AM
|
||||
|
||||
|
Quote:
From a changing of one unit to another perspective the biggest differences - and there's a great big fuss made about this in the FSM - are in the Pitman arms <= Pay attention to this => and measure the relative height of the idler arm and fitted Pitman arm to make sure you don't have messed up steering geometry. The only other difference that might be worth mentioning are power steering boxes and ones with no power assistance (very rare in the US of A though)
__________________
1992 W201 190E 1.8 171,000 km - Daily driver 1981 W123 300D ~ 100,000 miles / 160,000 km - project car stripped to the bone 1965 Land Rover Series 2a Station Wagon CIS recovery therapy! 1961 Volvo PV544 Bare metal rat rod-ish thing I'm here to chat about cars and to help others - I'm not here "to always be right" like an internet warrior Don't leave that there - I'll take it to bits!
|
|
#13
01-21-2014, 10:14 AM
|
|||
|
|||
|
Quote:
The answer is yes/no. All power steering boxes for w123s are the same-ish. The ball pitch and the internal stop are the only internal differences, and as Stretch mentioned the pitman arm is the main external difference. Don't bother yourself with the ball pitch, I can't tell the difference in feel and I've rebuilt and driven with each box type. What you do need to know is that the early boxes had an external stop on the chassis which would stop the box from going too far to either side. The later boxes had this stop internal to the box and no stop tabs on the chassis. So you can put a later style box into any early car, but you can't put an early style box into a later car and be safe. I can't remember the exact year or if there is one. I'd suggest that if you're looking at a car 1982 or younger look for the stopping tabs on the engine crossmember, and look for an "A" on the box (which means it has an internal stop. If you buy the box from me (or have yours rebuilt) I'll talk with you to make sure you get the right one. It might be information overload but this link will show you the different power steering boxes and what they went in. http://www.startekinfo.com/StarTek/outside/12265/disc_2/program/Chassis/46-010.pdf
__________________
Onus probandi incumbit ei qui dicit, non ei qui negat I recondition w123/w126/w124/w140/r107/r129/ steering boxes! 1984 300D "Elsa" odo reset 6/2011 147k 1983 300TD "Mitzi" ~268k OM603 powered 1995 E300 "Adelheid" 262k [Sold] Last edited by martureo; 01-21-2014 at 10:31 AM.
|
|
#14
01-21-2014, 10:42 AM
|
||||
|
||||
|
Quote:
.
__________________
1983 123.133 California - GreaseCar Veg System 
|
|
#15
01-21-2014, 02:41 AM
|
||||
|
||||
|
Quote:
I get the feeling it is a little bit more complicated than backlash - backlash would put you back in the same place. To me it is a little bit more like Hysteresis - Wikipedia, the free encyclopedia but anyway... ...whatever it is a weird one
__________________
1992 W201 190E 1.8 171,000 km - Daily driver 1981 W123 300D ~ 100,000 miles / 160,000 km - project car stripped to the bone 1965 Land Rover Series 2a Station Wagon CIS recovery therapy! 1961 Volvo PV544 Bare metal rat rod-ish thing I'm here to chat about cars and to help others - I'm not here "to always be right" like an internet warrior Don't leave that there - I'll take it to bits!
|
 |
| Bookmarks |
|
|


 Hybrid Mode


