

|
|
|
|
|
|
|
|
#1
 02-14-2016, 07:08 PM
|
|||
|
|||
|
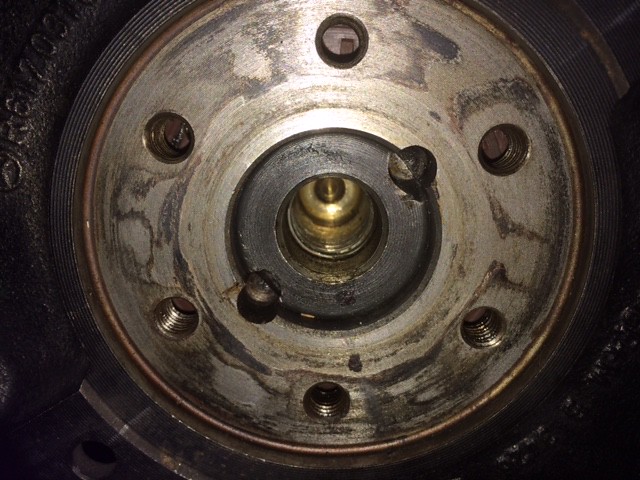
Cut off spacer ring on crank and...
While trying to get the spacer ring off the crank
Took a Dremel to it and voila. Ring off. But I knicked the corner of one of the dowel openings. Didn't damage the actual recess, but beveled the top edge where the pin enters. Will this be a problem? Almost done with this job. Not bad except for getting the hb and crank lined up
__________________
1983 300CD Turbodiesel 
|
|
#3
02-15-2016, 07:16 AM
|
||||
|
||||
|
Agreed, should okay.
__________________
83 SD 84 CD
|
|
#4
02-15-2016, 12:33 PM
|
|||
|
|||
|
__________________
1983 300CD Turbodiesel
|
|
#5
02-15-2016, 12:36 PM
|
|||
|
|||
|
here is a pic. you can see the dowel slot on the right side of the crank, bottom edge has a bevel.
tried to round it off and sand smooth. a real bummer. now getting the dowel pins in there seems to be a real challenge. they don't seem to want to go. checked and rechecked the alignment of the crank and hb. any secrets to this? or is it just hard pounding? thx
__________________
1983 300CD Turbodiesel
|
|
#6
02-16-2016, 11:02 AM
|
||||
|
||||
|
Quote:
__________________
 All Diesel Fleet 1985 R107 300SLD TURBODIESEL 2005 E320 CDI (daily) LOTS of parts for sale! EGR block kit http://www.peachparts.com/shopforum/diesel-discussion/355250-sale-egr-delete-block-off-plate-kit.html 1985 CA emissions 617 owners- You Need This! Sanden style A/C Compressor Mounting Kit for your 616/ 617 For Sale + Install Inst. Sanden Instalation Guide (post 11): http://www.peachparts.com/shopforum/diesel-discussion/367883-sanden-retrofit-installation-guide.html
|
|
#7
02-15-2016, 02:09 PM
|
|||
|
|||
|
thinking of putting jb weld in the recess to partially fill the bevel and get it flush...
overkill?
__________________
1983 300CD Turbodiesel
|
|
#8
02-16-2016, 11:41 AM
|
|||
|
|||
|
thx for the tip...
I ended up working the hb back and forth on the crank using a puller, and then the bolt with big washer to get it close. Then with the hb about 1/2 way on the crank, I pounded on one of the cut-outs to get the recesses lined up. then drew it in all the way with the bolt and washer. from there I just carefully tapped in the new dowel pins. the pins I got had a chamfer at the end to help get it locked initially. then a few careful taps to get it started. and then more aggressive knocks to get it to full seat. once they were about 1mm raised from the hb, I took my dremel with a disc and carefully adjusted the pins flush. I almost did it the other way. I guess there is always next time.
__________________
1983 300CD Turbodiesel
|
|
#9
02-16-2016, 11:44 AM
|
|||
|
|||
|
__________________
1983 300CD Turbodiesel
|
|
#10
02-16-2016, 11:47 AM
|
|||
|
|||
|
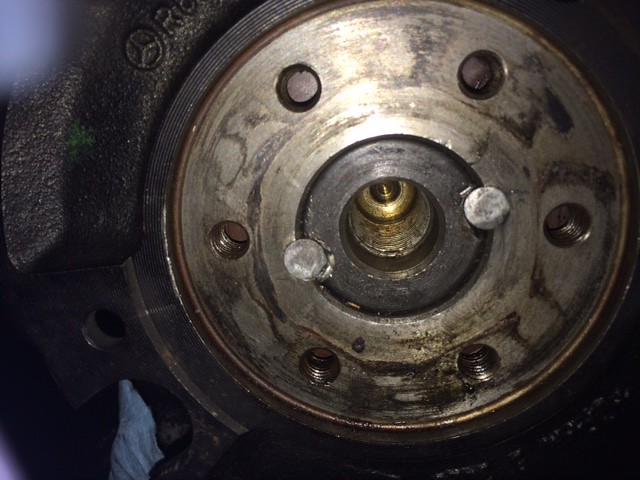
i left the knick on the crank alone.
it seems that the walls counterclockwise to the pins are responsible for taking the force of rotation. the edge i damaged is clockwise to the dowel pin on the right of the pic. i looked at pics of damaged crank recesses and all had oval dents directly counterclockwise to where the dowel pins were located.
__________________
1983 300CD Turbodiesel
|
|
#11
02-16-2016, 03:11 PM
|
|||
|
|||
|
Insure you aren't 180 deg off on damper to crank orientation (I don't see punch marks on your two parts). If so, the dowel hemispheres don't quite line up, at least as best I could tell on my 84 300D, using a mirror (AC condenser blocked view). I punched mine, but then got confused by prior punch marks and started installing 180 off, until I found the crank angle marks didn't jive w/ the valves.
One older post says replacement pins are sometimes too long, and you should always use new pins. As Rollguy, I pushed them in using the 3 crank washers and bolt. I have seen them a bit mushroom'ed after pressing in, so perhaps they were slightly too long.
__________________
1984 & 1985 CA 300D's 1964 & 65 Mopar's - Valiant, Dart, Newport 1996 & 2002 Chrysler minivans
|
|
#12
02-16-2016, 03:26 PM
|
|||
|
|||
|
thanks for the comments bill,
i marked the crank and hb with some nail polish. couldn't get good swing to punch with the radiator in place. later ended up taking the radiator out to get a little wiggle room. should've just done that from the start... the pins were indeed too long. the old ones with flush with the crank. probably 3-5mm shorter than the new ones. the new ones were installed, then trimmed flush to the balancer. i considered pre-cutting them to length, but ended up shortening them afterwards. i felt more comfortable cutting them down after insertion. getting the dowel recesses lined up was the hardest part. left a few scars on the balancer from banging it into position. the new bolt and spring washes call for 270-330Nm torque, with threads lubricated. i went for 300. like trying to row a boat in mud. hopefully the front of the block will remain oil free. time will tell Quote:
__________________
1983 300CD Turbodiesel
|
 |
| Bookmarks |
|
|


 Hybrid Mode


