

|
|
|
|
|
|
|
|
#1
 06-17-2012, 02:11 PM
|
||||
|
||||
|
Quote:
I think you are going to find it easier to remove the whole sub frame with the differential still attached to the sub frame especially if you are doing the trailing arm bushings. Haynes says that if you are just doing the sub frame bushings you can do one side at a time by dropping them down on a jack. My problem with this recommendation is that this will (in my opinion) twist the mount to the rear of the differential excessively. OK if you are replacing it anyway (and do it as the last thing) but the sub frame mounts get twisted quite a bit doing it this way too. Using this method you'll be twisting one new sub frame mount quite a bit to get the last mount in place. I've read that some people have done trailing arm bushings without removing them all the way from the car - I say make your life easier! You'd have to lower the sub frame quite a way to be able to remove the nuts on the bolts that hold the sub frame in place anyway... Removing 25+ year old bushings on a trailing arm under a car? No thanks - much easier on a bench! Best tip I've picked up since starting this thread is to leave the wheels on the hubs and roll the whole sub frame with everything still on it out from under the car. It works a treat so long as you can raise the car up high enough at the back.
__________________
1992 W201 190E 1.8 171,000 km - Daily driver 1981 W123 300D ~ 100,000 miles / 160,000 km - project car stripped to the bone 1965 Land Rover Series 2a Station Wagon CIS recovery therapy! 1961 Volvo PV544 Bare metal rat rod-ish thing I'm here to chat about cars and to help others - I'm not here "to always be right" like an internet warrior  Don't leave that there - I'll take it to bits! 
|
|
#2
06-17-2012, 02:28 PM
|
||||
|
||||
|
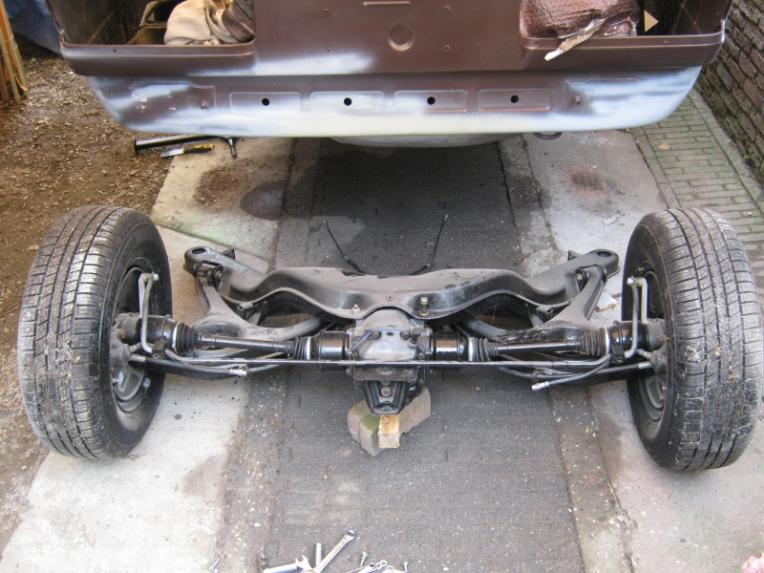
Here's a picture showing what I mean about the sub frame just being wheeled out
 Does anyone want step by step instructions for this?
__________________
1992 W201 190E 1.8 171,000 km - Daily driver 1981 W123 300D ~ 100,000 miles / 160,000 km - project car stripped to the bone 1965 Land Rover Series 2a Station Wagon CIS recovery therapy! 1961 Volvo PV544 Bare metal rat rod-ish thing I'm here to chat about cars and to help others - I'm not here "to always be right" like an internet warrior Don't leave that there - I'll take it to bits!
|
|
#3
08-22-2012, 10:24 PM
|
|||
|
|||
|
Yes
Yes, I would. Thanks for all of the great info in this thread. I am thinking about doing this. I have all of the parts except for new axles that I need to get. But have all of the bushings.
It looks like taking it out assembled as in your picture would make it much easier to continue from there. Thanks, Marc.
|
|
#4
08-22-2012, 10:58 PM
|
|||
|
|||
|
I wish you the best on this project, not as difficult as it seemed, now that I have remove the assembly, replaced the parts and reinstalled it. once you start into the project, things will fall into place that you read, as you remove them.
Let us know how you are doing as you go along. Just be safe, have the vehicle securely stabilized so it can`t move forward or back in any way. once the rear suspention is out and you start looking at the rear up on stands and the front wheels blocked, it gives you an errie feeling. hope the ground doesn`t start shaking, we get that out west. I copied this line from Dieseldan. Just a note - I personally think this job is extremely dangerous. It would be really easy to just drop the rear of the car - best case scenario onto the floor, worst case scenario onto yourself. Please please please future readers use a lot of caution if you are going to attempt this. Charlie
__________________
there were three HP ratings on the OM616... 1) Not much power 2) Even less power 3) Not nearly enough power!! 240D w/auto Anyone that thinks a 240D is slow drives too fast. 80 240D Naturally Exasperated, 4-Spd 388k DD 150mph spedo 3:58 Diff We are advised to NOT judge ALL Muslims by the actions of a few lunatics, but we are encouraged to judge ALL gun owners by the actions of a few lunatics. Funny how that works
|
|
#5
07-31-2014, 12:14 AM
|
|||
|
|||
|
Great thread. Thanks a lot!
After reading everything, I have some questions/comments. HELP PLEASE! Quote:
Quote:
Quote:
My interpretation is to jack up the diff. a little bit so that everything is not hanging from the diff. mount at such a large angle. Jack it up high enough so that you still have access to torque the trailing arm bolts. Then place a level on the axel shaft and jack up the trailing arms with additional jacks until they have completely horizontal. Then use a string to measure the distance from differential mount to hub centre on each axel to confirm the distances are the same. Then torque. This is with everything in the car. Is this correct, or am I missing something?
|
|
#6
07-31-2014, 02:22 AM
|
||||
|
||||
|
Quote:
...I've had Febi rubber parts die within a winter before - but that was tie rod end boots not suspension bushings... Quote:
__________________
1992 W201 190E 1.8 171,000 km - Daily driver 1981 W123 300D ~ 100,000 miles / 160,000 km - project car stripped to the bone 1965 Land Rover Series 2a Station Wagon CIS recovery therapy! 1961 Volvo PV544 Bare metal rat rod-ish thing I'm here to chat about cars and to help others - I'm not here "to always be right" like an internet warrior Don't leave that there - I'll take it to bits!
|
|
#7
07-31-2014, 05:43 AM
|
|||
|
|||
|
To be clear, it does not matter how much downward angle there is on the differential as it it slopes down from the diff mount, as long as the two axels are horizontal, I can torque the bushing bolts to 89 ft-lbs?
Has anyone successfully removed the trailing arms bushings without cutting off the flange, or damaging the bushing in some way? If so, how? I went to wiskeydan's post about his homemade bushing press, but he too cut off the rubber bushing flange. I was thinking I might try using a 2-jaw puller in reverse. I might be able to squish the puller's jaws into the bushing flange area to grab onto the trailing arm. Then use a C-clamp or a vice to squish the jaws of the puller tighter and tighter together to maintain grip on the trailing arm. Then tighten the screw on the puller, which will drive the bushing out. EDIT: If I ultimately fail and need to order new bushings again, is Boge or Lemforder the better brand in this regard? Last edited by feipoa; 07-31-2014 at 05:56 AM.
|
|
#8
07-31-2014, 07:39 AM
|
||||
|
||||
|
Quote:
So with the car supported on axle stands and the differential mount in place and the front sub frame mounts fitted as well => Remove the rear wheels and raise or lower the wheel so that the axle is straight so that you get the ideal position. You need to do this when the springs are not fitted to the trailing arm. It sounds like you've been doing just the trailing arm bushings one at a time with the springs in - is that correct? If so then I would put some weight in the back of the car / fit a spring compressor and compress the rear springs and then try to squeeze under there to tighten the bushings (but bloody hell what a drama!) To be honest I've always tightened my trailing arm bushings with the sub frame out of the car - with the axles out you can look through the wheel hub and centre it like sights on a rifle against the centre of the differential output Quote:
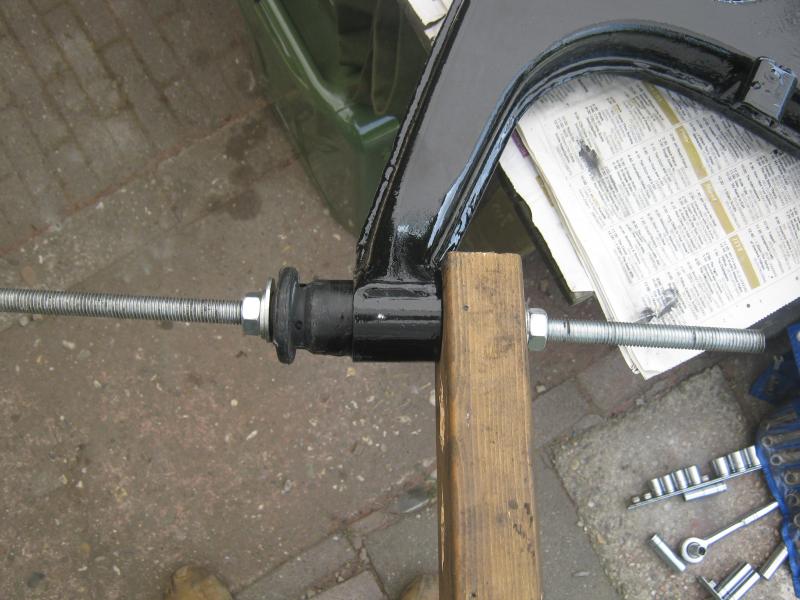 Where you see the bushing in this picture there was a steel plumbing fitting and the block of wood. The threaded bar went through as above but on the right hand side there was a washer and a nut and a lock nut. A bit further out from the washer and nut next to the bushing I had two more nuts locked together so I could tighten both sides of the trailing arm. Quote:
Quote:
__________________
1992 W201 190E 1.8 171,000 km - Daily driver 1981 W123 300D ~ 100,000 miles / 160,000 km - project car stripped to the bone 1965 Land Rover Series 2a Station Wagon CIS recovery therapy! 1961 Volvo PV544 Bare metal rat rod-ish thing I'm here to chat about cars and to help others - I'm not here "to always be right" like an internet warrior Don't leave that there - I'll take it to bits!
|
|
#9
07-31-2014, 04:28 PM
|
|||
|
|||
|
Both rear springs, shocks, wheels, calipers are removed. I've plugged the brake line.
I have released the e-brake cables from the centre coupler under the car. The axel shafts are installed. The front and rear of the chassis are raised up on four large jack stands, positioned near the vehicle's jack holes. I use a plate of 3/8" steel between the jack and the chassis so that the stands don't dent the body. The differential is currently mounted to the diff mount, which is mounted to the chassis. The differential is mounted to the subframe, however the subframe is not mounted to the chassis (it is unbolted). With the sub-frame unbolted, the differential and sub-frame will articulate downward. This downward tilt is needed to have access to the trailing arm bolts. I am only wanting to confirm how much downward tilt is acceptable when I am leveling off the axels to determine torque position. The downward tilt can be increased or decreased with a jack positioned on the forward-most section of the diff. I have the sub-frame mounts installed, but not bolted to the frame. I'm not sure what you meay by "fitted". If by fitted you mean "bolted", if I were to bolt on the sub-frame bushings/mounts to the vehicle, I will not have access to the trailing arm bolts. I noted your photo and device to remove the bushings, however that also required trimming of the bushing flange. I do not want to reuse a cut bushing. I'll try to get my old ones out with my wild ideas first, then order new ones if I do not succeed.
|
|
#10
08-01-2014, 02:16 AM
|
||||
|
||||
|
I reckon an angle like this
 is enough to kill any differential mount even a new one. They are not designed to twist like that. I expect that needs to be changed now. If when you get it all back together the car seems to be a bit low at the back then you'll know what's causing it... ...I can understand the urge not to remove everything and make more work but I think in the case of fitting trailing arms to sub frames there a fair amount that need to come off to make sure you can reach those bolts. I like the removal combination =>  I think it is fair to warn people that to try and do it this way on old stuck in bushings you might damage the trailing arm with the puller's grip on that edge. Obviously this is less likely to happen with freshly installed well greased bushings. I'm sorry to bring a bit of bad news. I hope I'm wrong about the diff mount but it looks to me like it might be a goner now.
__________________
1992 W201 190E 1.8 171,000 km - Daily driver 1981 W123 300D ~ 100,000 miles / 160,000 km - project car stripped to the bone 1965 Land Rover Series 2a Station Wagon CIS recovery therapy! 1961 Volvo PV544 Bare metal rat rod-ish thing I'm here to chat about cars and to help others - I'm not here "to always be right" like an internet warrior Don't leave that there - I'll take it to bits!
|
|
#11
08-01-2014, 02:58 AM
|
|||
|
|||
|
Oh no, that is a brand spanking new differential mount!
For the most part, I have the jack resting under the differential to lesson the angle. I'll tie the exhaust pipe as low as possible to avoid torque on it and remove the diff. What pain. The 240D rear end has always sagged more than any other car I've known, so it would be difficult for me to say how much "more" sag there is compared to its normal state.
|
|
#12
08-01-2014, 03:39 AM
|
|||
|
|||
|
I'm reading through the FSM, 35-110 and it did not mention removing the differential or the diff. mount - just to raise/lower trailing arm until axle shafts are level.
What is further confusing is after it notes to raise/lower the trailing arms to level the axles (11), torque the trailing arm nuts (12), and then install the axles (13). With this sequence, step 13 is redundant.  I am surely missing something...
|
|
#13
08-01-2014, 05:50 AM
|
||||
|
||||
|
Quote:
...if you read 35-110 para 1 says remove sub frame => chapter 35-010 (even though it is often worded as something different)... ...just after the screen shot you've added from chapter 35-110 the last para says refit sub frame => chapter 35-010. In chapter 35-010 the first thing is remove exhaust => goes on to the differential mount in para 15
__________________
1992 W201 190E 1.8 171,000 km - Daily driver 1981 W123 300D ~ 100,000 miles / 160,000 km - project car stripped to the bone 1965 Land Rover Series 2a Station Wagon CIS recovery therapy! 1961 Volvo PV544 Bare metal rat rod-ish thing I'm here to chat about cars and to help others - I'm not here "to always be right" like an internet warrior Don't leave that there - I'll take it to bits!
|
|
#14
08-01-2014, 07:05 AM
|
|||
|
|||
|
I see now. Thanks a lot for your help.
From 35-110, "1. Completely remove rear axle together with rear axle carrier (35-010)." I saw the "remove rear axle", and thought "ok, skip that section, I will leave the axles in". All those sections equates to a lot of reading and tonnes more steps. I have now relubed my four trailing arm bushings and 2 sub-frame bushings with KY jelly and pressed them in. It was much faster the second time. The status is now the same as noted previously, except I have not yet re-bolted the trailing arms to the sub-frame. These are the steps I believe come next. Please correct any step that is incorrect. 1. Re-bolt the 4 trailing arms to the sub-frame, but leave them finger tight. 2. Place a hydraulic jack under the centre of gravity of the differential (with axles, sub-frame, and 2 trailing arms connected). Jack it up until the output shaft of the diff. is at riding height. 3. Remove 4 bungee hangers for exhaust and tie a string around the back of the tail pipe so that the pipe hangs down as much as possible without any resistance. Find a suitable location to attach the other end of the string. 4. Remove the 4 diff. mount bolts (or should I just take off the two larger diff-to-mount bolts instead?) 5. Lower the jack stand to a height that allows access to all 4 trailing arm bolts. 6. Use a second jack (the Jeep's in-car jack) to raise one of the trailing arms until the left axle shaft is horizontal. 7. Use a third jack to raise the other trailing arm until the right axel shaft is horizontal. Note that I do not have a third jack, so I will need to use a jack stand to rest the 1st axle on after it has been jacked up. 8. Use a carpenter's level to ensure everything is horizontal and perpendicular. Use string meaurements to ensure both axles are square. 9. Torque the 4 trailing arm bolts to 89 ft-lbs. 10. Jack up diff. and reattach diff. mount 11. Place coil springs and shocks back in. 12. Bolt sub-frame mounts in. Not sure how I am going to do this yet. I am only familiar with the lift-one-side-at-a-time method. 13. Re-attach e-brake cables at centre coupling. 14. Reinstall callipers, rotors, driveshaft. Set e-brake tension. 15. Proceed to a tonne of other work needed on this car before the weekend ends. EDIT: to go along with #5, I need to know what the verticle tilt angle is of the diff. output shaft when the vehicle is on all four wheels. This is needed to establish proper ride tilt of the diff/subframe. Since my vehicle is taken apart, I cannot accurately measure this. The best I could do was to angle the diff. up using a jack such that the subframe mounts hit the chassis. Under this condition, I get that the diff. output shaft is tilting 2.5 degrees upward (+-1 deg. - accuracy of the device). Can anyone confirm this? Here is a photo of my setup. Thanks. 
Last edited by feipoa; 08-01-2014 at 08:19 AM.
|
|
#15
08-01-2014, 09:38 AM
|
||||
|
||||
|
WOW hmmm OK
The four 13 or 14mm bolts for the differential mount are the best parts to remove. The big bolts that go in to the differential are often buggers to get undone. So do the easy thing! Forget the string and angle gauges this isn't precise science. This is just automotive mechanics. Lower the differential so that you can lower the whole subframe - if you need to remove the exhaust then do this at the manifold and drop the whole effing thing out of the way Then using your MK1 eye ball - or if it is difficult to see use a spirit level - to raise or lower the trailing arms and the sub frame so you can tighten up the trailing arm bolts. As you are working under the car you might find it better to raise the car some more rather than messing about with the trailing arms and the subframe. You don't have to worry about the angle of the differential with respect to the true horizontal - that's not the point. Imagine looking through wheel hub to see the output shaft of the differential - that's all that is important - a straight line from one hub centre through the centre line of the output shafts of differential to the other wheel hub centre. The sub frame could be at any angle you choose as can the differential to help you tighten those pesky bolts - it doesn't matter only that line of alignment matters. Then lift the sub frame and trailing arms etc etc etc up into position on the car - alternatively lower the car onto the other bits - which ever is easiest. Make sure you can see the wood for the trees. I have found that approximate positioning of the sub frame with jacks is the best you can expect. It is then much quicker to man handle lift and push one corner of the sub frame "triangle" into position - hold it in place with a bolt => do the next corner => do the last - then go round and tighten it all up.
__________________
1992 W201 190E 1.8 171,000 km - Daily driver 1981 W123 300D ~ 100,000 miles / 160,000 km - project car stripped to the bone 1965 Land Rover Series 2a Station Wagon CIS recovery therapy! 1961 Volvo PV544 Bare metal rat rod-ish thing I'm here to chat about cars and to help others - I'm not here "to always be right" like an internet warrior Don't leave that there - I'll take it to bits!
|
 |
| Bookmarks |
|
|


 Hybrid Mode


