

|
|
|
|
|
|
|||||||
 |
|
|
LinkBack | Thread Tools | Display Modes |
|
#121
 07-04-2015, 01:46 PM
|
||||
|
||||
|
Quote:
 .....Rich .....Rich
__________________
 All Diesel Fleet 1985 R107 300SLD TURBODIESEL 2005 E320 CDI (daily) LOTS of parts for sale! EGR block kit http://www.peachparts.com/shopforum/diesel-discussion/355250-sale-egr-delete-block-off-plate-kit.html 1985 CA emissions 617 owners- You Need This! Sanden style A/C Compressor Mounting Kit for your 616/ 617 For Sale + Install Inst. Sanden Instalation Guide (post 11): http://www.peachparts.com/shopforum/diesel-discussion/367883-sanden-retrofit-installation-guide.html 
|
|
#122
07-25-2015, 12:47 AM
|
|||
|
|||
|
Quote:
|
|
#123
07-25-2015, 01:03 AM
|
||||
|
||||
|
Quote:
380SL Diesel Conversion Project
__________________
Current Stable
|
|
#124
08-28-2015, 04:36 PM
|
|||
|
|||
|
Rollguy,
Have you considered putting a spring loaded idler wheel in the design to eliminate any problem with belts stretching ? It would also allow more degrees of contact wherever it is needed... to provide the friction needed without the need for excessive tension on the belt/s which I assume is the reason for the stretching problem....
__________________
1980 240d , chain elongation, cam marks reference: http://www.peachparts.com/shopforum/diesel-discussion/10414-help-i-need-check-stretch.html http://www.peachparts.com/shopforum/diesel-discussion/305365-9-degrees-chain-stretch.html evap fin cleaning: http://www.peachparts.com/shopforum/diesel-discussion/156207-photo-step-step-post-showing-w123-evaporator-removal-1983-240d-1982-300td.html?highlight=evaporator A/C thread http://www.peachparts.com/shopforum/diesel-discussion/297462-c-recommendations-mb-vehicles.html
|
|
#125
08-28-2015, 08:18 PM
|
||||
|
||||
|
Quote:
__________________
All Diesel Fleet 1985 R107 300SLD TURBODIESEL 2005 E320 CDI (daily) LOTS of parts for sale! EGR block kit http://www.peachparts.com/shopforum/diesel-discussion/355250-sale-egr-delete-block-off-plate-kit.html 1985 CA emissions 617 owners- You Need This! Sanden style A/C Compressor Mounting Kit for your 616/ 617 For Sale + Install Inst. Sanden Instalation Guide (post 11): http://www.peachparts.com/shopforum/diesel-discussion/367883-sanden-retrofit-installation-guide.html
|
|
#126
08-28-2015, 08:30 PM
|
|||
|
|||
|
People want a turn key dependable unit.... you are SO close.... you have not really checked on the cost of these items ?... I don't understand .... have you given up on the dream ?
__________________
1980 240d , chain elongation, cam marks reference: http://www.peachparts.com/shopforum/showthread.php?threadid=10414 http://www.peachparts.com/shopforum/diesel-discussion/305365-9-degrees-chain-stretch.html evap fin cleaning: http://www.peachparts.com/shopforum/diesel-discussion/156207-photo-step-step-post-showing-w123-evaporator-removal-1983-240d-1982-300td.html?highlight=evaporator A/C thread http://www.peachparts.com/shopforum/diesel-discussion/297462-c-recommendations-mb-vehicles.html
|
|
#127
08-29-2015, 01:01 PM
|
||||
|
||||
|
Quote:
__________________
All Diesel Fleet 1985 R107 300SLD TURBODIESEL 2005 E320 CDI (daily) LOTS of parts for sale! EGR block kit http://www.peachparts.com/shopforum/diesel-discussion/355250-sale-egr-delete-block-off-plate-kit.html 1985 CA emissions 617 owners- You Need This! Sanden style A/C Compressor Mounting Kit for your 616/ 617 For Sale + Install Inst. Sanden Instalation Guide (post 11): http://www.peachparts.com/shopforum/diesel-discussion/367883-sanden-retrofit-installation-guide.html
|
|
#128
10-09-2015, 02:45 PM
|
||||
|
||||
|
Price increase
I thought I posted the price increase that was effective July first 2015, but it seems I did not. It was talked about in post 117. The currant prices are: $200 for the bracket kit, $200 for a 7 cyl Sanden, $180 for a 5 cyl, $100 for the hose kit, $20 for the drier, $25 for the relay kit, and $45 for the shipping/Handling/Insurance on a complete kit.
__________________
All Diesel Fleet 1985 R107 300SLD TURBODIESEL 2005 E320 CDI (daily) LOTS of parts for sale! EGR block kit http://www.peachparts.com/shopforum/diesel-discussion/355250-sale-egr-delete-block-off-plate-kit.html 1985 CA emissions 617 owners- You Need This! Sanden style A/C Compressor Mounting Kit for your 616/ 617 For Sale + Install Inst. Sanden Instalation Guide (post 11): http://www.peachparts.com/shopforum/diesel-discussion/367883-sanden-retrofit-installation-guide.html Last edited by ROLLGUY; 10-09-2015 at 05:06 PM.
|
|
#129
10-09-2015, 03:22 PM
|
|||
|
|||
|
Quote:
you meant to Allude to the price increase....
__________________
1980 240d , chain elongation, cam marks reference: http://www.peachparts.com/shopforum/showthread.php?threadid=10414 http://www.peachparts.com/shopforum/diesel-discussion/305365-9-degrees-chain-stretch.html evap fin cleaning: http://www.peachparts.com/shopforum/diesel-discussion/156207-photo-step-step-post-showing-w123-evaporator-removal-1983-240d-1982-300td.html?highlight=evaporator A/C thread http://www.peachparts.com/shopforum/diesel-discussion/297462-c-recommendations-mb-vehicles.html
|
|
#130
10-09-2015, 04:23 PM
|
|||
|
|||
|
Rich,
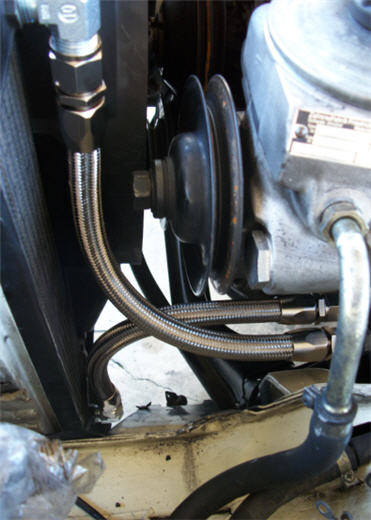
I complement you on being one of the most responsive and attentive manufacturers out there. Most who deal with the public rely on phone spoolers and such to frustrate customers who have questions. My Gen 2.0 Sanden bracket is still working fine. I used a shorter H13 Sanden so had to add spacers anyway. All Sandens have the front bracket and pulley in the same place, so any adjustments are at the rear mount. The only bracket problems I had were from the later bracket2 that bolts to the upper oil pan. One mounting bolt was too long and knocked my crank indicator pin off (not used in my 1985 anyway). Bracket2 didn't reach the main bracket so I had to add washer spacers, but hard because the surfaces weren't exactly parallel. I kept finding the bolt & washers missing. I think I finally secured it by using a self-jamming nut plus a backup nut (my son has car). My hoses caused some problems. I had to bend the factory hoses to fit my Sanden (w/ GM Pad head). I did this w/ hoses on car and had to use a big pipe wrench, working under the car on ramps. I later got a refrigerant leak right in the middle of the factory HP tube at the compressor. You couldn't even see the hole, but my pipe had nicked the tube too much. Fortunately, I had a spare set of AC fittings and hose material, so fixed it quick. Bending the tubes on the bench was much easier and I used round bars to not nick them. So I suggest anyone just rebuild your hoses and bend the tubes as needed then. I ran the HP hose straight over to the condenser, bending the factory fitting there to angle correctly. I like that much better than the run up the side of the engine that the factory used. My 1984's fitting was easier to angle down than my 1985 CA.
__________________
1984 & 1985 CA 300D's 1964 & 65 Mopar's - Valiant, Dart, Newport 1996 & 2002 Chrysler minivans
|
|
#131
10-09-2015, 05:07 PM
|
||||
|
||||
|
Quote:
__________________
All Diesel Fleet 1985 R107 300SLD TURBODIESEL 2005 E320 CDI (daily) LOTS of parts for sale! EGR block kit http://www.peachparts.com/shopforum/diesel-discussion/355250-sale-egr-delete-block-off-plate-kit.html 1985 CA emissions 617 owners- You Need This! Sanden style A/C Compressor Mounting Kit for your 616/ 617 For Sale + Install Inst. Sanden Instalation Guide (post 11): http://www.peachparts.com/shopforum/diesel-discussion/367883-sanden-retrofit-installation-guide.html
|
|
#133
03-30-2016, 10:33 PM
|
|||
|
|||
|
Quote:
 Have a good day!
__________________
Current fleet: 1985 Mercedes-Benz 280TE - Waiting for heart surgery. 1985 Mercedes-Benz 300TDT - Rear ended 23 September 2016 and now looking for a new home. 1979 Mercedes-Benz 300TD - Parted out. 1964 Volkswgen Beetle - Vater's since September 1968 and undergoing a restoration. 1971 Volkswagen Sunroof Squareback with F.I. - in need of full restoration. 1971 Volkswagen Squareback automatic with F.I. - Vacationing with her caretaker until he is in better health.
|
|
#134
08-22-2016, 01:25 AM
|
|||
|
|||
|
I found my Sanden bracket cracked, after ~3 years. I had wondered where a rattling sound was coming from, just off idle, and finally found it got much quieter when I turned the AC compressor off. I had wondered why I had to turn the adjuster bolt all the way in, indeed had to move the lock nut to the other side and still got the belt barely tight.
As best I can tell, the crack runs all the way across, under the top tube. I can see the 2 parts of the bracket move as I push on the belt. Sorry for the poorly focused photo. I'll try to get the camera to focus correctly next time I have it up on ramps. Since summer is ending, I removed the belt for now to avoid any catastrophe. I'll remove the bracket when I have my spare vehicle running, and finish other priorities, maybe before next Spring. One exacerbating condition is that originally I didn't have the extra support bracket to the upper oil pan that Rollguy later added. That was to stop shaking, which could cause such fatigue cracks. Even when I added it, there was a large un-parallel gap and I kept finding the washers & bolt I installed gone, and don't know how long since my son had the car out of town some years. I finally got some jam nuts that held. Thus, no telling how long the main bracket might have been shaking too much. In my experience, bracket cracks are common. Indeed, it is hard to design one for infinite fatigue life. Since steel, I should be able to effect a weld repair, and beef up that area. Others should watch this are on their bracket and report, so Rollguy can make any needed design changes for the next customers.
__________________
1984 & 1985 CA 300D's 1964 & 65 Mopar's - Valiant, Dart, Newport 1996 & 2002 Chrysler minivans
|
|
#135
08-22-2016, 08:37 AM
|
||||
|
||||
|
I'm finally getting around to an install on a kit I bought two years ago. Did you all run the low side hose between the compressor and condenser under the engine? Where does the schrader valve end up?
Thanks! Sent from my iPhone using Tapatalk
__________________
1985 Euro 300TD Turbo
|
|
| Bookmarks |
|
|


 Linear Mode


